General: Motion Detection
Setting up Motion Detection
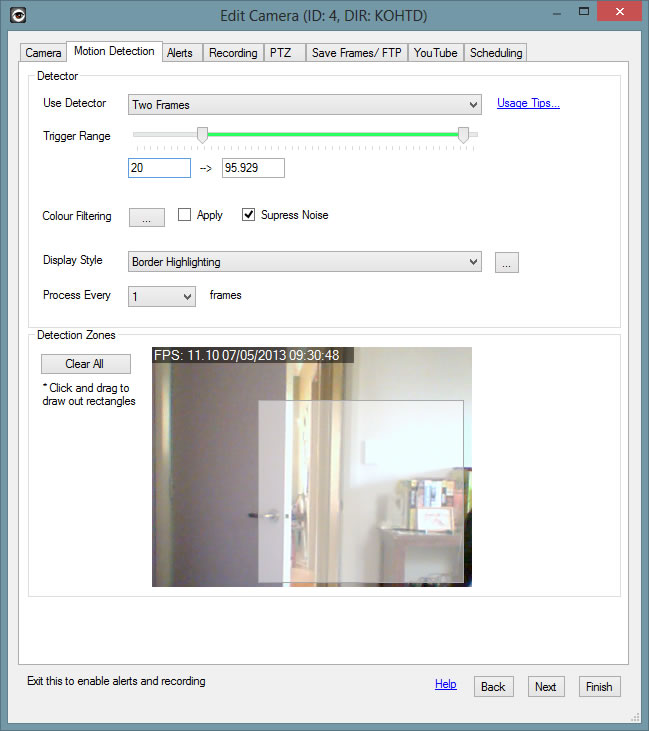
iSpy comes with a range of different motion detectors built in. Each motion detector has different performance impacts and is suited to different purposes. Depending on which motion detector you select some of the checkboxes below may be greyed out. These options only apply to specific motion detectors. There is an option on the Alerts tab, "Alert on object count" that is only available if "Object Tracking" is selected as the motion detector. This option will cause alerts to only be sent if iSpy detects the set number of objects, regardless of the level of movement.
Detector Types
- Two Frames: Probably the most common type you would use. iSpy just compares the last frame to the current frame.
- Custom Frame: iSpy stores one frame in memory and compares subsequent frames to this - good for detecting if things change - say someone takes a bag out of the scene.
- Background Modelling: iSpy takes a custom frame but adjusts it over time to morph it towards the current frame. This is good when you have something in your scene that is constantly moving - ispy will learn to ignore it.
- None: No motion detection, use this if you are just recording on a schedule or want to record a timelapse video or record on demand.
You can also trigger alerts on face detection. Face detection isn't a type of motion detection so doesn't fit here - it's available on the Alerts tab.
Sensitivity
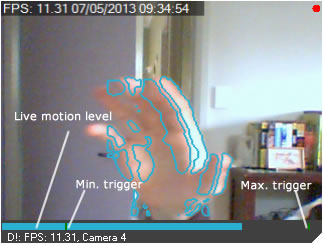 Trigger Range: This is probably the most important control in iSpy. This sets the minimum and maximum trigger levels for motion detection which controls all recording and alerting functions. As shown here the camera provides a live view of how much motion is being detected along with exactly where the trigger points are. The control lets you set a minimum and maximum value to trigger on (as percentages). Setting a maximum is good for ignoring whole scene changes, like sudden brightness changes due to weather variations.
Depending on your camera model and lighting conditions you will need to play with these settings to ensure that movement alerts are not continuously being reported due to signal noise. This can take a bit of experimentation. The control affects the camera in real time and the detection graph will flash when triggered, so adjust the range control until you are happy with the level of movement required to set off an alert.
The text boxes under the range control enables you to specify more accurate values for the trigger points. This is useful if you have a high resolution, low signal noise camera and want to trigger on the slightest bit of movement.
HSL Filtering
A picture paints a thousand words...
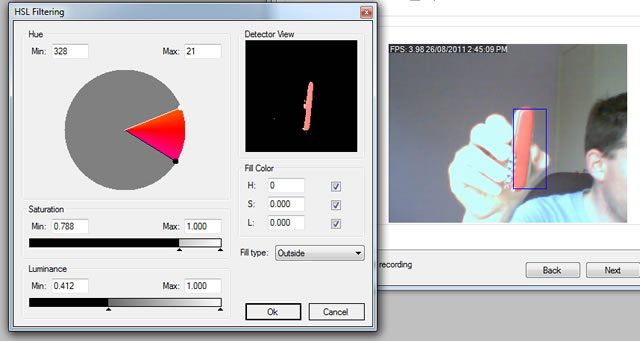 HSL (Hue, Saturation and Luminosity) Filtering: This feature tells iSpy to ignore certain colour or luminosity ranges when looking for motion. There are many ways this can be useful, for example:
- Smoke detection
- Fire detection
- Fever detection (for use with thermal imaging cameras)
- Ignoring constantly moving objects (like trees or clouds)
- Tracking objects of a specific colour
Use the colour wheel on the left to select a range of colours to either ignore, or track (depending on the dropdown selection for "Fill type"). You can then specify the minimum and maximum levels for saturation and luminance. A live preview of what the motion detector is seeing is provided on the top right. Here you can see that the detector is set to only look for red colours and ignore everything else - this means that it will only record and alert if something red enters the frame.
Note that HSL filtering does add a significant amount of processing overhead and may slow down the framerate (depending on your computers capabilities).
Display Styles
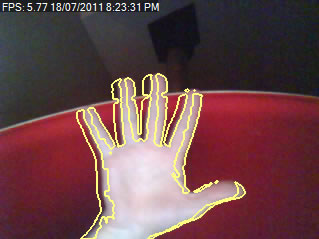
Display Style: iSpy comes with a few different ways to highlight detected movement, there's Grid Highlight, Object Tracking, Border Highlighting (used here), Area Highlighting or None (default). Object tracking is a special case that enables iSpy to keep a count of the number of detected individual objects in the scene. If you select object tracking then you are able to set an alert on the alerts tab to fire only when iSpy counts a specific number of moving objects. There's a color box to the right of the display style that lets you specify the color of the highlight that gets applied to the image.
Process Interval: This option is an easy way to reduce the processor usage that iSpy takes up. You can set here how many milliseconds between successive motion frame processing. 200 is the default (5 motion frames per second) - you can increase this up to 2000 (1 motion frame every 2 seconds) to decrease CPU usage.
Keep Edges: This ensures that the noise suppression routines don't cancel out the edge highlighting.
Suppress Noise: This option applies some noise suppression filters to the image to reduce false alerts. Using this option does incur some extra processor overhead.
Auto Off: This option will shutdown the camera after a period of time with no motion detected. You can tell another camera to switch this camera on using Alert Actions (add a new action and select "Switch Object On") and then use this setting to disable the camera automatically after a timeout. The default is 0 which means do not turn off.
Motion Zones
Detection Zones: iSpy can monitor specific areas of the camera view and ignore others. You can add as many rectangular detection zones as you like (iSpy will only monitor the area within the zones). To add a zone, click and drag out a translucent rectangle. To clear all zones click "Clear Zones". Note that with no zones defined iSpy will monitor the entire camera view.