General: Recording
Recording Settings
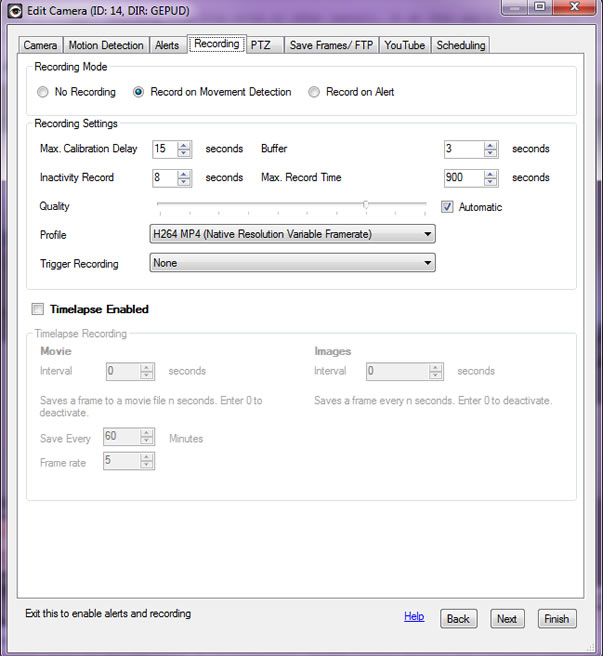
iSpy has 3 types of recording mode:
- No Recording: Triggered manually - either by right-clicking on the camera in iSpy and clicking "Record" or by clicking "Record" in iSpyConnect.
- Record on Detect: Starts recording as soon as motion is detected, regardless of how long the motion has been detected for.
- Record on Alert: This is very useful for cutting down on the number of recordings if you have set a sensitive motion detect trigger point.
Record on detect means record as soon as ispy detects movement. Record on alert means record when ispy generates an alert - alerts can be generated by plugins like face detection or numberplate recognition or whatever. Alerts are also throttled by the "distinct alert interval" setting on the alerts tab (default is 3 minutes - 180 seconds) - which prevents multiple alerts from being generated for one short event.
You can record on demand at any time regardless of the record mode set on this tab (as long as the camera is active).
Recording Settings:
- Max. Calibration Delay: This is the time in seconds that the camera will wait after switching on before it enables alerts/ motion detection. This delay gives the camera enough time to initialise, adjust to the brightness of the room, focus the lens, auto whitebalance etc. If you are getting false alerts from your camera when it switches on try increasing this value.
- Buffer: This is the number of seconds of video to buffer in memory. This feature enables iSpy to capture the full event that causes the motion detection event.
- Inactivity Record: The number of seconds to continue recording after motion is no longer detected. With a low value you may get lots of seperate clips. With a higher value you will get fewer clips but longer periods of inactivity recorded.
- Max. Record Time: This sets a maximum limit on the length of the videos generated. FFMPEG can use a lot of processor power converting long videos so it's advisable to keep this value to 15 minutes (900 seconds) or less. This setting applies to record on demand as well - iSpy will stop recording at the limit, start converting the video and start recording again.
- Quality: Sets the target quality of the recording. Lower quality means lower CPU overhead and smaller files. This option is only available for AVI recordings.
- Profile: Sets the profile for the recording. You can change this to target mobile compatible formats or AVI/MP4 file generation. Note that AVI files cannot be played back over the web interface.
- Trigger Recording: Use this to trigger another device to start recording when this device starts recording.
Timelapse Recording
iSpy supports 2 types of timelapse recording, you can use both simultaneously if you want:
- Timelapse Movie: iSpy saves a frame on the interval you choose to a movie file. Every hour (at 59 minutes past) it converts this movie to mp4. This movie can be played back in iSpyConnect.
- Timelapse Frames: iSpy saves a frame on the interval you choose to a subdirectory of the camera (called "timelapseframes") - you can only access these files in windows explorer. Right click the camera and click "view files" to access the director.
Video Conversion Settings
iSpy uses FFMPEG to convert the generated ".avi" files to ".mp4" or ".flv" files that can be played back in the web browser. We strongly recommend using the MP4 option as these can be played back in either the flash player or HTML5 capable web browsers (like the Safari on the iPhone and iPad). If you don't want FFMPEG to convert the videos then clear the text in the FFMPEG command textbox.
Usually the settings in this panel can be left as they are. If you want to tweak the settings and modify the command then refer to this pretty comprehensive guide. If you don't want iSpy to convert the movies to a web format then clear the text in the Command box and uncheck the Delete AVI flag (you will be unable to use iSpyConnect to watch videos if you do this).
Use Preset This tells FFMPEG to use one of the preset configuration files we've included with iSpy.
Delete AVI This checkbox tells iSpy to delete the AVI file after conversion to FLV or MP4. If you want a high quality copy of the movie then uncheck this option. Keeping the AVI files can use up a lot of disk space.