Configuring Layouts
Layouts dictate how devices are displayed in the live view. Agent DVR offers 9 configurable views (editable under server settings - local server), and each view can have its own layout. To select a view, click the icon at the bottom right.

Once a view is selected, click the icon at the bottom right of the live viewer to configure it.

- Name: Assign a friendly Name to your view, like "Outside Cameras".
- Layout: Select a layout from the dropdown. A variety of layouts are provided, or you can create your own.
- Selected Device: Choose a Device to highlight when this view is loaded.
- Auto Filter: If checked, Recordings, Photos, and Timeline controls will only show content from the selected device, ignoring other applied filters. If unchecked, regular device filters are applied.
Once you've chosen a layout, you can start adding devices to the layout slots. The slots are color-coded with a border to signify their type:
- Red border - Alert Slot: Displays devices in an Alert state, cycling through multiple ones if available.
- Blue border - Motion Slot: Shows devices that have detected motion, cycling through them if there are multiple.
- 🟢 Green border - Grid Slot: Displays devices in a grid layout, automatically adjusting to maximize camera space.
- 🟠 Orange border - Interval Slot: Can contain multiple devices, cycling through them if more than one is present.
- 🟣 Purple border - Control Slot: Displays controls like the recordings browser, floorplans, or timeline. Adding devices filters the content; no devices show all content. Only one control slot of each type can be added to a layout.
- Main Display: Shows the currently selected device. Devices cannot be added to this slot.
To add devices to a slot, click on the icon in the slot. This will open up the slot configuration control.
Configuring Layout Slots
To configure a slot, drag and drop the devices you want to include from the left column to the right. You can reorder devices in the right-hand column to change how they appear in the live viewer.

Additionally, you can add a new device directly from this panel, and it will automatically be included in this slot.
Use the bottom controls to move all devices into or out of a slot at once.
Customising Layouts
Create your own layouts in Agent. To start, navigate to the Server menu - Settings - Layouts. Here, you can add, edit, or delete layouts.
Click to add a new layout.

Use the icon to add slots to your layout. (Devices are added to these slots later via the live viewer).
Click and drag slots using the control, resize them with , and edit them with .
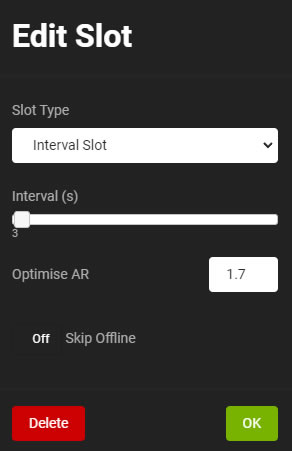
Clicking to add or edit a slot opens the slot configuration control:

- Slot Type: Choose the type of slot – options are detailed above.
- Interval: For slots with multiple devices, this sets the delay (in seconds) for cycling between devices (not applicable to Grid slots).
- Optimise AR: Adjust this to optimize the grid layout for different aspect ratios. Use 1.778 for 16:9 cameras and 1.333 for 4:3 cameras.
- Skip Offline: Excludes offline controls from the slot (not applicable to Grid view).
Configure your slot and click OK. To remove a slot, select Delete.
Click OK to save your layout. To apply your new layout in the live viewer, click the icon at the bottom right and select your new layout from the dropdown.