General: Pan Tilt and Zoom (PTZ)
About
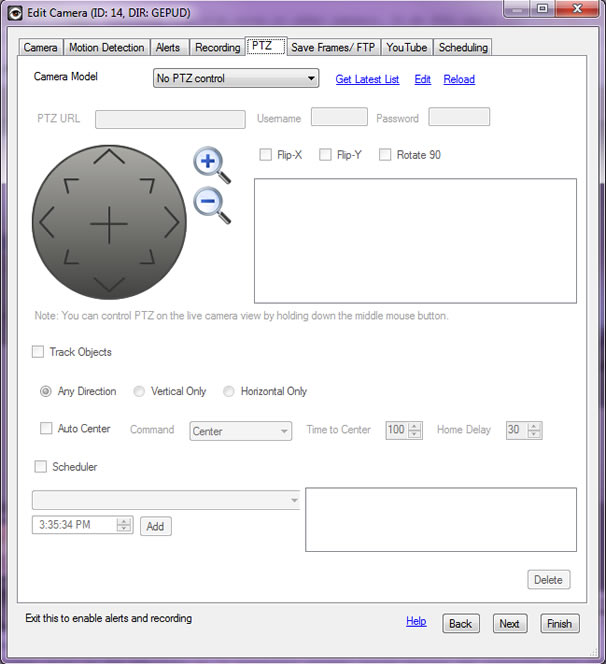
iSpy includes an XML definition file for controlling PTZ cameras. To use PTZ you need to have added an IP camera (via JPEG/ MJPEG or VLC). iSpy currently does not support PTZ for USB cameras. Choose your camera model from the drop-down at the top to switch on PTZ. You can click "Get Latest List" to load the latest definition file from the website.
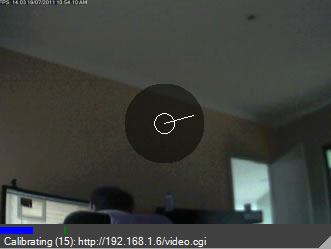 You can control PTZ for your camera from this panel, or you can control PTZ within iSpy by holding down the middle mouse button on the camera (shown here)
or from the context menu (for advanced commands like turning on/off the IR light). You can also control PTZ over the web through iSpyConnect via the camera settings panel.
The line shows the direction the camera is moving in. If your camera has zoom controls you can use the mouse wheel on the camera to zoom in or out. Note that as soon as you use a PTZ command iSpy goes into "Calibrating" mode. This suspends motion detection as when the camera is moving it will be detecting a lot of movement!
You can control PTZ for your camera from this panel, or you can control PTZ within iSpy by holding down the middle mouse button on the camera (shown here)
or from the context menu (for advanced commands like turning on/off the IR light). You can also control PTZ over the web through iSpyConnect via the camera settings panel.
The line shows the direction the camera is moving in. If your camera has zoom controls you can use the mouse wheel on the camera to zoom in or out. Note that as soon as you use a PTZ command iSpy goes into "Calibrating" mode. This suspends motion detection as when the camera is moving it will be detecting a lot of movement!
PTZ URL: You shouldn't need to change this if you found your camera in the list. This is the relative path from your camera IP address to the controller file.
Flip-X, Flip-Y and Rotate-90: These apply transformations to the PTZ commands. You can check these to reflect any transforms you apply to the image on the first tab. If for example your camera is mounted upside down you might check "Flip-Y" to make the PTZ control more intuitive.
Extended Commands: This is a list of all the extra available commands your camera supports over PTZ.
Adding PTZ Support for Unlisted Cameras
iSpy uses a simple XML configuration script to control PTZ cameras (called "PTZ2.xml"). You can find this file in the folder:
C:\Users\USERNAME\AppData\Roaming\iSpy\XML (where USERNAME is your username)
You can have a go at adding support for your camera (if you're technically minded) by editing this file. Some key points to consider:
- Use Fiddler to find the commands your camera takes to control PTZ (by using the existing web interface at the same time fiddler is running).
- Make sure you specify a new, sequential ID in the Camera entry
- The CommandURL entry is relative to the network address of your camera, so shouldn't start with http://... it should start with /
- The entries for the PTZ directions (Left,LeftUp etc) get appended to the querystring in CommandURL. iSpy automatically builds the URL.
- If you get it working please send it to us so we can include it in future versions of iSpy (and make it available to download as an update).
Track Objects
iSpy can track moving objects using PTZ automatically. Check this box to enable PTZ tracking. This requires the object tracking motion processor to be selected (iSpy will do this automatically for you when you check the box). The results you get from PTZ tracking will vary depending on the quality of your camera and the step size for the PTZ movement.
You can also lock PTZ auto tracking to the horizontal or vertical axis.
- Auto Center: When the camera moves whilst tracking, check this to return it to it's center position afterwards
- Command: The command to issue to the camera to move it to it's center position
- Time to Center: The time in seconds to give the camera to return to it's center position (prevents false motion alerts)
- Home Delay: The time in seconds to wait at a position after tracking an object before returning to the center position.
Scheduling PTZ commands
You can create detailed PTZ command scheduling using ispy - for example, to create a program to constantly move between 2 locations every minute between 9AM and 9PM you would do the following:
- Select your camera model in the PTZ dropdown and check the Scheduler checkbox.
- Select a command like "goto preset 1" in the dropdown
- Set it to start at 9:00:00 and click Add
- Select it in the box on the right and hit repeat, set it to repeat every 120 seconds until 21:00:00
- Select a new command like "goto preset 2"
- Set it to start at 9:01:00 and click Add
- Select it and hit repeat, set it to repeat every 120 seconds until 21:00:00