General: Connecting Cameras
USB Cameras (Local Device)
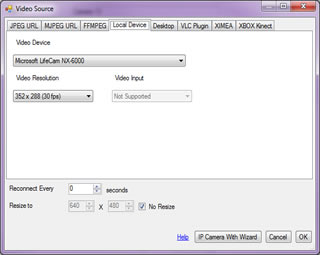 USB cameras must be connected to your computer to be able to add them in to iSpy. The device will appear in the drop down so adding it into iSpy is as simple as selecting it and clicking OK. Note that if the camera is in use by another application at the time iSpy will not be able to access it.
We've written a free virtual webcam driver which enables you to use any camera you have added to ispy in applications like skype, messenger etc.
USB cameras must be connected to your computer to be able to add them in to iSpy. The device will appear in the drop down so adding it into iSpy is as simple as selecting it and clicking OK. Note that if the camera is in use by another application at the time iSpy will not be able to access it.
We've written a free virtual webcam driver which enables you to use any camera you have added to ispy in applications like skype, messenger etc.
Important: You will usually only be able to add one USB camera from a particular manufacturer. For example if you have 2 logitech USB webcams only one will work at a time. This is due to limitations in the drivers provided by the manufacturers - it's nothing to do with iSpy (it's the same no matter what software you use). There are a few workarounds to this problem:
- Use USB cameras from different manufacturers - for example you could use 3 USB cameras simultaneously if you use one from Microsoft, one from Logitech and one from Targus.
- Add your duplicate cameras to other computers and install iSpyServer on those computers and access them from iSpy as a JPEG feed.
- Some people have had success using multiple duplicate USB cameras by either using separate USB Hubs or installing an additional USB controller as an add-in card (this is unverified - let us know if it works!)
USB Cameras running on other computers (via iSpyServer)
 To connect to USB cameras running on another computer you need to install iSpyServer on that computer and then add the USB camera to iSpyServer. Under the camera in iSpyServer you'll see a link that reads (example):
http://192.168.1.8:256/?c=0
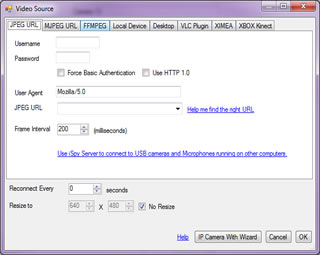
Copy this address down and come back to your computer running iSpy. Add a JPEG camera (as shown) and paste the address into the JPEG URL field. Click OK. You should now be able to access your remote USB camera feed over the network.
MJPEG and JPEG IP Cameras
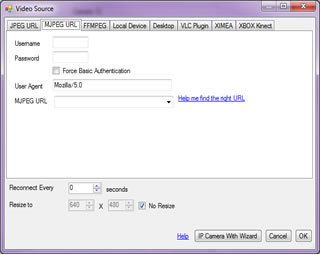 Use an MJPEG or JPEG source to connect to webcams and most IP cameras. The URLs for IP cameras vary a lot. We've added a wizard to the iSpyConnect website which guides you through finding the right URL for your camera.
IP camera connection wizard.
If you can't get it to work, see our guide for Finding Camera URLs with Fiddler/ WireShark.
MP4, ASF, RTSP and other IP Camera Sources via VLC
 Many IP cameras publish both audio and video feeds in other stream formats - like MP4 or ASF or RTSP. iSpy can connect to all these using the VLC plugin. To use VLC you will need to download and install it, then restart iSpy and select VLC when adding a camera. The URL to connect to your camera feeds should be available in the manual that came with your camera or on request from the manufacturer.
VLC takes usernames and passwords directly in the URL so you need to enter the URL of your video feed formatted like this:
http://USERNAME:PASSWORD@IPADDRESS/PATH-TO-VIDEO-FEED
For example:
http://admin:password@192.168.1.4/video.asf
You can pass many other arguments in to get VLC to format your stream in different ways although the default commands that are provided in iSpy should allow you to connect to anything. For more information see https://www.videolan.org/doc/streaming-howto/en/ch03.html
- Reconnect Every: Some sources will only stream for a set amount of time. Enter a value here to force VLC to reconnect to the camera on an interval (recording won't be affected) - or enter 0 to disable (default).
Monitoring the Windows Desktop
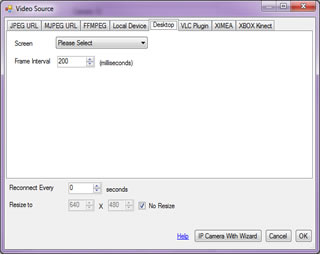 iSpy includes the ability to monitor and record the windows desktop. As most desktops are high resolution we've added in the ability to resize the recording to minimise processor and file sizes. You can treat the windows desktop camera type just like a normal camera - for example you can do motion detection on it (so you get an alert if anyone starts using the computer) or you can watch a live feed remotely to see what people are doing on it (and what they have been doing on it). iSpy also supports multi display setups and you can choose a screen to monitor.
XIMEA cameras
XIMEA cameras have an embedded windows operating system in them - and so can run iSpy without the need of a separate computer. Find out more about XIMEA here.
XBox Kinect
iSpy can connect to Kinect cameras. Note that the Kinect device needs to be plugged into your computer - it cannot be accessed over the network on your Xbox 360.
Finding Camera URLs with Fiddler/ WireShark
Finding the URL to your video feed is usually pretty simple with Fiddler:
- Download, install and run fiddler (it's free)
- Access your IP camera in the usual way through a web browser
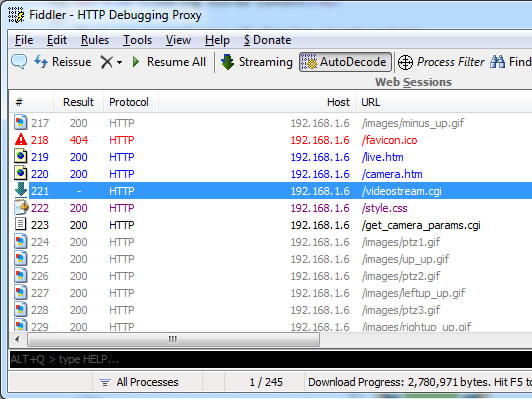
- Watch the traffic in fiddler - it'll show you every request going in and out. When you see something that looks like a video feed (in this case it's /videostream.cgi) click on File and untick "Capture Traffic".
- Use this URL in iSpy as either a JPEG feed, an MJPEG feed or a VLC feed (depending on the extension). In this case i'd add a new MJPEG type, put my username and password into the fields and use http://192.168.1.6/videostream.cgi as the URL.
- Important: remember to close Fiddler down before trying to connect. Fiddler includes a proxy server that can sometimes interrupt the network connection from iSpy.
Using VLC with iSpy
Using the VLC plugin iSpy can connect to a vast array of devices and media URLs. You will need to install VLC on the same computer that is running ispy to use the plugin.
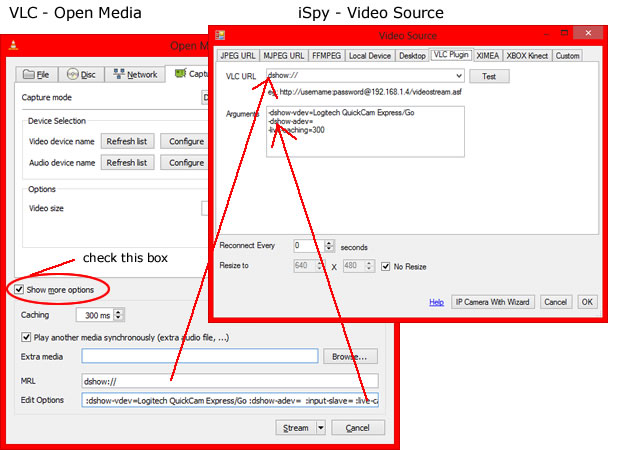
You can connect to virtually any video source using VLC including HTTP and RTSP video feeds, video capture devices, local cameras, DVD's, local files etc. To setup the connection refer to the above diagram and follow these steps:
- Open VLC. Click "Media" -> "Open Network Stream"
- Choose a tab (File/ Disc/ Network/ Capture Device)
- Select or enter your device/ file information (you can also add audio sources as well)
- Check the box at the bottom "Show more options"
- Click "Add" -> "IP Camera" in iSpy.
- Choose the VLC tab
- Copy and paste the MRL field in VLC (at the bottom) to the "URL" field in iSpy
- Copy and paste the "Edit Options" in VLC to the "Arguments" field in iSpy (Note that iSpy reformats the edit options into an argument list when you paste the string - specifically it replaces ":" with newline and "-". Check the formatted result if you have any issues)
- Close VLC
- Click OK in iSpy. iSpy will now connect to your video source using the VLC plugin and start playing it.
Enable GPU H264 Decoding
You can enable GPU decoding of H264 streams in VLC by adding adding this to the command options:
--ffmpeg-hw
Note that this functionality is currently experimental and may actually decrease performance depending on your video card capabilities (it takes time to move memory between the CPU and GPU).
Nest
See Nest
IP Webcam Android
Using your Android device as an IP camera
Using the popular and free Android application IP Webcam you can turn your android device into a fully functioning wireless IP camera that you can use within iSpy, including video, audio, talk, text-to-speech and commands!*
How do I add it?
- Connect your android device to your wireless network
- Install IP Webcam on your android device
- Start the IP Webcam application. See Video preferences and set the video resolution to a smaller format (example 640x480)
- Press "Start Server" at the bottom of the main menu
- Start iSpy, click Add - IP Camera with wizard (or see the wizard tab if using iSpyPro)
Follow the wizard to add your android device to iSpy:
 in the sources list")
")


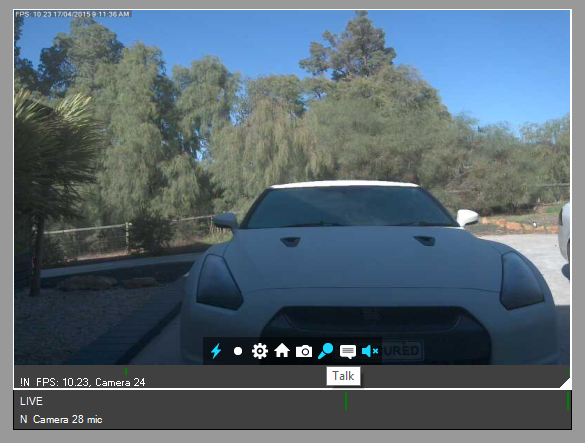
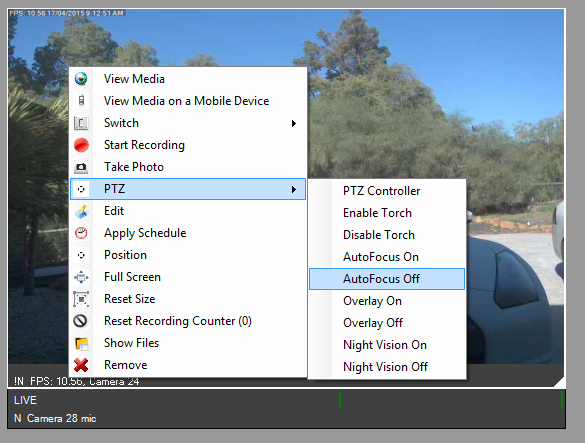
That's it! You should now see live video and audio in iSpy. You can click the microphone icon to talk or right click the live video to control the commands via the PTZ Menu:
*Notes:
Talk is only available on some Android devices. If talk isn't working check that you have selected a microphone to use in settings - talk.