General: Overview
About
iSpy is both a Windows application and a web application. The Windows app lets you add cameras and microphones to a "surface", configure them and monitor them - displaying live video and even playing live audio from a variety of network sources. For playback of content you can either play the generated files in a viewer of your choice (Windows Media Player for example) or you can use the iSpyConnect website. iSpyConnect is a web based service that runs at www.ispyconnect.com and provides a direct interface to control and browse iSpy through a web browser. Using the iSpyConnect website has a few distinct advantages - it displays thumbnails of your captured videos along with preview images (these are generated at the point of maximum movement to enable you to quickly see if the video is of interest or not) and it also provides statistical data, live views, live audio, remote controls and a whole load of other features and benefits.
The iSpy Surface

The iSpy surface is the grey background of iSpy - this is where all the action takes place. You interact with the surface by right clicking and adding objects to it. Objects are either cameras, microphones or floorplans. Once an object has been added to the surface you can move it around (click and drag), resize it (using the grab area at the bottom right, hold SHIFT to maintain aspect ratio), or right click it to edit its settings. The right-click (context) menu displays different options depending on what you have clicked on - for example if you right click on a microphone control it will let you listen to that microphone live, whereas a camera will let you take a snapshot image. You can also add objects to the surface using the "Add" menu on the toolbar. The Getting Started panel has a fair amount of useful content, tips and links to other resources to help you get to grips with iSpy fast.
Loading and Saving
You can save the current configuration (setup of cameras, microphones, floorplans etc) at any time using the File menu. This allows you to backup configurations or even share configurations with friends - if for example you are monitoring webcams. iSpy saves the current configuration when you exit and automatically loads it in when it starts up. iSpy saves files with a ".ispy" extension - you can double click these files to load them into iSpy. The configuration files iSpy saves are XML text files so if you are technically minded you may find it faster to edit these files in a text editor than using iSpy to edit them. Editing the files this way gives you access to some properties not exposed in the iSpy UI (like editing the folder names that iSpy generates for each camera/ microphone).
Adding and Editing Objects
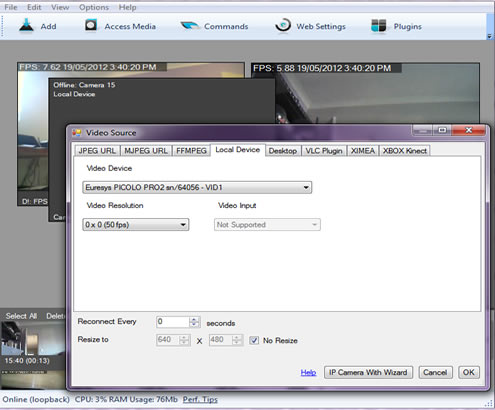 You add cameras and microphones into iSpy using the right click context menu on the grey background or by using the "Add" menu item on the toolbar. iSpy lets you connect to a vast array of hardware and will walk you through the process step by step. In this example we right clicked, clicked "Add Camera" and we've been taken to the video source dialog. From here we can select a local USB device or choose to connect to an IP camera through JPEG/ MJPEG or VLC, process an existing ".avi" file or add a virtual camera that monitors the windows desktop. Once you have selected your camera click OK and then on the next Configuration page click "Finish" - we'll cover those settings in more detail later. Your camera has now been added to the iSpy Surface and you can move it around with the mouse or resize it using the grab area at the bottom right. To edit this camera's settings, right click on it and select "edit". The process for adding a microphone is identical.
Shortcut Keys
Main Window
| PageUp | Previous control |
|---|---|
| PageDown | Next control |
| Ctrl+P | Play |
| Ctrl+S | Stop |
| Ctrl+R | Record |
| Ctrl+Z | Maximise |
| Ctrl+T | Talk |
| Ctrl+L | Listen |
| Ctrl+F | Display Tags |
| Ctrl+G | Grab (snapshot) |
| Ctrl+E | Edit |
| Alt+F4 | Power |
| 0 to 9 | Maximise control |
| alt+enter | Maximise/Minimise control |
| delete | Delete control |
Camera Control
| Digital Controls | |
|---|---|
| - | Zoom Out |
| + | Zoom In |
| Arrow Keys | Digital PTZ |
Remote Commands
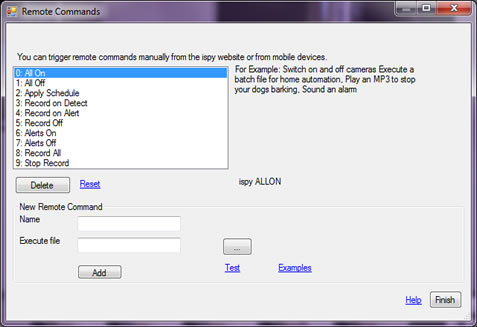
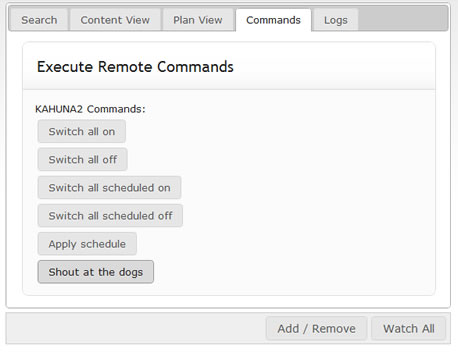 Remote commands enable you to run any program remotely using iSpyConnect. You can assign your command a friendly name (as in this example "Shout at the dogs") - and then select a file to run (in this case an MP3 of me shouting at the dogs to be quiet but it could be a controller file for home automation - say to open the curtains, or an alarm to wake up your lazy children!). This then adds a command into the iSpyConnect web interface which you can run whenever you like. iSpy comes pre-configured with commands to bulk switch on or off objects. There's also an "Apply Schedule" command that works out what should be on or off depending on the latest schedule entries and applies that, over-riding what has been manually changed.
Remote commands can also be run via the iSpyConnect mobile site so you can execute them from any web enabled mobile phone. Access Remote Commands by clicking the "Remote Commands" toolbar button within iSpy.
Emit Shortcut
You can also setup a remote command to emit a shortcut command to ispy - this provides a way to control the currently selected camera/ control. Just enter the shortcut command you want to use using your keyboard.
Remote Control
You can use either your MediaCenter Remote Control or your keyboard to control iSpy. Shown here are the buttons you can use along with their keyboard equivalents:
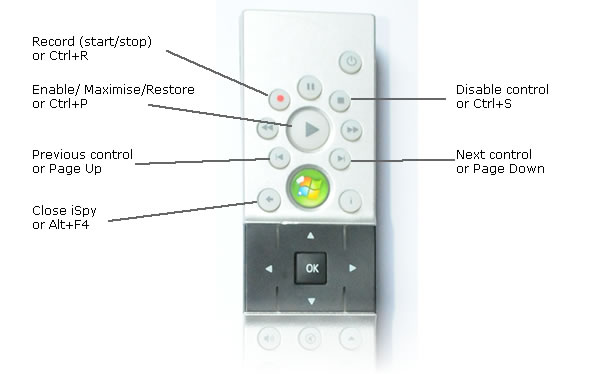
In addition to these commands you can also press the numeric keys 0-9 on the keyboard (not the remote control) to maximise the related camera control in the ispy interface.
Home Automation
iSpy works with virtually every home automation system using command line parameters. You can setup home automation systems to pass commands into ispy by directly calling the ispy executable with command line options (either through manual controls, events or timers). You can pass in multiple commands to switch cameras and microphones on or off, trigger recordings, switch on alerts etc. You can trigger individual cameras and microphones or apply settings to all. For more information see Controlling iSpy via the Command Line.
Interfacing with Twine Devices
Twine devices are WiFi sensors that you can place around your house that can act as switches or monitor things like temperature and vibration. You can interface Twine devices with iSpy by setting up your device to call HTTP URLs when specific conditions are satisfied. To inteface Twine devices with iSpy please see the HTTP Interface.
Online Help
If you have questions that aren't covered by this manual (for example you can't connect to a specific camera) then try the iSpyConnect reddit forums. There are a lot of knowledgeable people there who are happy to help. Alternatively contact us and we'll do our best to help you out.
Multiple Computers
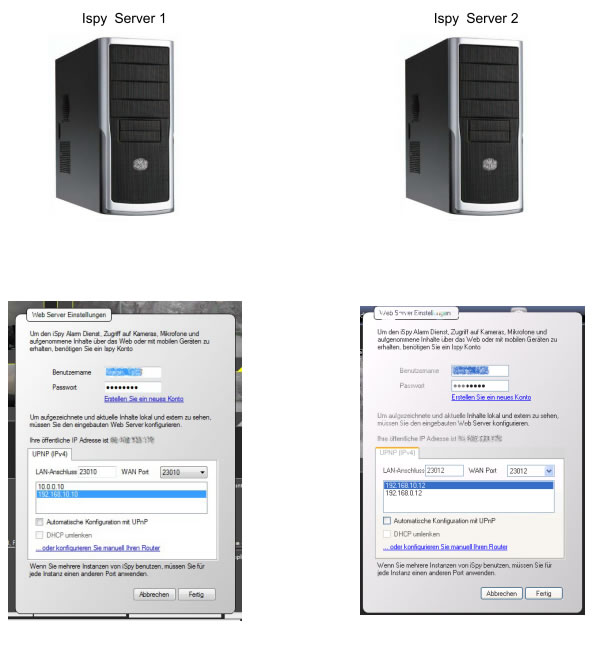
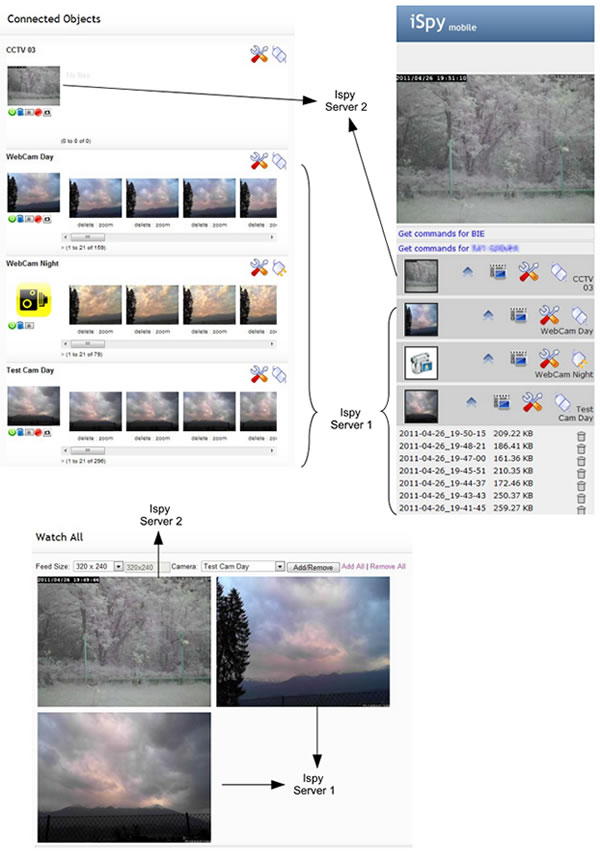
With one iSpy account you can access and control cameras and microphones on multiple computers Use the same login details for each computer and just specify a different port. All connected cameras and microphones will be fully accessible from our website as long as your router is setup to forward those ports to the relevant computers on your network. You may for example setup 2 ispy servers, one at home and one at work. You can then access live and recorded content from both anywhere in the world via this website.
For Example: