General: iSpy Settings
iSpy
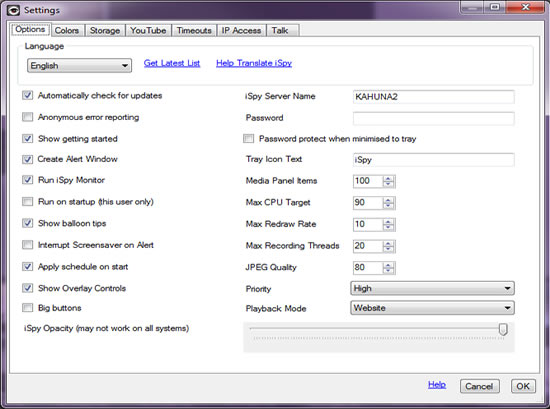
Access the settings panel from the toolbar button "Settings". Within Settings you can set a variety of options including security, storage management, color schemes, youtube account information, storage limits and timeouts. There are some other options that are only accessible from the context menu of the iSpy Surface - like "Fullscreen" and enabling and disabling the file menu, toolbar and status bar.
Languages
Thanks to a small army of volunteer translators iSpy is available in quite a few different languages. Feel free to choose the language you are most comfortable with either on the Getting Started panel (Help-> Getting Started) or within Settings (Options-> Settings). The language will be applied immediately. If you notice any translation mistakes and want to help correct them please let us know (click "Help Translate iSpy").
Password Protection
iSpy sits in your system tray when minimised to be as unobtrusive as possible. If you don't want other users of your computer to be able to control iSpy then set a password here. You can also change the tray icon text here to be something more innocuous than "iSpy".
Opacity
On systems with hardware accelerated graphics you may be able to set an opacity for iSpy - this is useful if you want to watch cameras without other people around you noticing it on your screen.
Colors
You can modify nearly all the colors in iSpy to create your own theme using the Colors tab in settings.
Storage Management
 When left for a long time with a lot of cameras iSpy can end up taking up a lot of disk space. Storage Management enables you to set a limit on the size of the directory and automatically delete files to free up space. This does incur some overhead in processing - so we recommend manually using iSpyConnect to bulk delete media files.
The "size of the directory" is the size of all the files in the specified directory and all the sub-directories under that.
The maximum folder size is expressed in MB for those people who want that level of granular control. To express GB in MB just convert it by adding a 3 zeros to the end - i.e. 10GB is expressed as 10000 MB.
The deletion occurs when the amount of storage used is 70% of the maximum storage allotment. Then ispy will start deleting files over x days old until the storage amount falls below 70% of the total allocated.
For example, you have 10 gb of storage configured. You cross 70%. iSpy deletes recordings over x days old (oldest first) and your storage usage drops to 68%. Now storage management will not kick in again until it once again crosses 70% used of the allotted storage. When it does, this process repeats.
For a simple setup, set the storage allotment to whatever amount you want to allocate, then set the days setting to 1. This way it will pretty much ignore the days setting and operate only based on storage space vs storage allotment.
YouTube Synchronisation
iSpy supports both manual and automatic upload to YouTube. This is a great way of backing up your captured content and ensuring that even the theft of your computer won't remove the video of the theives in the act. The movies that are uploaded can be automatically set to private so you won't be broadcasting yourself over the web every time you walk past the camera.
Please note that iSpy doesn't verify your YouTube login information after you enter it here, so please make sure you have entered it correctly. If files are not appearing in YouTube then check the log file as failed uploads will appear in there, along with a reason for the failure.
Timeouts
This section deals with timeouts for MJPEG and the inbuilt iSpy web server. If you are getting frequent timeout errors in your log files then try increasing the relevant value here.
IP Access Control
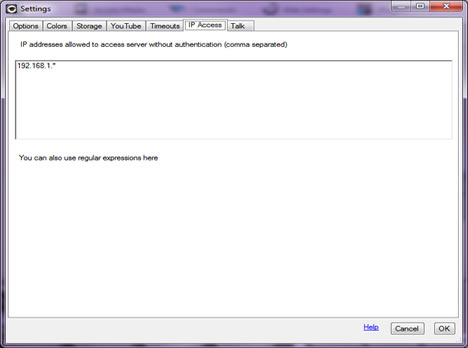
This is a list of IP addresses on your network that are allowed to access the local iSpy server bypassing the authentication token system. This is used for integrating iSpy with third party devices like trip wires and IP cameras with motion detection software built in. See HTTP Access for more details.
Talk
Select the microphone device you want to use when you are talking through cameras or ispyserver computers.
Joystick Support
iSpy can use your USB devices to control Pan/Tilt/Zoom and other functions. Select your joystick on this tab and use your joysticks axes and buttons to setup controls. You can also invert and center axes if you need to.
When using the joystick ensure that the camera control you want to control is highlighted within the iSpy user interface.
Picture in Picture
You can add multiple video feeds as overlays on an existing camera using ispy's picture in picture features. You can access this from the first tab when editing a camera. The overlays don't interfere with ispy's ability to detect movement. To add an overlay you need to first add the overlay video feed into ispy as another camera.
Adding Overlays

Enable: Enable or disable picture in picture
Camera: Select a camera to add as an overlay.
Areas: Use the mouse to draw out an area for the selected camera. You can add multiple overlays by selecting a camera, drawing out an area and then selecting a different camera. To delete an area just click and drag it outside of the preview window. You can also resize areas by click-dragging on the corners of the overlay.
Log Files
iSpy keeps track of various messages and errors in HTML log files. You can view these error logs from the View Menu. By default iSpy keeps the last 6 days worth of log files. If you are looking for something specific and you've restarted iSpy and the log file is empty then click "View Log Files" instead and take a look at the previous log file.
A common error in the log files is "A connection attempt failed because the connected party did not properly respond after a period of time" - this is OK to ignore, it's just a dropped connection from the website (for example a browser window was closed whilst iSpy was loading some data in the background).
You can also view the log files remotely - click on the Logs tab on the iSpy Viewer to access the most recent logs from any connected iSpy instance.
Clearing Stored Content
There are several ways of clearing stored content:
- Right click the camera/ microphone on the iSpy Surface and click "View Files" - delete the files through explorer. This breaks the synchonisation with the activity data (no big drama, it will be rebuilt automatically).
- To clear all content, click Options -> Clear Capture Directories
- Use iSpyConnect and click the rubbish bin icon below each thumbnail / file entry
- Use iSpyConnect (optionally set a search filter) and click on the File Browser button under the live view thumbnail. You can delete multiple items at once this way.
Note: If you remove a camera/ microphone from iSpy, iSpy won't delete all the captured content. You will need to manually open up a file browser and either copy out or delete the files that have been generated.
Checking For Updates
iSpy will automatically check for updates when it starts. You can turn this feature on or off on the settings panel. If you turn it off we recommend you manually check for updates regularly. If you experience a bug or other problem then check for updates to see if it's been fixed already. If there is an update then we'll tell you what has been added or fixed so you can decide if it's worth upgrading.