General: Camera Settings
About
Once you have selected a video source iSpy will show you the main configuration screen. You can get back to these settings at any time by right clicking the camera on the iSpy Surface and clicking "Edit".
Main Settings

Source: Video source for the camera
Advanced Camera Properties/ Inputs: This section only applies to USB cameras and allows you to change frame-rates and resolution settings. Depending on your cameras drivers these may or may not persist between restarts of iSpy.
Name: Once you have specified a video source iSpy automatically sets a name for the camera in the name field to match. When using a VLC source this name frequently has usernames and passwords in it so check the name before continuing. It's a good idea to give the camera a location based name like "Office Cam" or "Front Door Cam" as this will help differentiate the feeds when viewing them later.
Access Groups: List of group names to control access to this camera via ispyconnect (subscribers only)
Active: The camera active checkbox is a live control - that is it switches the camera on or off immediately without waiting for you to click Finish. There are quite a few live controls in these pages.
Flip-X, Flip-Y and Rotate 90 are all live controls and are used to make the live feed orient properly (useful for example if your camera is mounted upside down on the ceiling.
Timestamp: iSpy overlays a timestamp field displaying the Frames Per Second (FPS) along with the current time. You can change the format of the timestamp using this combo box. The curly brackets are special formatter expressions. You can position this text in a number of places using the drop-down to the right of this.
Other available tags are:
- {FPS} Frames Per Second
- {NAME} Camera name
- {REC} Recording Status
- {LEVEL} Motion Level
Mask Image: You can apply a transparent PNG file to iSpy to black-out sensitive areas of the cameras view using this.
Picture in Picture: Overlay other camera feeds on this camera - More Information.
Max Framerate: The default framerate limiter for the camera.
When Recording: The framerate limiter for the camera when recording (only available for mp4 files).
Microphone: The microphone list displays available microphones that you have already added to iSpy. Pairing a microphone with a camera enables iSpy to record video on sound detection or sound on video detection. The recordings are then combined when iSpy creates the .mp4 file. If you want to pair a microphone with a camera you will need to exit the camera settings, add a microphone to iSpy and then edit the camera and select the microphone from the list.
Ignore Audio: Force iSpy to ignore the audio feed from the camera
Talk: Talk configuration for the camera (enables you to speak or run text-to-speech through the camera speaker)
Talk
iSpy now supports talk functions through several camera manufacturers including Foscam, Axis and our own iSpyServer. To use the talk function, hover over the camera with your mouse and click the "T" button that pops up (if nothing pops up then enable overlay in settings). Talk uses the default microphone that you select on the "Talk" tab in settings. When talk is active the "T" turns red and you can then talk into the microphone and your voice will come out of the camera speaker. Remember to turn off talk when you are finished!
If you use the IP camera wizard then talk settings will be automatically setup. Otherwise see the bottom of the first tab when editing the camera to configure talk.
Supported cameras for talk include:
- Foscam Talk
- Axis Talk
- iSpyServer Talk
- IP Webcam (Android) Talk
Alerts

iSpy raises alerts for cameras and microphones when it detects movement or sound (you can also raise alerts for no movement or no sound or by using a plugin).
- Mode Choose between movement/ no movement or plugin modes. Click the "..." button to configure various settings
- Continuous/ When Motion Detected/ External Trigger - these options apply to plugins only. For example you may only want to perform license plate recognition (using the plugin) when motion is detected. See the http userguide for working with triggers
- Intervals - more information
- Email on Disconnect - Check this to receive an email (to your registered account) if the camera unexpectedly disconnects (subscribers only)
- Actions - Actions to perform on alert - You can add as many actions here as you like
The key thing to remember when testing alerts is the Distinct Alert Interval. iSpy is limited to one alert every 3 minutes (by default) - so if you are trying to trigger alerts to test and nothing is happening then you probably need to adjust this setting.
Using arguments with your actions
With any action that takes a parameter (like call URL or execute file) you can use the ID or name of the camera using the macros {ID} or {NAME}. If you are using a plugin you can pass through a message from the plugin using {MESSAGE}. The LPR plugin for example will pass back messages like "Plate in List: AU28826" or "Plate Not in List: ABC123". You can also use {MESSAGE} with the recording started and recording stopped alerts and iSpy will merge in a full URL encoded external URL to the file that is being generated .
Passing back commands to iSpy
You can integrate command line options back into ispy using the Execute File action - just set the File to "ispy" (no quotes) and then use the command line options in the arguments field to do whatever you like.
Fisheye Correction
iSpy can transform feeds from fisheye cameras into rectangular video feeds

- Focal Length (px) This is the focal length of the camera in pixels. You can estimate this by calculating (frame width in pixels) * (focal length in mm) / (CCD width in mm)
- Limit and Scale are 2 factors you can use to tweak the distortion field for conversion
Alert Intervals
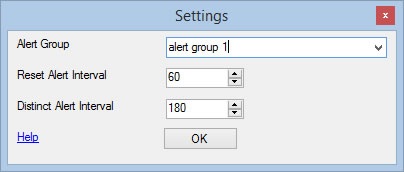
You can control when cameras and microphones raise alerts by using a combination of alert groups, reset intervals and distinct intervals:
- Alert Group Specify a group name here to create groups of cameras that share a reset interval. For example you may have multiple cameras that monitor a specific area. Assign these cameras the same group name and when one alerts it will suspend additional alerts from all the other cameras in the group.
- Reset Alert Interval (seconds) This is used with the alert group. When one camera or microphone in the group triggers an alert then iSpy will wait for a period of inactivity equal to this value before allowing another alert to trigger. If there are any alerts raised by the group within this time then the timer is reset.
- Distinct Alert Interval (seconds) This is used to prevent multiple alert events from a camera or microphone. The default value is 180 - which means that iSpy won't raise repeated alerts for 3 minutes on each event.
Delete the group name or set the reset interval to zero to disable alert suppression
SMS Alerts
The number must start with your country code, followed by your number excluding the leading zero. For example if you live in Australia and your mobile number is 0416 123456 then you'd enter 614161236456. See our wizard for formatting your number.
You get a number of SMS credits with your subscription (as it costs us each time you send one). You can recharge your SMS credits through the recharge page on iSpyConnect.