About
MQTT, which stands for Message Queuing Telemetry Transport, is a lightweight and efficient messaging protocol widely used in the Internet of Things (IoT) for device-to-device communication. It's designed to work under limited network bandwidth and with low-power devices, making it ideal for connecting remote sensors, mobile devices, and various small-scale gadgets to the internet.
Agent DVR can both publish events to MQTT and receive commands over it, making it a flexible bridge between your cameras and your smart home or home automation system.
Connecting
Connect Agent DVR to your MQTT server using the Settings menu. Once connected, you can set alert actions to publish messages to your MQTT server. See MQTT Server Settings for details.
To configure this, edit your device and select Actions in the menu. Add an action for an alert (or other event) and choose MQTT as the task type. Here, you can specify the topic and message to post.
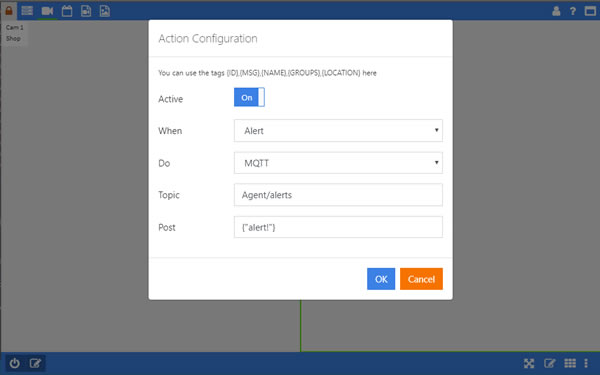
Specify the topic to post to (e.g., Agent/alerts) and craft your message accordingly.
Sending Commands
Agent DVR can also receive and process MQTT messages on the SERVER/commands topic, where SERVER is your server name (displayed in the server menu, editable in Settings). Any slashes, underscores and hyphens are removed from the server name for MQTT topics. These commands are formatted similarly to the HTTP API. Just replace /command with cmd=:
To turn all devices on: cmd=allon.
To take a photo on a specific device: cmd=snapshot&ot=2&oid=1.
To reset the trip wire crossing counters on a camera: cmd=resettripwires&ot=2&oid=1.
Using mosquitto, you can send a command like (replace SERVER with your server name):
mosquitto_pub -t 'SERVER/commands' -m 'cmd=record&ot=2&oid=1'.
Agent DVR will execute the command and send a JSON response to the SERVER/responses topic.
Auto MQTT
Agent DVR features an automatic MQTT configuration that sends default events, statuses, and usage statistics. To activate this feature, enable the "MQTT Events" option on the MQTT tab while editing a device.
Topics are published under SERVER/cameras/NAME/ or SERVER/microphones/NAME/, where SERVER is your server name and NAME is the device name (both lower case, with slashes removed). This configuration includes flags for topics such as motion, connected, alert, recording, timelapse, alerts (armed state) and detector (motion detection on or off), plus JSON results from AI object, face, plate and sound recognition.
Cameras using the trip wire detector with Count enabled also publish (v7.7.4.0+):
- tripwire: one message per counted crossing, e.g.
{"wire":1,"direction":"left","left":3,"right":2,"total":5} - tripwire_left, tripwire_right, tripwire_total: the current counters, retained so they are available as soon as you subscribe. Reset to 0 by the Reset Count button, the resettripwires command or a camera restart.
If you use Home Assistant you don't need to work with these topics directly: see Home Assistant for automatic setup.
Troubleshooting
If you encounter frequent disconnects and reconnects in MQTT, it typically indicates that the Client ID specified in Server Settings under MQTT is being used by multiple clients. It's important to ensure that each client connected to MQTT has a unique Client ID.
Home Assistant
Agent DVR can announce its devices to Home Assistant automatically using MQTT discovery. Your cameras and microphones then appear in Home Assistant as devices with sensors and switches, ready to use in dashboards and automations with no YAML configuration.
What you get
- Motion sensor: on while the detector sees activity.
- Alert sensor: on while the device is alerting.
- Connected sensor: whether the device is online.
- Recording sensor: on while the device is recording.
- Enabled switch: turn the device on or off from Home Assistant.
- Alerts switch: arm or disarm alerts from Home Assistant.
- Detector switch: turn motion detection on or off from Home Assistant.
- Count Left, Count Right and Count Total sensors: crossing counters for cameras using the trip wire detector, for people counting. (v7.7.4.0+)
With Send Stats enabled the server also appears as a device with CPU, memory and disk usage sensors. All entities show as unavailable in Home Assistant when Agent DVR goes offline.
Setting it up
You need an MQTT broker (typically the Mosquitto add-on on your Home Assistant machine) and Home Assistant's MQTT integration connected to it. No extra ports need to be opened for Agent DVR: it connects out to the broker just like Home Assistant does.
On a new install, just enter your broker's address and login under Home Assistant on the welcome screen. That's it: MQTT and discovery are switched on for you, and every camera and microphone you add afterwards will appear in Home Assistant automatically.
To set it up later (or on an existing install), go to Server Settings - MQTT, configure your broker and enable both Enabled and Home Assistant Discovery. Then enable MQTT Events on each device you want published (MQTT tab when editing the device). Devices added while discovery is on have MQTT Events enabled automatically; devices that existed before keep their current setting.
Notes
- Devices appear in Home Assistant within a few seconds of Agent DVR connecting to the broker. Renaming a device or toggling MQTT Events updates Home Assistant automatically.
- The Discovery Prefix in advanced MQTT settings must match the discovery prefix in Home Assistant's MQTT integration. Leave both at the default (homeassistant) unless you know you've changed it.
- Turning Home Assistant Discovery off removes the entities from Home Assistant.
- The switches use Agent DVR's MQTT commands under the hood, so anything else on your MQTT network can send the same commands.