Local Object Recognition
Agent DVR supports live real-time object recognition using AI model files (.onnx). This local AI object detection runs entirely on your own hardware (no cloud service required), so you can be alerted only when something that matters appears, like a person or a car, instead of every time a tree moves. You will need a license (or active subscription) to use this feature. See AI Servers for configuring Agent to use external AI servers.
To get started, edit your camera and go to the Object Recognition tab. Choose your AI server at the top. The default is Internal, which is Agent DVR's built-in AI. If you want to use an AI server, add it in Server Settings - AI Settings - AI Servers and then select it here.
The following details are for configuring Agent DVR with its fast built-in AI. You can also add any other models you like, for example Ultralytics YOLO models.
- Model: Select the AI model you want to use. Agent will automatically download built-in models as needed. The Small model is good for low-end hardware or lots of cameras. The Medium model is good for better accuracy but uses more processing power.
- Mode: Select when you want AI to process frames from your video. If you select Interval, Agent will use the Processing Rate field below to continuously analyze your video feed.
- Configure Overlay: Set up drawing real-time results on live video: enable the overlay, show labels and confidence, set line width and colors, or blur recognized objects (for example, people). The overlay is great for tuning the confidence limit.
- Use GPU: Check this to use your GPU instead of CPU.
- Device: Select the device to run the model on.
- Processing Rate: This is only used when Mode is Interval - it controls the rate that frames are sent to the model. Enter 1 for 1 frame per second, 20 for 20 frames per second or 0.1 for 1 frame every 10 seconds.
- Confidence: This filters the results from the model. Adjust this higher to reduce false positives, but note it may also miss objects.
- Check Corners: Refer to Checking Corners for more details.
- Find: Specify objects for the AI to detect. The list of options here comes from the model configuration.
- Static Objects: Choose how to filter objects that aren't moving. Ignore Static Objects ignores objects detected repeatedly in the same position (like parked cars); they still alert the first time they appear. Moving Only only reports objects where the motion detector currently sees movement, so still objects never alert (no effect with camera-side detectors like ONVIF, Reolink, Hikvision or MQTT).
- Movement Tolerance: Allowed movement between detections when checking for static objects. Low values rarely match; high values suppress more. Recommended: 40-60.
- Learn From Feedback: Let Agent learn from you. With this enabled you can confirm or reject detections in the alert viewer and Agent will learn to suppress similar false alerts on this camera. See Learning From Feedback.
Custom Models
To add your own models to AI, copy the model file (.onnx) into Agent's Models folder and see Adding Models.
Actions
Object Recognition generates AI: Object Found and AI: Object Not Found events for use in Actions.
Photos
For information on photos, see Photos.
Learning From Feedback
Agent DVR can learn from your feedback to reduce false alerts, camera by camera. When a detection gets it wrong - a bush that looks like a person at night, a flag the AI keeps calling a bird - you can tell Agent and it will learn to suppress similar detections on that camera in the future. Everything runs 100% locally: no images or data ever leave your machine, and the detection model itself is never modified, so this is always safe to use and easy to reset.
Enabling
Edit your camera, go to the Object Recognition tab and switch on Learn From Feedback. Agent will automatically download a small embedding model the first time it's needed.
Giving Feedback
With feedback enabled, alerts generated by object recognition store the detection results alongside the alert image. Open an alert in the Alerts panel and you'll see boxes drawn over each detection with a "Did we get this right?" prompt:
- Correct: Confirms the detection. Confirmed examples protect similar detections from ever being suppressed.
- Incorrect: Rejects the detection. Agent learns the appearance of rejected detections for that camera and object type. After a few rejections of similar-looking detections (at least 3), Agent starts suppressing matching false alerts automatically.
You can change or remove a verdict at any time by clicking the button again.
The "Did we get this right?" panel collapses - click its header to hide or show the prompts and detection overlays. Agent remembers your choice (per browser), so once you're happy with how a camera is performing you can collapse the panel and just see clean alert images. Collapsing the panel never stops the learning - suppression keeps working. To stop learning entirely, switch off Learn From Feedback on the camera instead (note this also stops suppression).
Suppressed Alerts
Suppression is deliberately conservative - a detection is only suppressed when it clearly matches your rejected examples and doesn't match any confirmed ones. When Agent suppresses what would otherwise have been an alert, it stores a suppressed alert instead so nothing ever disappears silently. Click the icon in the Alerts panel header to show or hide them (the icon only appears when suppressed alerts exist; they're kept separately and don't count against your normal alerts).
If Agent suppressed something it shouldn't have, open the suppressed alert and mark the detection as Correct - this lifts the suppression for similar detections immediately.
How It Works
Agent uses a general-purpose vision model to create a compact mathematical "fingerprint" of each detection. Your verdicts file these fingerprints as confirmed or rejected examples per camera and object type. Future detections are compared against your examples by similarity - the same approach used by Facial Recognition. Your chosen detection model and its classes are untouched.
Resetting
To remove everything a camera has learned, click Clear Learning on the camera's Object Recognition tab and confirm - suppressed alerts will start alerting again. Learned feedback is stored in FeedbackDB.json in Agent's XML folder; the clearfeedback API command is also available (optionally with cameraid and label parameters). Learned feedback (and learned faces) are included in the server configuration export/import, so your training moves with your settings to a new computer.
Copying Learning Between Cameras
You can copy a camera's learned feedback to other cameras with Copy Settings - tick Learning (under Object Recognition) in the section list. This replaces the target cameras' learning with a copy of the source's. It's most useful for cameras covering the same or a similar scene - learned examples are appearance-based, so feedback about a bush on one camera only helps another camera that can see something like that bush.
Converting Ultralytics YOLO Models to ONNX
Agent DVR supports ONNX model files for object recognition. You can download pretrained models and convert them to ONNX format in a few steps.
The example below uses the YOLO26s model via Ultralytics. YOLO26s is a smaller, general-purpose model with a good speed/accuracy trade-off.
Prerequisites
- Python 3.10 or newer
- pip available in PATH
- Internet connection
- ~1-2 GB free disk space
Step 1 - Install Ultralytics
pip install ultralyticsStep 2 - Download the YOLO26s Model
Ultralytics automatically downloads the pretrained weights when first used:
yolo detect predict model=yolo26s.pt source=https://ultralytics.com/images/bus.jpgStep 3 - Convert to ONNX
Once downloaded, export the model to ONNX format:
yolo export model=yolo26s.pt format=onnx opset=12 simplify=TruePython Alternative
from ultralytics import YOLO

model = YOLO("yolo26s.pt")
model.export(format="onnx", opset=12, simplify=True)
Step 4 - Locate the ONNX File
The exported yolo26s.onnx file will be created in your working directory
or in the
runs/exportStep 5 - Copy to Agent DVR
Move the ONNX file into your Agent DVR ONNX models folder (on the Agent server), for example:
Agent\Media\Models\ONNX\Step 6 - Add the Model in Agent DVR
- Go to Server Settings > AI Settings > AI Models.
- Click Object Recognition and add a new model.
-
Enter a name e.g.
yolo26sand select the.onnxfile in the dropdown. - Leave the remaining options at their defaults and click OK.
- Edit your camera, open the Object Recognition tab, set Server to Internal, and choose your new model.
Local Face Recognition
Agent DVR supports live real-time facial recognition using AI, running locally on your own hardware. Use it to know who is at the door and trigger different actions for recognized and unknown faces. You will need a license (or active subscription) to use this feature. See AI Servers for configuring Agent to use external AI servers.
To get started, edit your camera and go to the Facial Recognition tab. Choose your AI server at the top. The default is Internal, which is Agent DVR's built-in AI. If you want to use an AI server, add it in Server Settings - AI Settings - AI Servers and then select it here.
The following details are for configuring Agent DVR with its fast built-in AI.
- Mode: Select when you want AI to process frames from your video. If you select Interval, Agent will use the Processing Rate field below to continuously analyze your video feed.
- Configure Overlay: Set up drawing real-time results on live video: enable the overlay, show labels and confidence, set line width and colors, or blur faces. The overlay is great for tuning the confidence limit.
- Use GPU: Check this to use your GPU instead of CPU.
- Device: Select the device to run the model on.
- Processing Rate: This is only used when Mode is Interval - it controls the rate that frames are sent to the model. Enter 1 for 1 frame per second, 20 for 20 frames per second or 0.1 for 1 frame every 10 seconds.
- Confidence: This filters the results from the model. Adjust this higher to reduce false positives, but note it may also miss people.
- Check Corners: Refer to Checking Corners for more details.
You can choose which face recognition model Agent uses in Server Settings - AI Settings - AI Models - Face Recognition.
Faces to Recognize
Click Edit Faces to upload photos of people you want to recognize. You can upload multiple photos of the same person to improve results. You can upload images from your file system or use a built in webcam to capture photos (requires SSL or localhost).
Actions
Facial Recognition generates AI: Face Recognized and AI: Face Not Recognized events for use in Actions.
Photos
For information on photos, see Photos.
Local License Plate Recognition
Agent DVR supports live real-time license plate recognition, running locally on your own hardware. Use it to log every vehicle entering a driveway or car park and trigger actions, like opening a gate, when a known plate is recognized. You will need a license (or active subscription) to use this feature. See AI Servers for configuring Agent to use external AI servers.
To get started, edit your camera and go to the LPR tab. Choose your AI server at the top. The default is Internal, which is Agent DVR's built-in AI. If you want to use an AI server, add it in Server Settings - AI Settings - AI Servers and then select it here.
The following details are for configuring Agent DVR with its fast built-in AI.
- Mode: Select when you want AI to process frames from your video. If you select Interval, Agent will use the Processing Rate field below to continuously analyze your video feed.
- Configure Overlay: Set up drawing real-time results on live video: enable the overlay, show labels and confidence, set line width and colors, or blur detected license plates. The overlay is great for tuning the confidence limit.
- Use GPU: Check this to use your GPU instead of CPU. Note that this currently only works on Windows or macOS due to GPU driver and runtime support. Linux currently falls back to CPU.
- Device: Select the device to run the model on.
- Processing Rate: This is only used when Mode is Interval - it controls the rate that frames are sent to the model. Enter 1 for 1 frame per second, 20 for 20 frames per second or 0.1 for 1 frame every 10 seconds.
- Confidence: This filters the results from the model. Adjust this higher to reduce false positives, but note it may also miss objects.
- Check Corners: Refer to Checking Corners for more details.
License Plates to Look For
- License Plates: Enter a comma-separated list of plates or a URL to a CSV file containing plates. Agent DVR will generate License Plate Recognized and License Plate Not Recognized events for these plates, which can trigger actions.
- Reload Interval: Set the frequency for reloading the plate list from the URL.
- Normalize: Adjust commonly misidentified plates to improve matching.
Actions
LPR generates AI: License Plate Recognized and AI: License Plate Not Recognized events for use in Actions.
Photos
For information on photos, see Photos.
AI Alert Filtering
Alert filtering combines motion detection with AI so you only get alerted when something that matters is detected, like a person on the porch, rather than moving branches or passing headlights. It's the most effective way to reduce false alarms. To set up Alert filtering in Agent DVR, follow these steps:
- Configure and enable a Motion Detector. For minimal CPU usage, use the Simple detector. Ensure at least one zone is defined to cover the area you want to monitor.
- On the Alerts tab, set the Mode to Actions Only and enable Alerts.
- On the recording tab, set the Mode to Alerts (if you want recordings)
- Enable Object Recognition on the Object Recognition tab. Set the mode to Motion Detected, select a model, and click Find to choose objects for detection, like Person, Dog, Car, etc.
- Go to Actions in the tab menu and add an Action for the event AI: Object Found.
Select zones to specify where to detect objects, like different zones for your driveway and the road. For instance, selecting the driveway zone will only trigger an alert if a car is detected there.
Under Tasks, click Add to create an Alert task. Click OK twice to confirm.
Agent DVR will process AI object recognition upon motion detection. If it detects a specified object in a chosen zone, it will trigger an action to raise an alert. Absence of zone selection will trigger alerts for any zone.
Set up alert filters similarly for LPR Recognition, Face Recognition, or Audio Recognition.
For constant AI object recognition without a motion detection trigger, set the Mode on Object Recognition to Interval. Monitor the impact on your hardware resources and adjust as needed.
You can configure multiple actions for different objects in various zones. Use the {AI} tag in actions to reference the detected object.
AI Filter Troubleshooting
If AI isn't effectively filtering your recordings, consider the following:
- Ensure the Find setting matches one of the Available options.
- Verify that the master alert switch at the top left of Agent DVR shows a closed padlock, indicating active alerts.
- Confirm that the recording mode is set to Alert and not Detect.
- Ensure the alert mode is set to Actions Only.
- Try lowering the Confidence level under Object Recognition.
- Check /logs.html for error messages, possibly indicating server issues or network blocks.
- Monitor AI server performance and ensure it's not causing system overload or timeouts.
- If AI detects all object classes, it may indicate GPU issues. Check GPU drivers or switch to a CPU-based AI module.
AI Object Recognition
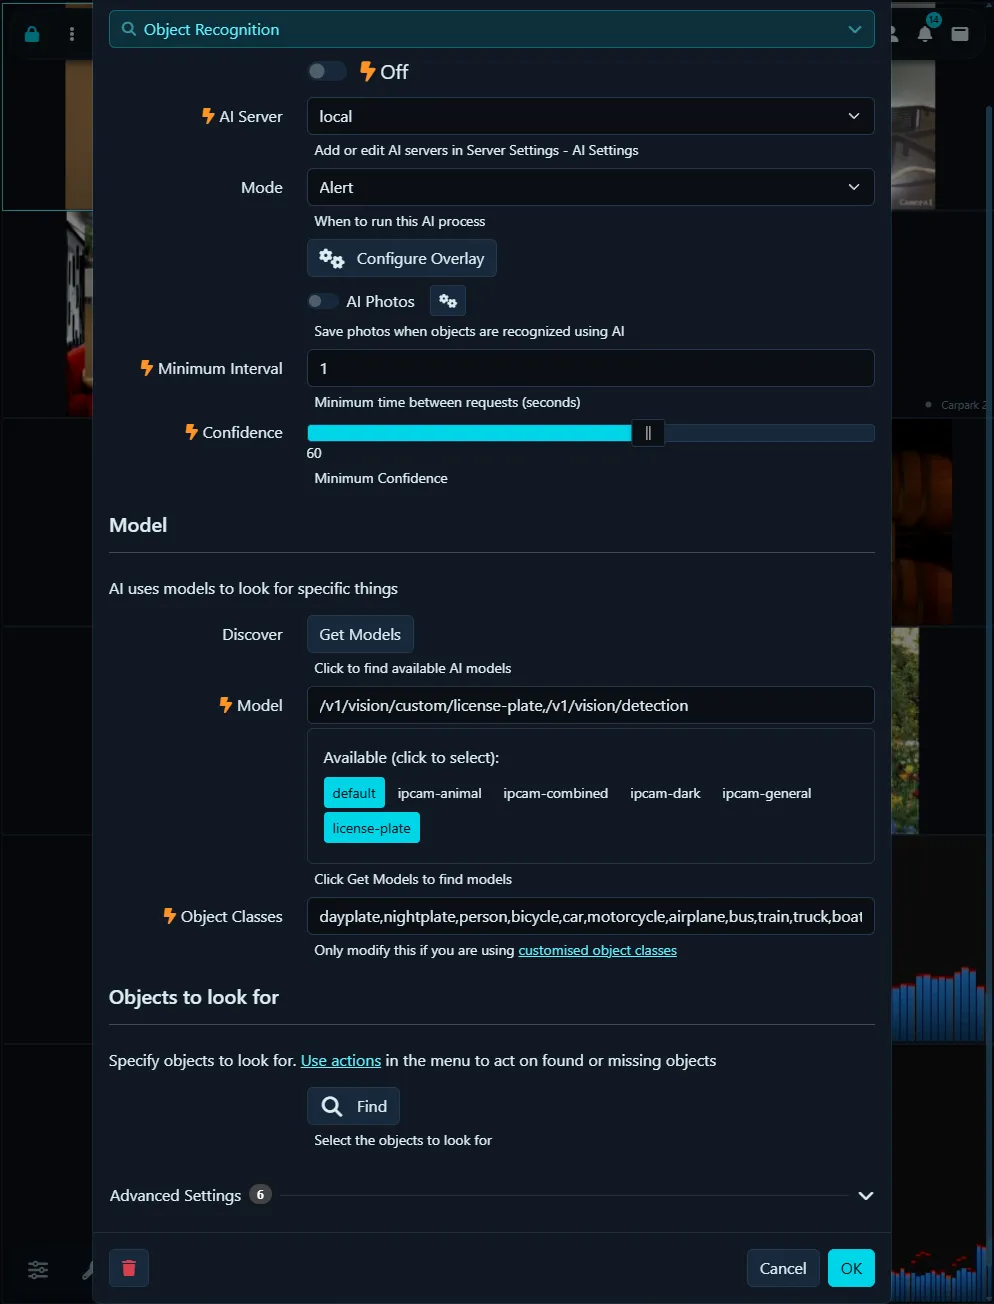
Object Recognition in Agent DVR uses either our local AI or an AI server (CodeProject.AI recommended) to recognize specific objects in video feeds and can generate events, raise alerts, or act as a filter on motion alerts.
- Enabled: Toggle to enable or disable the AI process.
- AI Server: Select from your configured servers, or use the default option.
- Mode: Choose the trigger for the AI process. Trigger via API only by setting this to None and calling triggerObject.
- Motion Pass-through: If the AI server is down and filtering alerts, this allows alerts to pass through without filtering.
- Use Snapshot URI: Use a high-resolution frame from your camera instead of the current live stream frame.
- Resize Mode: Resize images before sending them to the AI server to reduce load and improve response times.
- Configure Overlay: Set up drawing AI results on the live video stream, including labels, confidence, line width, colors and blurring.
- Request Interval: Set the minimum time between server requests.
- Confidence: Set the minimum confidence level to recognize an object.
- Check Corners: Refer to Checking Corners for more details.
Models
- Discover: Retrieve installed models from your server (specific to CodeProject.AI).
- AI Endpoint: Choose from available models or use the default endpoint.
- AI Object Classes: Automatically populated with relevant classes or manually entered.
- Find: Specify objects for the AI to detect.
- Static Objects: Filter objects that aren't moving. Ignore Static Objects ignores objects detected repeatedly in the same position; Moving Only only reports objects where the motion detector currently sees movement.
- Movement Tolerance: Allowed movement between detections when checking for static objects.
Custom Models
To add custom models to CodeProject.AI, copy the model file to the specified directory. Access it via the Discover button, but manually add the object list to Object Classes.
Change the directory for model storage by editing the Object Recognition module settings.
Actions
Object Recognition generates AI: Object Found and AI: Object Not Found events for use in Actions.
Photos
For information on photos, see photos.
Ask AI
Agent DVR uses AI servers (OpenAI/ Claude/ Gemini/ Local LLMs like Ollama, LM Studio, vLLM etc) to answer human readable questions about the images from your cameras. This can then generate events, raise alerts, or act as a filter on motion alerts. You will need to complete the settings in Server Settings - AI Settings - Ask AI.
You can check the Logs at /logs.html on the local server to see when requests are sent. Set the Server Settings - Logging - Log Level to Info.
- Enabled: Toggle to enable or disable the AI process.
- Provider: Choose which AI provider you want to use to process images. The provider will need to be configured in server settings - AI Settings. If you select Default then the first configured provider will be used.
- Mode: Choose the trigger for the AI process. Trigger via API only by setting this to None and calling triggerAskAI
- Motion Pass-through: If the AI server is down and filtering alerts, this allows alerts to pass through without filtering.
- Use Snapshot URI: Use a high-resolution frame from your camera instead of the current live stream frame.
- Resize Mode: Resize images before sending them to the AI server to reduce load and improve response times.
- Configure Overlay: Set up drawing AI results on the live video stream.
- Request Interval: Set the minimum time between server requests.
- Detail Mode: Choose Low or High image detail. Low is cheaper to use than High and fine for most scenarios.
- Use Video: Send a short video clip instead of an image (Gemini only). Set the Duration in seconds and check Include Audio to send sound along with the video.
AI Messaging
- Message: Enter your question for AI here. Some examples:
- If you see fire in this image respond with FIRE. If you see a dog sitting on a sofa, respond with DOG. If the door is open respond with DOOR. If multiple conditions are met separate them with a ,
- If the light on the machine on the bench is red respond with ALERT
- If a police car is parked in the driveway respond with POLICE
- If there is any mail or packages on the floor respond with MAIL
- If it looks like someone has broken into my house respond with BREAKIN
- Find: Enter the tags that you have instructed AI to respond with. For example FIRE, DOG, DOOR
- No Repeats: Ignore tags that were returned in the last call to AI
As noted above you can ask for multiple conditions to be met in the message and set up actions to handle each result.
Actions
Ask AI generates AI: Ask AI Positive Result events for use in Actions.
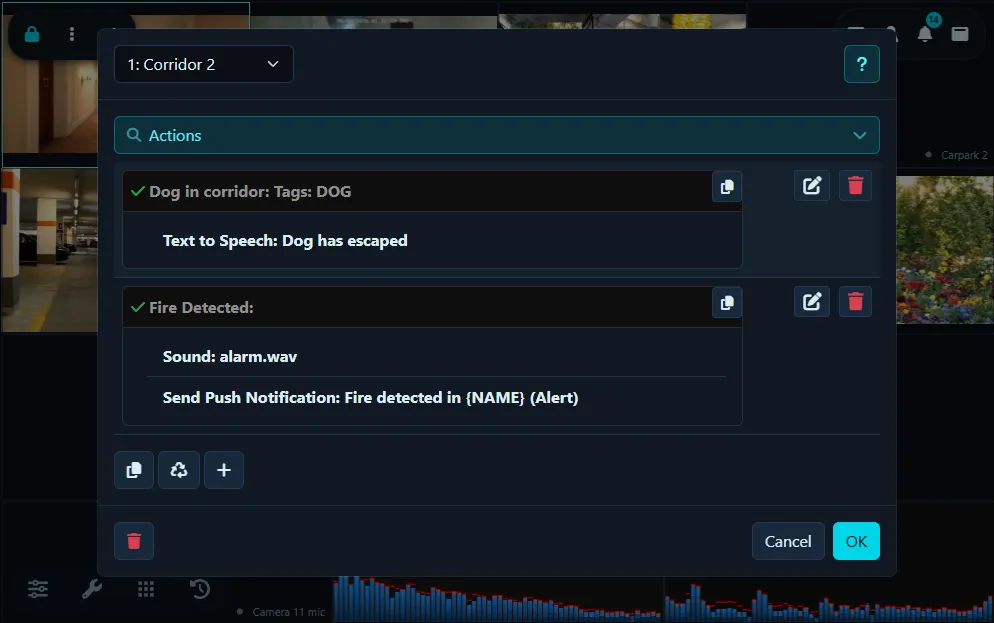
Photos
For information on photos, see photos. Note that AI doesn't yet return any spatial data about where things are in the image so crop and static detection are currently not working.
AI Photos
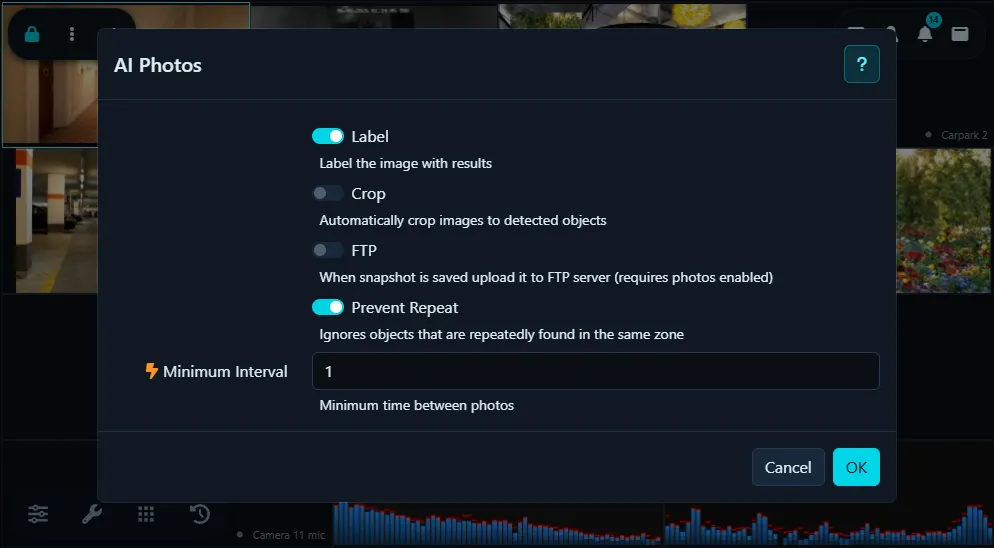
AI processes can capture photos when objects are recognized, offering options for saving, cropping, FTP uploading, and more.
To configure this, go to the Photos option at the bottom of each AI configuration tab when editing a camera. Enable Photos and click to configure.
- Label: Agent DVR overlays boxes on the image and labels the detected objects.
- Crop: Agent DVR crops the image to each detected area and saves multiple images, one for each region.
- FTP: Uploads the saved images to the camera's configured FTP server.
- Prevent Repeat: Agent DVR avoids saving multiple copies of the same object until it leaves the motion zone.
- Minimum Interval: Set the minimum time between photos, in seconds.
LPR or ALPR
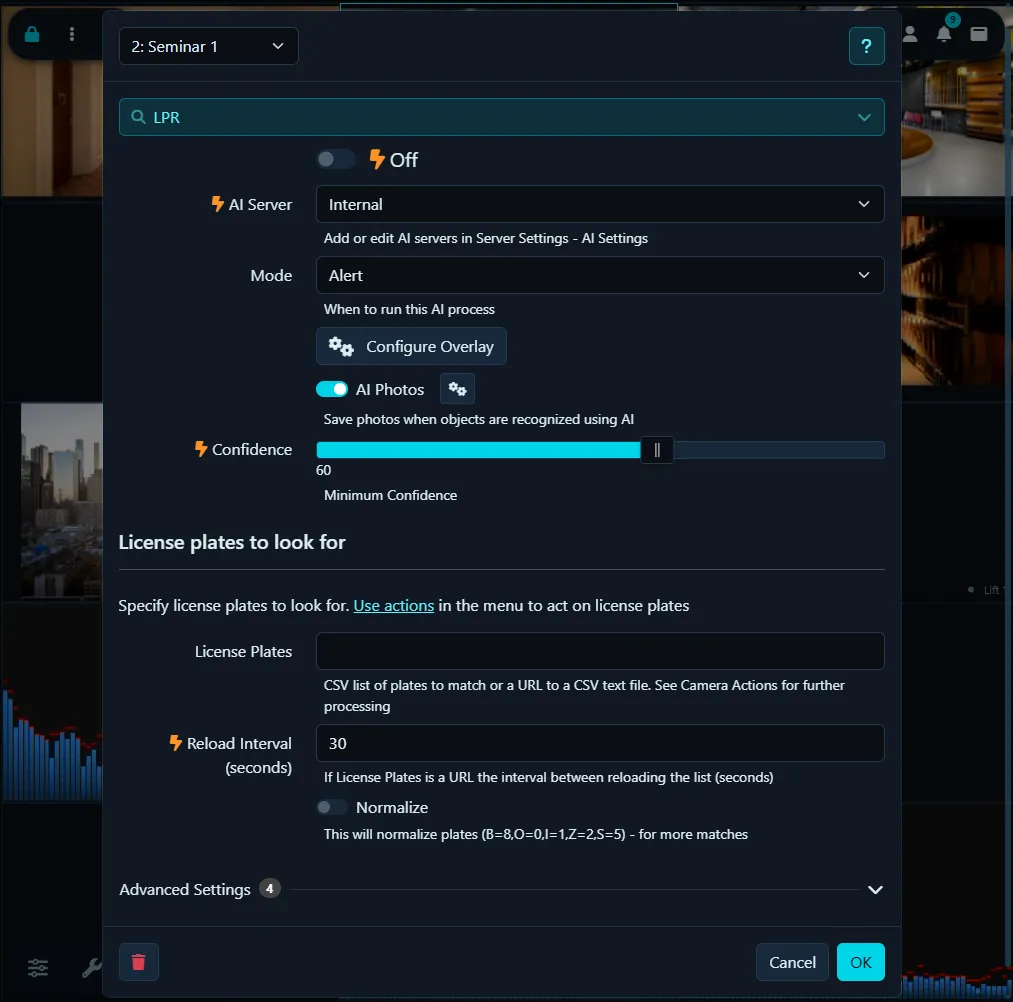
LPR (License Plate Recognition, also known as ALPR/ ANPR) utilizes an AI server to recognize and read license plates from cars in your video feeds. It generates events, raises alerts, or acts as a filter on motion alerts.
- Enabled: Toggle to enable or disable the AI process.
- AI Server: Choose from your configured servers or use the default option. Agent DVR supports LPR via CodeProject.AI, PlateRecognizer.com, Gemini or any OpenAI compatible vision LLM (like vLLM, Ollama and LM Studio).
- Mode: Choose the trigger for the AI process. Trigger via API only by setting this to None and calling triggerLPR.
- Use Snapshot URI: Opt for a high-resolution frame from your camera instead of the current live stream frame.
- Resize Mode: Resize images before sending them to the AI server to reduce load and improve response times.
- Configure Overlay: Set up drawing AI results on the live video stream.
- Request Interval: Set the minimum time between server requests to reduce load.
- Confidence: Define the minimum confidence level to recognize a license plate.
- Check Corners: Refer to Checking Corners for more details.
- License Plates: Enter a comma-separated list of plates or a URL to a CSV file containing plates. Agent DVR will generate License Plate Recognized and License Plate Not Recognized events for these plates, which can trigger actions.
- Reload Interval: Set the frequency for reloading the plate list from the URL.
- Normalize: Adjust commonly misidentified plates to improve matching.
- Make, Model, and Color: Enable this only if using a paid plan on PlateRecognizer.com that supports these features. It's not included in the free plan. Details will be included in {AIJSON} in Agent DVR Actions.
Actions
LPR generates AI: License Plate Recognized and AI: License Plate Not Recognized events for use in Actions.
Photos
For information on photos, see photos.
Using ALPR-Database
You can set up an integration with ALPR-Database.com to store your license plates. See Agent DVR with ALPR-Database for instructions.
AI Face Recognition
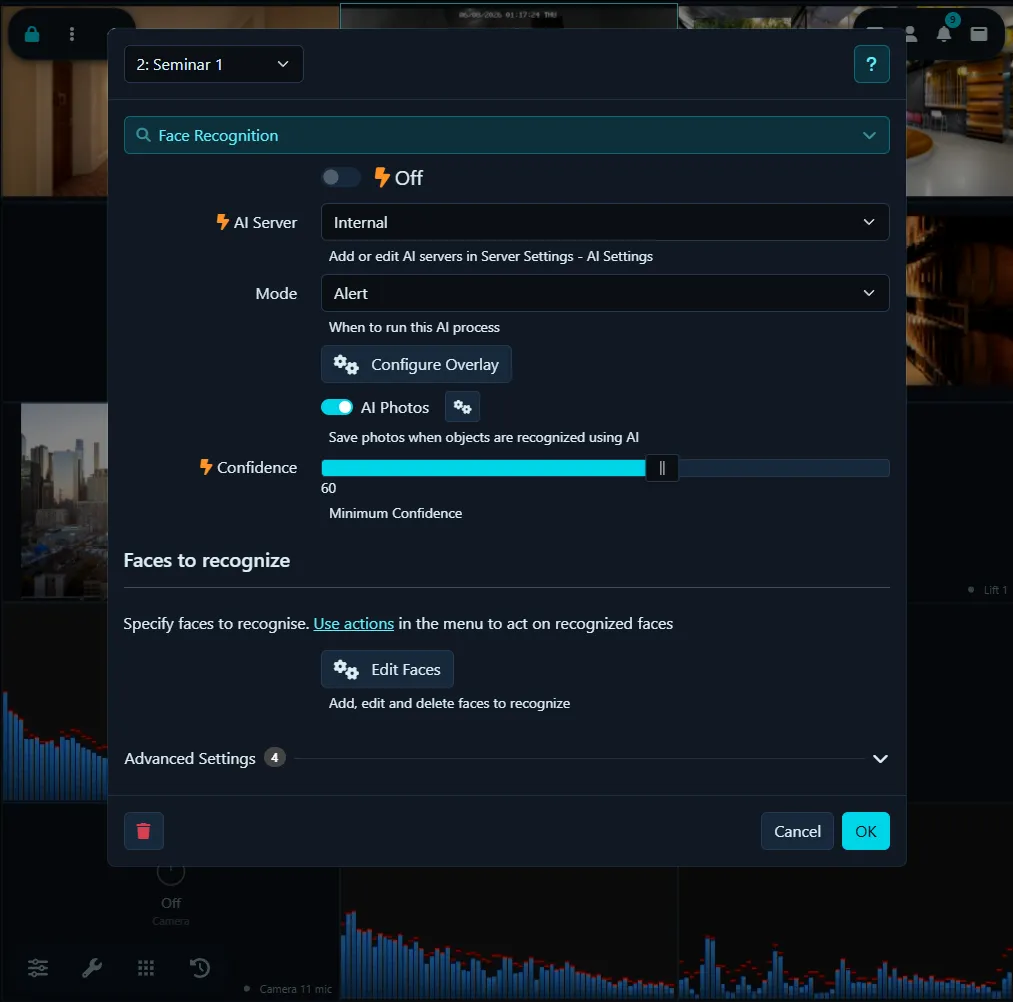
Face Recognition utilizes an AI server (recommended: CodeProject.AI) to recognize specific faces in video feeds. It can generate events, raise alerts, or act as a filter on motion alerts. Faces can be added, edited, or deleted using your camera or by uploading images. See Edit Faces in this tab for more.
- Enabled: Toggle to enable or disable the AI process.
- AI Server: Select from your configured servers, or use the default option.
- Mode: Choose the trigger for the AI process. Trigger via API only by setting this to None and calling triggerFace
- Use Snapshot URI: Opt for a high-resolution frame from your camera instead of the current live stream frame.
- Resize Mode: Resize images before sending them to the AI server to reduce load and improve response times.
- Configure Overlay: Set up drawing AI results on the live video stream.
- Request Interval: Set the minimum time between server requests to reduce load.
- Confidence: Define the minimum confidence level to recognize a face.
- Check Corners: Refer to Checking Corners for more details.
- Edit Faces: Upload images to the server database for recognition. Ensure that only one face is visible and clearly defined in each image.
Actions
Face Recognition generates AI: Face Recognized and AI: Face Not Recognized events for use in Actions.
Tall or composite frames
CodeProject.AI's face module scales every frame it receives to a fixed square (416 pixels on the long side, even in High mode) before it looks for faces. On a normal 16:9 frame that still leaves a face at a usable size, but on a tall portrait frame, or a multi-lens camera that stitches several views into one image, a face that is clearly visible in the original can arrive at the detector only 10 to 20 pixels high and CodeProject.AI reports "No face found in image". This happens inside CodeProject.AI after Agent DVR has sent the frame, so Resize Mode and Use Snapshot URI cannot fix it. Raising the FACE_HIGH resolution in CodeProject.AI's face module settings (its shared.py) restores detection. Alternatively use the local face recognition, which does not have this limit.
Photos
For information on photos, see photos.
AI Audio Recognition
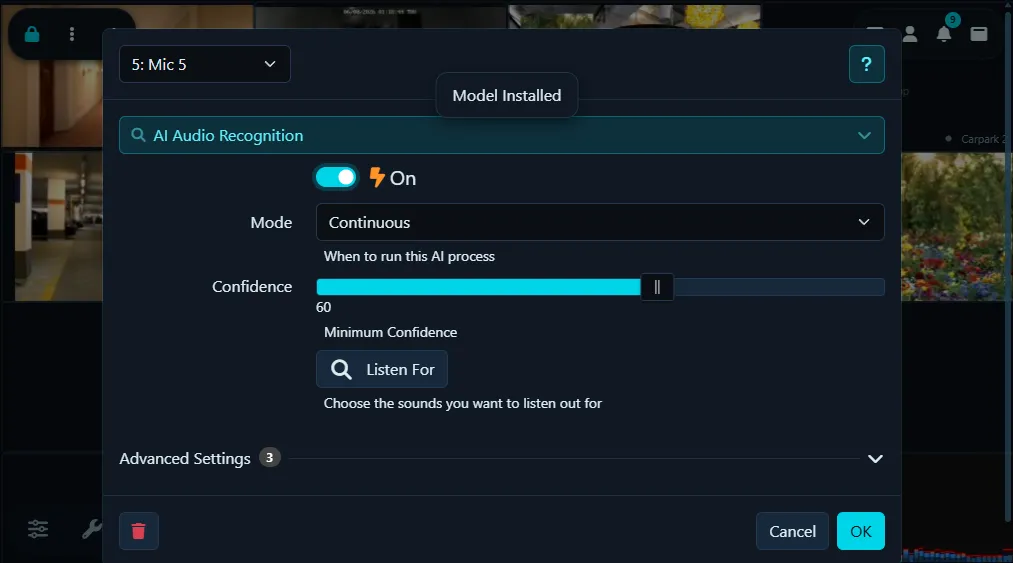
AI-based audio recognition in Agent DVR responds to recognized sounds from microphones or audio streams.
You will need to edit the Microphone settings to set up audio recognition. If you have a camera with an audio stream you can access the audio settings by editing the camera, selecting the Audio tab and clicking "Configure".
- Enabled: Toggle to enable or disable the AI process.
- Mode: Choose the trigger for the AI process.
- Confidence: Set the minimum confidence level for sound recognition.
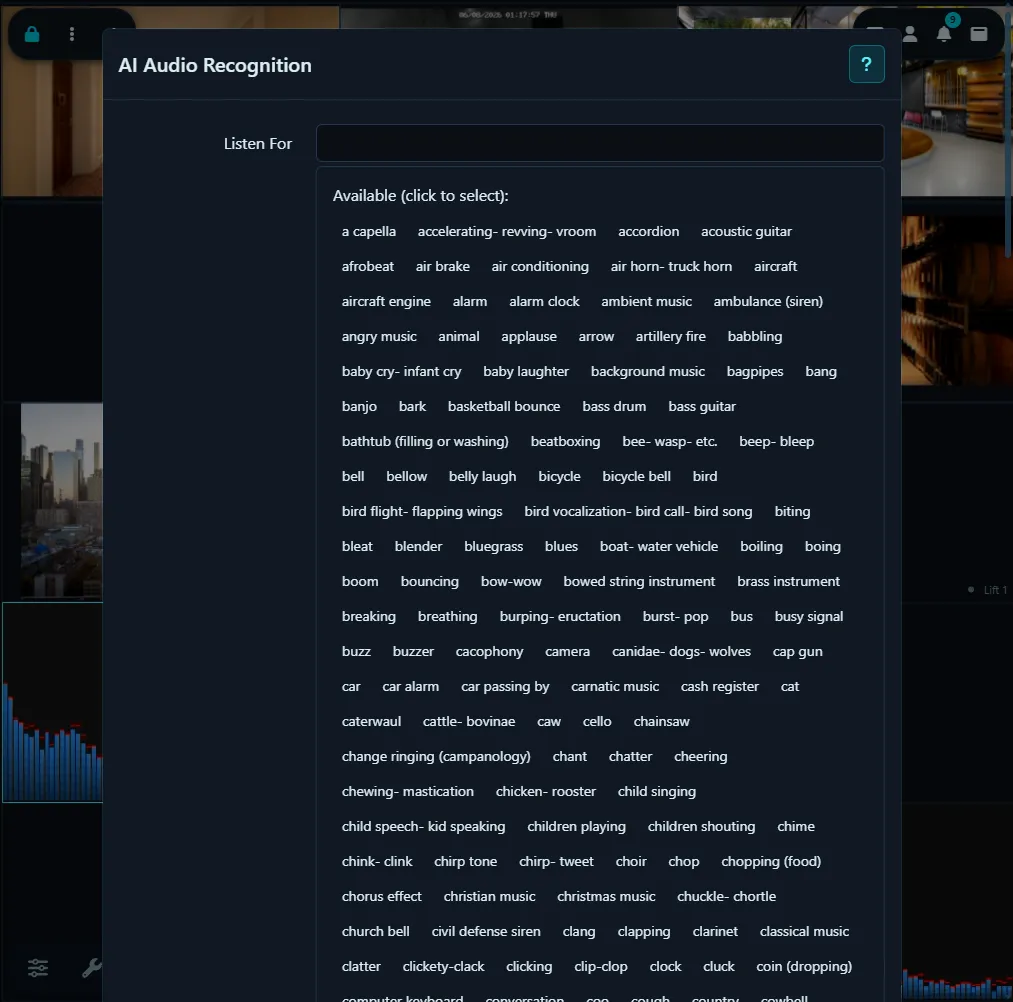
- Listen For: Select specific sounds for the AI to detect.
- Overlay: Displays recognized sounds on the live audio visualization. Only the sounds you have chosen under Listen For are shown, so what appears on screen matches what raises alerts.
- Overlay All Sounds: Also display sounds you are not listening for, so the overlay shows everything the model recognizes. Useful for working out why a sound isn't being picked up.
- Use GPU: Check this to use your GPU instead of CPU.
- Device: Select the device to run the model on.
Clicking Listen For shows available sounds for detection. Select sounds as needed.
If a sound isn't being detected, turn on Overlay and Overlay All Sounds, then play the sound and watch the audio visualization. The overlay lists each recognized sound with its confidence, so you can see whether the model heard nothing at all, heard the sound but below your Confidence setting, or classified it as something else - in which case add that sound to Listen For. Turn Overlay All Sounds back off when you are done, so the overlay only shows sounds that actually raise alerts.
Use the Action AI: Sound Recognized to perform tasks when a sound is identified.
Audio recognition can also be used to filter alerts, similar to cameras.
AI Language
To change the language used for labels and tagging in image overlays, go to Server Menu - Settings - General - Default Language.
Adding Actions to AI Events
Agent DVR generates events through AI processes, which can trigger Actions. For instance, Object Recognition generates "Object Found" and "Object Not Found" events. Each AI system in Agent DVR produces unique events.
These events can trigger various actions, such as raising alerts, calling URLs with object labels, executing programs, or publishing messages to MQTT servers. Use tags {AI} for labels or {AIJSON} for the full JSON response from the AI server in actions.