Configuration: Editing Microphones
About
Accessing the device settings in Agent DVR is straightforward. Begin by clicking on the Server icon at the top left of the Agent DVR User Interface. From there, select "Edit Devices" under Devices. You can then choose the device you wish to modify and click the Edit icon . Alternatively, in the Live View, you can select a microphone and click the edit icon on the bottom toolbar, or simply use the shortcut key "E". On Desktop, right-click the Microphone in the Live View or in any area within Agent DVR where a live thumbnail is displayed, like the timeline.
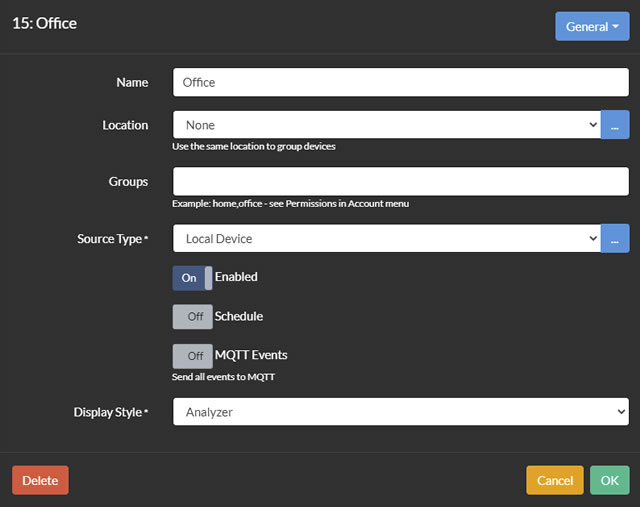
This interface is the central hub for configuring your devices. At the top, it displays essential details like the object ID (for example, "15"), and the device name (like "Office"). On the right side, you'll find the main device menu, which provides access to various configurable areas, referred to as tabs. Notably, a * next to certain settings indicates that changes to these settings are applied immediately, without the need to click 'OK'.
General
This tab provides access to general settings that are commonly used in configuration.
- Name: Assign a descriptive name to your microphone, like "Office" or "Back Yard."
- Location: Manage locations by clicking the button. You can add locations such as "Main House" and assign a color to them. Devices assigned to locations will be color-coded in the live view.
- Groups: Utilized in permissions.
- Source Type: Select the method by which Agent DVR connects to your devices. See Audio Source Types.
- Enabled: Toggle to turn the microphone on or off in Agent.
- Schedule: Activate or deactivate the scheduler. If disabled, no scheduled events will be triggered.
- MQTT Events: Enable or disable automatic MQTT event packets that Agent DVR sends to your MQTT server - requires a configured MQTT server.
- Display Style: Choose the display style for the microphone in the live view: 'Analyzer' (spectrum analyzer), 'Level' (overall volume level), or 'Historical' (historical volume level graph).
- Color: Select a color for the audio bars.
- Trigger Color: Choose a color for the trigger points (the volume level that activates audio detection).
- Back Color: Select a background color for the audio overlay.
- Device Color: This color links the timeline in the time machine view to the playback view.
Actions
Instruct Agent DVR on the desired actions to take in response to various events, such as Alerts, devices being turned off, or when recordings are completed. For more information on configuring these responses, refer to the Actions guide.
Alerts
Alerts in Agent DVR are triggered by AI, motion detection and various plugins. For a detailed understanding of how these alerts function and can be configured, please refer to the Alerts guide.
Cloud
- Provider: Select your cloud provider for uploads. Configure your cloud providers in - Settings - Cloud. For additional details, see More info.
- Path: Define the upload path for Agent DVR. For example, using [MEDIATYPE]/[NAME] will upload a video file to Video/somefilename.mp4. The actual filename is determined in the recording tab.
- Upload Recordings: Enable this to automatically upload your recordings.
Detector
The sound detector feature listens for increases in volume. Any sound exceeding the lower limit is highlighted in red, making it easier to identify the sources causing alerts.
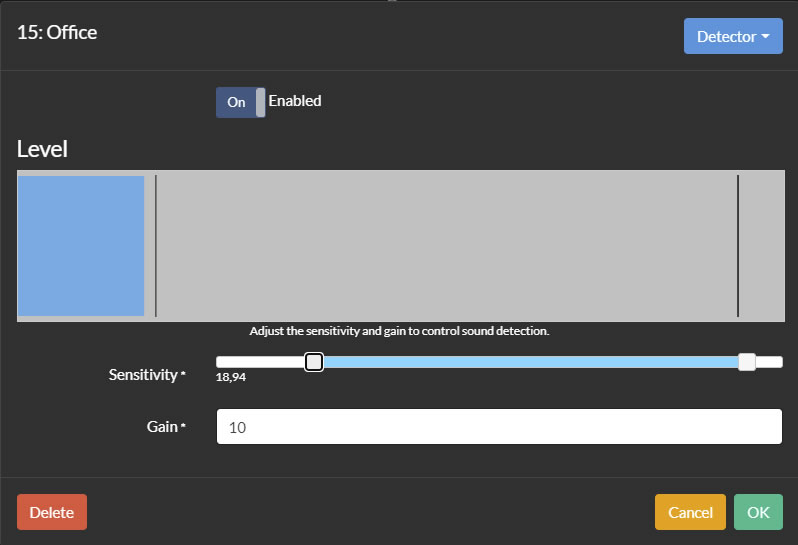
- Enabled: Activate or deactivate the sound detector.
- Sensitivity: Adjust the level of sound required to trigger sound detection. Minimum and maximum values can be set, with the numbers below the slider indicating the percentage of the maximum volume range.
- Gain: Apply a multiplier to the detected volume to enhance or reduce the sensitivity of sound detection.
- Motion Timeout: Set the duration (in seconds, between 1 and 60, default is 3) for which the microphone remains in a detected after sound detection ceases. This helps reduce fast repeating events.
Plugin
Agent DVR is equipped to handle both video and audio plugins, enabling external applications to process media in real time and generate alerts and detection events. Plugins can be installed through the remote website portal at ispyconnect.com. Navigate to - Plugins for installation. If you're interested in developing custom plugins, please refer to our plugins guide.
Recording
Agent DVR has the capability to record video based on sound detection, alerts, manual commands, or according to a predefined schedule.
- Mode: Options include Alert, Detect, or None. 'Alert' mode triggers recording only when sound detection causes an Alert event (see Alerts). 'Detect' mode records whenever sound is detected by Agent. 'None' means recording will only occur when manually initiated or scheduled.
- Filename: Enter a template for the filename, excluding the file type extension (e.g., .mp3). Agent DVR will append the appropriate extension based on the encoder in use. The default filename format is {id}_{0:yyyy-MM-dd_HH-mm-ss_fff}. See merge tags.
- Max Record Time: Set the maximum duration for each recording. Upon reaching this limit, Agent DVR will complete the current recording and start a new one.
- Min Record Time: Define the minimum duration for a recording.
- Inactivity Timeout: For recordings triggered by motion or alerts, this determines how long recording continues after the triggering motion or sound ceases.
- Trigger Timeout: In the case of recording initiated by a "Trigger Recording" action, this sets how long the recording should continue. This timer resets with each new trigger recording action call. (Available from v4.3.7.0+)
- Buffer: Specify the amount of time in seconds to buffer video from the microphone before the start of a recording. This essentially acts as pre-recording, with the buffered content being saved to disk once recording begins.
Schedule
Add schedule entries to manage when the microphone is enabled or disabled, when recording starts or stops, and to adjust other settings on a weekly calendar basis.
Tip: Enabling "Apply Schedule at Start" in - Settings - General allows Agent DVR to determine and apply the appropriate settings to your devices based on the established schedule at startup. Without this option enabled, Agent DVR will start with the devices in their last known state.
To add a new schedule entry, simply click on 'Add':
- Enabled: Activate this schedule entry. Active entries are indicated with a green tick in the Schedule summary, while inactive ones are marked with an X.
- Time: Set a specific local time for the schedule entry to run.
- Days: Choose which days of the week the schedule should operate. Selected days will be highlighted.
- Command: Select a command for execution. Options include Alert Action Run, which allows you to schedule alert actions at specific times. For more details, refer to Actions.
Storage
See Storage Settings