Agent DVR: Plugins
Installing Plugins
The easiest way to install plugins is through the remote web portal. Once connected, click on the Server icon at the top left and navigate to 'Plugins' under System. Here, you can select the plugin you wish to use from the drop-down menu at the top-right and click 'Install' to get started.
Prefer to install manually? No problem! You can build the plugins from source and then copy the built output to Agent/Plugins/PLUGINNAME. This method gives you more control over the installation process.
Available Plugins
Agent DVR comes packed with advanced video processing features like CodeProject AI integration, along with advanced object tracking, audio recognition and counting detectors. To further enhance your experience, we offer a range of plugins you can use in AgentDVR to extend its functionality.
Plugin List
Barcodes
Scan pretty much any barcode from a camera (windows only).
Raised Events: Barcode Recognized
Supports: Video
Gain
Apply live band filters on audio coming from audio devices.
Raised Events: None
Supports: Audio
Live Delay
Adds a delay to live audio and video (useful for sports analysis).
Raised Events: None
Supports: Video, Audio
Weather
Adds a weather status overlay to live video based on your location. Raise events if the weather changes - for example if a storm is coming or if wind gusts or temperature limits are exceeded. You can customise the layout and display mode of the weather data from just an icon to full detail.
Full information:
{icon}{main}: {description}
 Wind: {wind} Gust: {gust}
 Temp: {temp} Feels Like: {feelsLike}
 Humidity: {humidity} UVI: {uvi}
Icon Only:
{icon}
One Line:
{main} {wind} {temp} {humidity} UVI: {uvi}
Raised Events: High Temp, Gust, Status
Supports: Video
Configuring Plugins
Ready to harness the power of plugins? Simply add a device (camera and/or microphone) and go into its edit settings. Look for the Plugins tab in the drop-down at the top right. Here, you can select your desired plugin and click the "..." button to configure it to your needs.
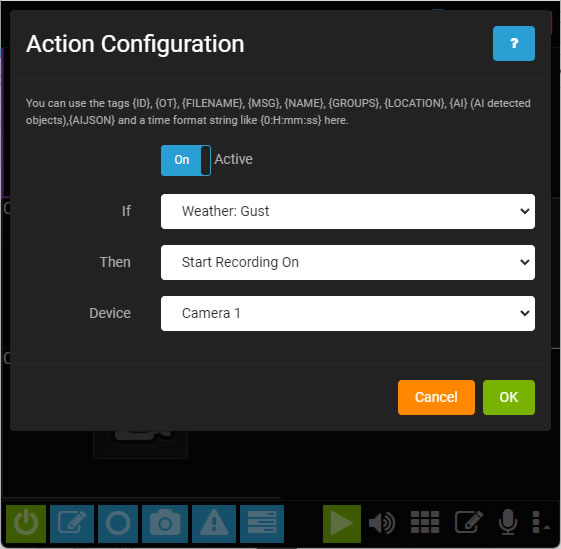
Some plugins raise events that you can attach actions to. The Weather plugin, for example, raises a Gust event when gusting winds exceed a specified value (configurable in the plugin). Editing the camera and navigating to the Actions tab gives you options to respond to this - sounding an alarm or starting a recording for example. Simply select the plugin name: event - ie Weather: Gust in the If select box and assign an action.

Create your own Plugin
Plugins are dynamic modules you can add to Agent DVR to enhance its audio and video processing capabilities. With plugins, apply real-time effects, overlays, raise events, and trigger alerts in Agent DVR, allowing for advanced custom actions.
To start creating plugins for Agent DVR, begin by cloning our open-source plugins at https://github.com/ispysoftware/AgentDVR-Plugins. You'll need a recent version of Visual Studio to build them.
We recommend starting with the demo plugin as your base. Ensure you have the latest version of Agent installed. After building the demo plugin, copy all files from the output folder to Agent\Plugins\Demo\. Restart Agent DVR, edit a camera, and head to the Plugins tab. Enable the plugin, select Demo from the dropdown, and click the "..." button to configure it.
The Demo plugin is fully cross-platform compatible and showcases the extensive functionality you can build with plugins. It includes live video effects, graphic overlays, live volume control, and integration with Agent DVR's Events subsystem. The plugin menu provides insights into how various input controls operate.
Plugin Notes for Developers:
Configuration:Agent DVR uses JSON and a class file for settings storage. To configure settings edit the config.cs file.
Agent DVR's configuration rendering rely on .json files. Edit config_en.json in the json directory for UI display, where you can add multiple sections rendered as tabs. The key 'bindto' fields in json link to the config fields. Agent DVR automates control rendering, settings storage, and updates.
Adding "live": true to json entries enables immediate updates without waiting for the OK button click, which is great for live tuning. The 'converter' field utilizes 'PopulateResponse' in Utils.cs for value formatting.
Media Support: Choose to process "video", "audio", or both. The 'Supports' field in Main.cs can be hardcoded.
Continuous Processing: Every video and audio frame from the device is sent to the plugin for analysis or processing, as demonstrated in the demo.
Motion/Alert Processing: Process frames on motion or alerts by utilizing the 'ProcessEvent' method in the demo plugin. This allows frame processing only during these events.
Custom Events: 'GetCustomEvents' method in your plugin should return a list of custom events it generates. These events then appear under Actions in Agent DVR UI's 'If' list. Trigger these events with a 'Result' item, specifying action name and optional MSG, Tag, Filename, and AIJSON.
Alert, Detect, and Tag: Raise alerts or detect events by adding a Result with "alert" or "detect" eventName. Tag ongoing recordings with a 'tag' eventName and set Tags as needed.
API Calls:Agent DVR initializes plugins with device info and local server port, useful for API commands for the device. The properties AppDataPath and AppPath are also set for display or file saving locations.
Distribution: Created a cool or useful plugin? Share it with us and contribute to the community!