User Interface: Time Line
Using the Time Line
To access the Time Line, click on the view menu in the top bar and select the Time Line icon.
The Timeline provides a straightforward way to visualize events in chronological order. Recordings from all devices are arranged sequentially. Swipe or click and drag with the mouse to navigate. To zoom, use the mouse wheel or pinch gestures. Click on an activity bar on the timeline to start playback, or on a camera thumbnail to initiate a mini live feed.
Note: The timeline only displays cameras with recordings; cameras without any recordings will not be shown.

The controls on the toolbar let you:
- Switch to the Time Machine at the current selected time
- Zoom out
- Zoom in
- Zoom reset
- Page left
- Page right
- Go to Now
- Quick Filter
- Filter
- Toggle display mode (by name or by location)
Filtering
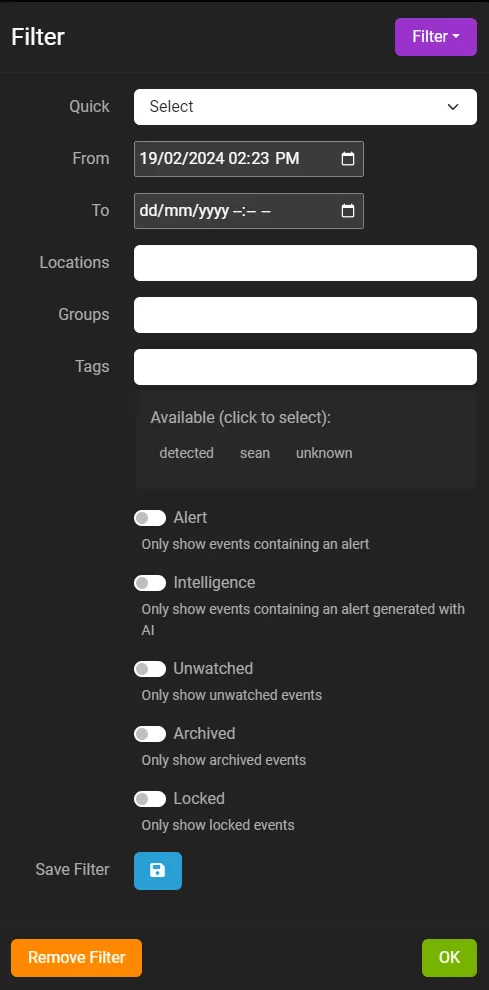
To manually filter recordings, click on the filter icon (magnifying glass) at the bottom right.

- From/ To: Select a date range for your search.
- Locations: Filter by locations. Add locations in the camera settings under the General tab.
- Tags: Enter tags like "person" or "cat" for filtering, especially useful if you've tagged recordings manually or with AI. 'Timelapse' is an auto tag for timelapse recordings.
- Alert: Check this to display only recordings containing an alert event.
- Intelligence: Filter to show only recordings with alert events generated by AI.
- Unwatched: Check this to display only recordings you haven't viewed yet.
- Archived: Check this to display only recordings that have been archived.
- Locked: Check this to display only recordings that are locked.
- Click the Remove Filter button to clear filters and display all files.
- Click the Save Filter button to save your filter settings. Access these quickly from the toolbar filter icon .
Motion Searching
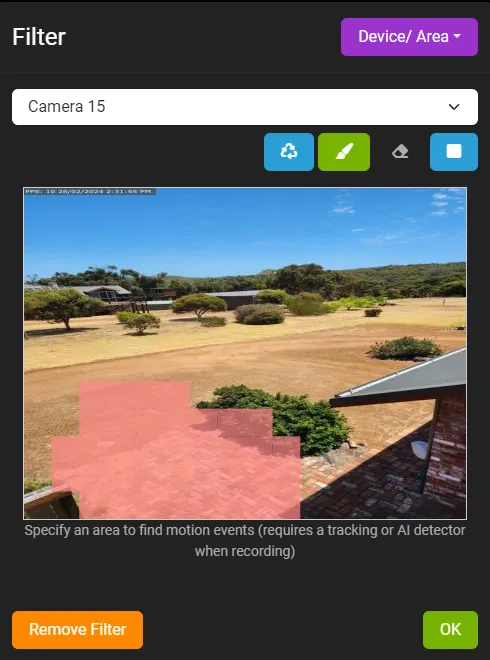
To search for motion in specific areas in your recordings, click on the filter icon (magnifying glass) at the bottom right and select "Device/ Area" in the menu.

- Device: Select a camera to search
- Area: Using the draw tools select an area to search for motion. The selected area is highlighted.
- Click OK to search through recordings for motion detected within the highlighted area.
Note: Motion searching is only available for recordings using a tracking motion detector, like object tracking, tripwires or speed - or an AI detector that returns area data (like CodeProject AI). Only applies to recordings created with v5.2.9.0+.
Tips and Tricks
- To start playback at a specific time, align the timeline's left-most timestamp with the desired time. Click on a recording underneath, and playback will start and seek to that point.
- Timelapse recordings are displayed alongside regular ones but occupy only half the height within the slot.
- Recordings are color-coded based on peak motion levels. Bright red bars indicate high movement.
- Zoom in enough, and Agent DVR will display thumbnails for recordings when space allows.
- Click on a recording to enter playback mode.
- A marker line appears on the timeline during playback, helping you track the last viewed recording for each device.
- If your screen is wide enough, Agent DVR shows live thumbnails of your devices on the left. Icons may also be displayed - see recordings for icon details.
- Click on a live device thumbnail (if shown) for a mini live feed. Drag this feed around the screen as needed. Click the thumbnail again to exit the mini-player.
File Merge Tags
Available tags for filename merging:
- {ID}: The ID of the device.
- {TYPE}: The type ID of the device (1 = microphone, 2 = camera).
- {NAME}: The name of the device.
- {0:yyyy-MM-dd_HH-mm-ss_fff}, {0:MM-dd}: Any valid date-time formatter.
Examples of date-time formatters:
-
{0:yyyy-MM-dd_HH-mm-ss_fff}: e.g.
2026-01-07_14-32-05_123 -
{0:MM-dd}: e.g.
01-07 -
Example filename:
{NAME}_{0:yyyy-MM-dd_HH-mm-ss}.mp4→FrontDoor_2026-01-07_14-32-05.mp4