AI: Servers
About
Agent DVR integrates fully with AI servers like DeepStack AI, CodeProject AI, PlateRecognizer.com, Claude, Gemini, OpenAI (ChatGPT) and local LLMs like Ollama, vLLM and LM Studio to add smart alert filtering, object recognition, scene recognition and intelligent event control.
In addition to DeepStack and CodeProject AI, you can also use other AI servers that support the same API:
Object Recognition & Computer Vision
- https://codeproject.github.io/ - Cross Platform GPU/CPU based AI Processing Server
- https://docs.platerecognizer.com/ - License Plate Recognition Server (Web based API)
- https://github.com/runningman84/docker-coral-rest-server - Tensorflow-lite models on an RPi (or Linux/Mac) with acceleration from Coral USB stick
- https://github.com/robmarkcole/coral-pi-rest-server/ - Tensorflow-lite models on a Coral USB accelerator via a Flask app
- https://xnorpx.github.io/blue-onyx/ - Blue Onyx Object Detection Service
Cloud AI Services
- https://platform.openai.com/ - OpenAI API (ChatGPT, GPT-4 Vision) for image analysis and chat
- https://console.anthropic.com/ - Anthropic Claude API for advanced reasoning and image understanding
- https://ai.google.dev/ - Google Gemini API for multimodal AI capabilities
- https://docs.anthropic.com/ - Claude API Documentation
- https://platform.openai.com/docs/ - OpenAI API Documentation
- https://ai.google.dev/gemini-api/docs - Gemini API Documentation
Local AI Servers (LLMs)
- https://ollama.com/ - Ollama: Run large language models locally
- https://docs.vllm.ai/ - vLLM: High-throughput LLM inference and serving
- https://lmstudio.ai/ - LM Studio: Easy-to-use desktop app for local LLMs
- https://github.com/ollama/ollama - Ollama GitHub repository
- https://github.com/vllm-project/vllm - vLLM GitHub repository
Adding AI models
To add your own model files into Agent DVR, go to Server Settings > AI Settings and click Configure under AI Models. Agent comes with two pre-built models that have been performance tuned for Agent DVR.
Before you configure a model, you will need to add it to Agent DVR's Models folder (see building AI models). This is usually found at Agent/Media/Models/ONNX (path may vary by OS). The full path is displayed on the Add Model page if you are unsure. Agent uses .onnx models. You can convert other AI model formats to ONNX using Python tools.
Once you've built and copied the model, adding it to Agent is easy - click to add a model:
- Name: Give your model a name - this can be anything you like.
- Model File: Select the model filename you copied into the folder.
- Labels: Enter a list of labels (or "classes") that your model looks for in CSV format without quotes (spaces are automatically trimmed).
- Layout: Select whether your model is NCHW or NHWC. Most models are NCHW if you are unsure.
- Channel Order: Select if your model wants images in RGB or BGR. Most models use RGB. If your model is single channel (grayscale) this will be ignored.
- Normalize: Select how the data should be normalized before it's used in your model. Most models use 0-1 normalization (divide pixel values by 255).
- Pad Image: This controls whether the image should be stretched to the input dimensions or padded with black bars. Usually it's better to pad images for accuracy.
- Has NMS: Check this if your model already performs Non-Maximum Suppression internally. Otherwise Agent will perform NMS itself. NMS controls how result rectangles are filtered.
- Default NMS: Set the overlap limiter for NMS (default is 45% overlap).
Once you have added your model, it will be available for use in your device's Object Recognition tab. If you have problems, you can come back to the model configuration and make changes. Agent also supports reloading the model file, so you can copy over it with a new version while it's running.
Setting up AI Servers
To set up AI Servers, click on the icon at the top left of the main Agent DVR UI. Then click on Settings under Configuration, select AI Settings from the dropdown menu, and click Configure under AI Servers.
Agent DVR integrates with CodeProject.AI for various AI features including object recognition, face recognition, ALPR (Automatic License Plate Recognition), and super resolution (enhance). PlateRecognizer.com is also supported as an ALPR provider. CodeProject.AI is open source, free, and compatible with most platforms.
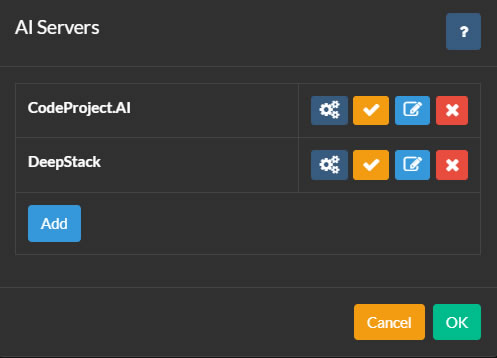
To start, install an AI server for your platform and connect Agent DVR to it by clicking the Configure button and then Add.
You can add as many AI servers to Agent DVR as needed. Cameras in Agent DVR can be configured to use different AI servers for each function, or you can use one AI server for all tasks.
Configuring your Server
- Name: Name your server, e.g., Cat Catcher.
- AI Server URL: Enter the URL of your AI server, e.g., http://localhost:32168/
- API Key: Enter your key if set up (optional).
- Timeout: The timeout in seconds for server requests.
- Retry delay: The time in seconds before retrying a failed request to this server.
Click OK to save your settings.
Using OpenAI
To set up OpenAI ("Chat GPT") to answer questions about what's happening in your video feed, navigate to Server Settings - AI Settings and select "Open AI" under Ask AI.
- URL: Enter the URL for the service. The default is "https://api.openai.com/v1/chat/completions".
- OpenAI API Key: After registering with OpenAI, go to the API Keys Page and generate a new secret key. Copy and paste this key into the specified field.
- Model: Specify the model to be used. The default is gpt-4o. OpenAI may remove or change this at a later time.
- Max Tokens: This sets the maximum token usage per request. If you encounter issues, check the logs at /logs.html as it could be related to token usage.
Once OpenAI is configured, refer to Ask AI for instructions on how to use it for answering general questions about what's happening in your camera feed.
Using Claude
To set up Claude AI to answer questions about what's happening in your video feed, navigate to Server Settings - AI Settings and select "Claude" under Ask AI.
- URL: Enter the URL to the service. Default is "https://api.anthropic.com/v1/messages".
- Claude API Key: After signing up for Claude, visit the API Keys Page and create a new secret key. Copy and Paste this key into the field.
- Version: Specify the version to use. The default is 2023-06-01 This may be removed or changed at some point by Anthropic.
- Model: Specify the model to use. The default at time of writing is claude-3-sonnet-20240229.
- Max Tokens: This controls the maximum token spend per request. Check the logs at /logs.html if you have issues as it might be related to token spend.
Once Claude is configured see Ask AI for how to use it to recognise general scenarios in your camera feed.
Using Gemini
To set up Gemini to answer questions about what's happening in your video feed, navigate to Server Settings - AI Settings and select "Gemini" under Ask AI.
- URL: Enter the URL to the service. Default is "https://generativelanguage.googleapis.com".
- Gemini API Key: After signing up for Gemini, visit the API Keys Page and create a new secret key. Copy and Paste this key into the field.
- Version: Specify the version to use. The default is v1beta This may be removed or changed at some point by Google.
- Model: Specify the model to use. The default at time of writing is gemini-1.5-flash.
- Max Tokens: This controls the maximum token spend per request. Check the logs at /logs.html if you have issues as it might be related to token spend.
Once Gemini is configured see Ask AI for how to use it to recognise general scenarios in your camera feed.
Using Other LLM servers
From v6.5.3.0+ you can use your own local LLM servers (like vLLM, Ollama, and LM Studio) to describe the images Agent DVR captures from your cameras in Alert events and answer questions about what's happening in your video streams. See AI Describe and Ask AI.
To configure a local AI server, go to Server Settings - AI Settings and click the Configure button next to the LLM you want to use (Ollama, vLLM, or LM Studio).
- URL: Specify the endpoint where your LLM server is running. Default URLs are:
- Ollama:
http://localhost:11434/api/chat - vLLM:
http://localhost:8000/v1/chat/completions - LM Studio:
http://localhost:1234/v1/chat/completions
- Ollama:
- API Key: If your LLM server requires authentication, enter the API key here. Most local servers don't require this unless specifically configured.
- Model: Select the vision-capable model to use for image analysis. You must have already downloaded and loaded this model in your LLM server. Popular choices include:
- LLaVA models (general purpose vision)
- Qwen2-VL (high performance)
- Llama 3.2 Vision (Meta's latest)
- Temperature: Controls creativity vs. accuracy in responses (0.0-1.0). Lower values (0.3-0.4) produce more factual, consistent descriptions. Higher values (0.6-0.8) generate more varied, creative responses. Recommended: 0.4 for security camera analysis.
- Max Tokens: Maximum number of words/tokens in the AI's response. Higher values allow more detailed descriptions but take longer to generate. Recommended: 300-500 for detailed image analysis, 150-250 for brief descriptions.
- top_p: Controls response diversity by limiting vocabulary selection (0.0-1.0). Lower values use more common words, higher values allow more varied vocabulary. Recommended: 0.9 for good balance of accuracy and natural language.
- top_k: Limits the model to choosing from the top K most likely next words. Lower values (20-40) produce more focused responses, higher values (80-100) allow more variety. Recommended: 50 for reliable image descriptions.
Using PlateRecognizer.com
To configure LPR (ANPR or License Plate Recognition) in Agent DVR, go to Server Settings - AI Settings and enter the details under Plate Recognizer. Sign up for a Free Trial at Plate Recognizer. No credit card required.
- URL: Enter the URL to the service. Default is "https://api.platerecognizer.com/v1/plate-reader/", or use your own server if hosting your own instance.
- Token: After signing up for Plate Recognizer, visit the Account Page and copy the API Token.
- Regions: Leave blank for default or enter a CSV list of regions.
- Config: Enter additional configuration values from the docs if needed.
Using DoubleTake
DoubleTake is an open source platforma that provides a unified API for processing facial recognition using:
- CompreFace
- Amazon Rekognition
- DeepStack
- CodeProject.AI Server
- Facebox
You will need in install and configure DoubleTake with your preferred facial recognition options.
Once DoubleTake is set up, open Agent DVR and go to Server Settings - AI Settings and click the Configure button next to DoubleTake.
Enter the URL to your doubletake server (e.g. http://localhost:3000/) and your password if set up.
Click OK then edit a camera and go to Face Recognition. Set the AI Server option to DoubleTake and configure facial recognition as needed.
Managing AI Modules
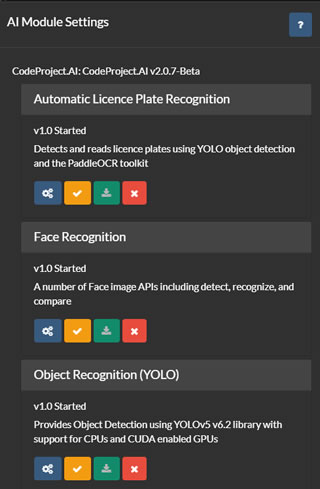
In the AI server list (referenced above), you have options to configure, test, edit, and remove AI servers. Click on the configure button to display the modules available or installed on the selected server.
Agent DVR retrieves the current module list from your server and offers a user interface for installing, uninstalling, configuring, and testing each module. Support is provided for all default CodeProject.UI modules, although Agent DVR only utilizes a subset of these.
To utilize ALPR (Automatic License Plate Recognition), Super Resolution, or Face Recognition in Agent DVR, you will need to install the respective module from this page. Typically, default settings suffice for these modules, but you can configure them by clicking on the icon under each module.