Configuration: Editing Cameras
About
Click on the Server icon at the top left of the Agent DVR UI and select "Edit Devices" under Devices. Choose the device you wish to edit and click the Edit icon . Alternatively, in the Live View, click a camera to select it and then click the edit icon on the bottom toolbar (or press the shortcut key "E"). On Desktop, you can right-click the camera in the Live View or anywhere in Agent DVR where there is a live thumbnail, like the timeline.
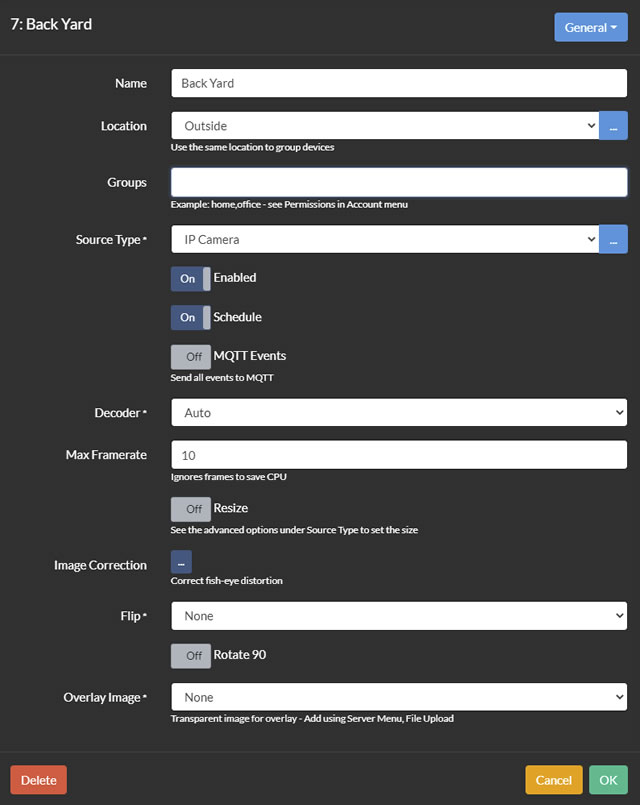
This is the main interface for configuring your devices. Displayed at the top are your object ID (in this case, 7), the device name (Back Yard), and on the right, the main device menu which grants access to all configurable areas, referred to as tabs. The ✨ next to some of the settings indicates that changes to these settings apply immediately, without needing to click OK.
General
This tab provides access to general and frequently used settings.
- Name: Give your camera a descriptive name, like "Office" or "Back Yard".
- Enabled: Controls whether the camera is active in Agent. Note: This does not power down your device unless it's a USB camera.
- Decoder: Moved to Advanced Video Source Settings.
- Source Type: Choose how Agent DVR connects to your devices. See Video Source Types. Click the button to the right of the drop-down to configure it.
- Location: Manage locations with a button click. Add locations like "Main House" and assign a color and GPS location to them. When devices are assigned to locations, they will be color-coded in the live view.
- Groups: Used in Remote Permissions and Local Users.
- Icon: Choose an icon for your device (used on the floorplans).
- Device Color: This color is used in the time machine view to link the timeline to the playback view.
Adjustments
This tab provides access to various adjustments for the live feed. Note: On v4980+ these options are merged with the General tab.
- Max Framerate: Use this to make Agent DVR ignore frames, reducing CPU usage.
- Resize: Check this to have Agent DVR resize frames. Set the resize size by clicking the button next to "Source Type", selecting "Advanced" tab, and setting Width and Height.
- Width and Height: Set the resize size. To apply, disable and re-enable the camera.
- Image Correction: Click the button to set the mode, focal length, limit, and scale for converting fisheye and 360 cameras into regular rectangular views. Use the virtual cameras option to create multiple virtual cameras from fisheye video feeds. Virtual cameras support independant digital PTZ.
- Flip: Vertically or horizontally mirror the live video, useful if your camera is mounted upside down.
- Rotate: Rotates the video through 90 or 270 degrees, useful for sideways-mounted cameras.
- Overlay Image: Provide a transparent .png file via - Upload, and Agent DVR will overlay it on your camera stream.
- Fill Mode: Controls how the camera renders in live view - Use Default: use the setting in Server Settings - Playback - Center Images. Center: maintain aspect ratio. Fill: fill the available space.
- Event Buffer: Specify time to buffer the live stream for events like push and email video. Agent DVR will buffer only if these features are in use. (v4.9.8.0+)
Actions
Tell Agent DVR what to do when various events occur, such as Alerts, devices being turned off, recordings finishing, etc. See Actions for more details.
Alerts
Alerts are generated by AI, motion detection and plugins. For more information, see Alerts.
Audio
Configure an audio device to pair with your camera (this is automatically configured if your camera has an audio stream). You can also configure an overlay audio display here.
Tip: Click to configure the microphone and you can change the colors of the audio display.
- Microphone: Click the button to associate a microphone with the camera. Once associated, the mic will provide audio for recordings and be enabled/disabled with the camera. Agent DVR will automatically add and pair a microphone control if your Camera has audio in its stream; otherwise, you will need to add a microphone to Agent DVR first via - Add Device.
- Ignore Audio: If your camera has its own audio stream (common in many IP cameras) and you don't want Agent DVR to use it, check this option. Enable and disable the camera to apply this change.
- Configure: Click to configure the associated microphone.
- Location: Select a location in the frame to draw the audio overlay.
- Display Style: Select a display style for the visual representation of the audio on the camera live stream.
- Show Background: Show a background color behind the audio.
- Width: Specify the width of the audio control.
- Height: Specify the height of the audio control.
Cloud
- Provider: Choose which cloud provider to upload to - see - Settings - Cloud to configure cloud providers.
- Path: This is the path that Agent DVR will upload to. For example, [MEDIATYPE]/[NAME] will upload video to Video/somefilename.mp4 (the actual filename is set on the recording tab).
- Upload Recordings: Check this to automatically upload recordings.
- Upload Photos: Check this to automatically upload photos.
If you have issues with cloud uploads, please check the logs on the local UI at /logs.html.
Detector
For detailed information on motion detection, see Motion Detection.
FTP
FTP recordings or photos to your FTP servers. You can also set up basic live streaming using FTP and a bit of JavaScript. See Server FTP Settings.
Photos
- Enabled: Switch on or off Photo upload.
- Server: You will need to add your FTP server into - Settings - FTP and then select it in this list.
- Mode: Choose between Motion, Alert, Interval, or None. Motion and alert only send images when something is happening. Interval will constantly send images to your server. Use None if you want to only trigger FTP images via the API.
- Interval: The minimum time between frames when mode is set to Interval.
- Delay: The minimum time between frames when mode is set to Motion or Alert.
- Quality: This sets the quality of the jpeg image. Lower quality has a smaller file size.
- Overlay Text: Optionally add some text to the image.
- Filename: The filename that gets saved to the server, for example, {C}.jpg or myfiles/{C}/frame.jpg. You can use a template date format here or the special {C} which substitutes in a counter value. For example, if Counter Max is 20, you will get 0.jpg, 1.jpg, 2.jpg ... 20.jpg, and then 0.jpg uploaded. You can also use {NAME} to merge in the device name (v4.4.7.0+).
- Counter Max: The maximum value for {C} - once this is reached, it resets to 0.
- Invert Counter: {C} stays at 0 (so the newest image is always 0) - existing files get progressively renamed up to Counter Max. Note that if your filename includes a date-time formatter, this may not work correctly.
Video
- Enabled: Switch on or off Video upload.
- Server: You will need to add your FTP server into - Settings - FTP and then select it in this list.
- Filename: The filename that gets uploaded to the server excluding the file type extension (e.g., .mp4), for example, {C}. You can use a fixed filename like "myvideo", a template date format, or the special {C} which substitutes in a counter value. For example, if Counter Max is 20, you will get 0.mp4, 1.mp4, 2.mp4 ... 20.mp4, and then 0.mp4 uploaded. Agent DVR will append the file extension as it can vary depending on what format it is recording to.
- Counter Max: The maximum value for {C} - once this is reached, it resets to 0.
FTP Image Streaming
If you want to display the images you are uploading on a website, you can use this script (you'll need to modify the _targetimage variable to point to the image you are uploading). This will only work if you have specified a fixed filename to your uploaded image, like "myimage.jpg" (i.e., it continually overwrites the same file).
Mask
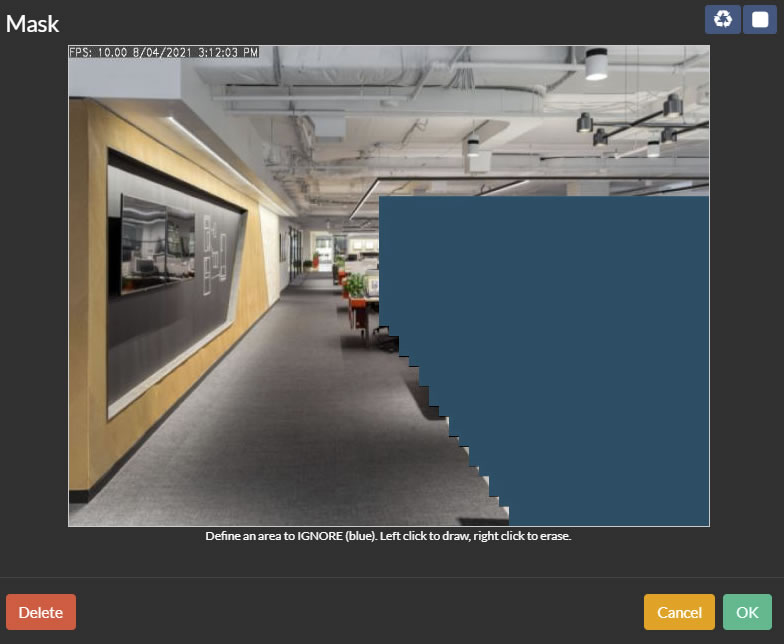
This feature offers a straightforward method to conceal areas in your video that you prefer to keep private. Activate the 'Enabled' switch and use the provided tools above the preview video to create blackout areas. Keep in mind, you'll need to encode your recordings (see our Recording section) to ensure the mask is applied to your recorded videos.
MQTT
Utilize actions to transmit messages via MQTT, or alternatively, enable the option in this tab to automatically forward all events to your MQTT server for streamlined communication and monitoring.
- MQTT Events: Toggle this on to activate or deactivate the magic of automatic MQTT event packets. Agent DVR will send these directly to your MQTT server - no manual setup needed! Just make sure you have an MQTT server configured and you're good to go!
Photos
The Photos feature stores captured images locally, making them accessible through the Agent DVR User Interface. For more details on how to utilize this feature, please refer to our Photos guide.
- Enabled: Toggle to turn Photo saving on or off.
- JPEG URL: (Optional) Set a URL to have Agent DVR download a snapshot from your camera, instead of using the decoded video stream.
- Mode: Choose from Motion, Alert, Interval, or None. 'Motion' and 'Alert' save images based on activity, while 'Interval' saves images continuously. Use 'None' if you prefer saving photos only through the API.
- Interval: The minimum time between frames in 'Interval' mode.
- Delay: Set the minimum time between frames for 'Motion' or 'Alert' modes.
- Quality: Adjust the jpeg image quality. Lower quality means smaller file sizes.
- Overlay Text: Add optional text to your image.
- Filename: Specify the filename format for saved images. Use a date template or {C} for a counter value. For instance, with Counter Max at 20, files will be named 0.jpg, 1.jpg, ... 20.jpg, and then start over at 0.jpg.
- FTP: Upload images to your FTP server as per the settings in the FTP tab (v4.0.0.1+).
- Counter Max: Set the maximum value for {C}. Once reached, it resets to 0.
PiP (Picture in Picture)
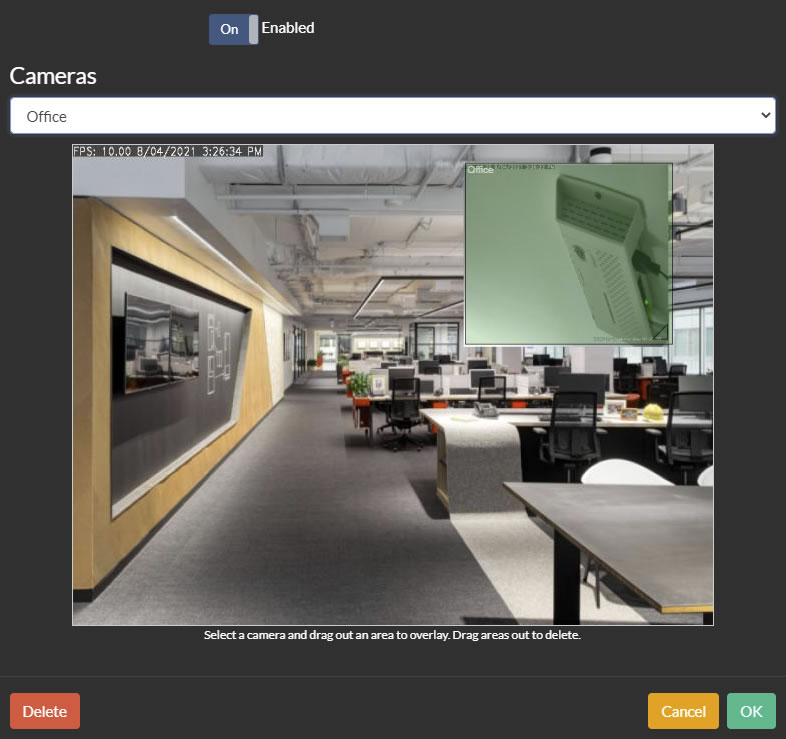
This tool allows you to overlay multiple camera feeds onto a single display. To activate, select 'Enabled', choose a camera from the dropdown menu, and draw a rectangle on the preview video. You can resize and reposition this rectangle by dragging the bottom right corner or the entire frame. To remove an overlay, simply drag it out of the preview area. This intuitive feature offers a streamlined approach to managing multiple camera views.
- Apply Zoom: Apply zoom rectangle to the embedded video. Tip: To apply a zoom to the embedded video without modifying the original camera add a clone of the camera and zoom that instead.
- Opacity: Set the opacity of the embedded video (may have a small performance hit).
Plugins
Agent DVR is equipped to handle both video and audio plugins, enabling external applications to process media in real time and generate alerts and detection events. Plugins can be installed through the remote website portal at ispyconnect.com. Navigate to - Plugins for installation. If you're interested in developing custom plugins, please refer to our plugins guide.
PTZ (Pan, Tilt and Zoom)
Agent DVR provides robust support for multiple PTZ (Pan, Tilt, and Zoom) devices. The user interface for controlling PTZ can be found on the Live View page.
- Model: Select the camera model you are using. Choose 'Digital' for digital-only cameras. If selecting 'ONVIF', ensure your source type on the General tab is set to ONVIF and properly configured.
- Pelco: Access Pelco Settings for communication configuration with your Pelco device.
- ONVIF: Adjust the speed for ONVIF PTZ commands. Toggle angular PTZ control support if your device doesn't support dual-axis movement. Note: If your camera moves continuously or behaves unusually with ONVIF, disabling angular controls might resolve the issue. Some ONVIF devices operate with simple up/down/left/right commands.
- PTZ URL: Usually left blank so Agent DVR uses your IP camera URL to send commands, but it can be overridden here if necessary.
- Calibration Delay: To prevent false alerts, Agent DVR ignores motion events for a brief period when PTZ is used, as camera movement might trigger the motion detector.
- Port: Set this to the port your camera uses for its web interface (commonly port 80).
- Channel: Optionally set the channel number to match your camera's channel.
- Username: Override the camera username (leave blank to use the default username).
- Password: Override the camera password (leave blank to use the default password).
- Flip: Mirror the controls horizontally, vertically, or both.
- Rotate: Rotate the control orientation by 0, 90, or 270 degrees, useful if your camera is mounted sideways.
- Zoom Out Delay: Automatically zooms the camera back out after a period of time to ensure it doesn't remain zoomed in. Set to 0 to disable this feature.
Adding PTZ Support for Unlisted Cameras
Agent DVR uses a JSON file to control PTZ cameras (called "PTZ.json"). You can find this file in the folder:
Agent/
You can have a go at adding support for your camera (if you're technically minded) by editing this file. Some key points to consider:
- If you modify this file you'll need to restart Agent DVR to load in the changes
- Use Fiddler to find the commands your camera takes to control PTZ (by using the existing web interface at the same time fiddler is running).
- Check the existing entries for matches against what you see in Fiddler. Chances are another model will be compatible.
- Make sure you specify a new, sequential ID in the Camera entry
- The CommandURL entry is relative to the network address of your camera, so shouldn't start with http://... it should start with /
- The entries for the PTZ directions (Left,LeftUp etc) get appended to the querystring in CommandURL. Agent DVR automatically builds the URL.
- To test your changes make sure you remember to edit the camera and change the PTZ mode to your new entry.
- If you get it working please send it to us so we can include it in future versions of Agent DVR (and make it available to download as an update).
PTZ Scheduler
The PTZ Schedule feature in Agent DVR allows you to create a daily list of scheduled commands for your PTZ camera. This functionality is designed to facilitate complex patrol movements. For instance, you can configure a schedule to move the camera to position 1 every 300 seconds (5 minutes), starting at 12:00:00, and repeat this 12 times for a total duration of one hour. You can then create similar entries for positions 2, 3, and so on, starting at 12:01:00, 12:02:00, etc., to establish an hour-long, dynamic patrol schedule for your camera.
-
PTZ Scheduler
PTZ Schedule: Enable or disable the PTZ schedule feature.
- Suspend on Move: Pause the PTZ schedule for a specified number of seconds if the camera's PTZ controls are used manually.
- Suspend on Motion: Temporarily halt the PTZ schedule if motion is detected.
- Configure: Access the PTZ Scheduler configuration via the PTZ Scheduler link.
PTZ Patrol
The PTZ Patrol feature offers a streamlined approach to setting up camera patrols. Simply add a series of patrol points along with their respective durations (the time in seconds the camera should remain at each point). Activating the patrol function enables the camera to automatically cycle through these points.
This feature can be easily enabled or disabled using the device scheduler.
-
PTZ Patrol
PTZ Patrol: Toggle the PTZ Patrol function on or off (available from v4.4.2.0+).
- Configure: Access the PTZ Patrol settings guide.
PTZ Patrol Settings
The PTZ Patrol system lets you add a sequence of PTZ commands with a delay between each position. When enabled Agent DVR will cycle through these positions in order.
Note that the camera may need to be enabled to display a list of available commands
The Patrol system uses the settings under PTZ Schedule settings to pause the patrol if motion is detected or if the camera is moved manually.
Note that the camera moving can trigger motion detection. Check the motion timeout setting on the detector tab.
This feature can be easily enabled or disabled using the device scheduler.
PTZ Tracking
Tracking functionality in Agent DVR employs an object tracker to identify moving objects within the camera's view and then uses the PTZ controller to follow them within the scene.
- Enabled: Activate or deactivate the PTZ tracker.
-
Configure: Configure the PTZ tracker settings:
Tracking
- Tracking Mode: Select from options such as Any Direction, Horizontal, or Vertical.
- Reverse: Inverse tracking direction. For example, if movement is detected to the right, the camera will move left, which can be helpful for capturing fast-moving events like traffic.
- Track Stop Delay: Set the duration for the camera to pause and recalibrate before moving again during tracking.
- Auto Home: Configure the camera to return to a preset 'Home' position after movement is no longer detected, if your camera supports a home command.
- Home Command: Select the specific Home Command for your camera to use for the Auto Home feature.
- Auto Home Delay: Determine the wait time after movement ceases before initiating the Home command.
Recording
Agent DVR offers a variety of recording modes, including motion detection, alert, group detection, group alert, manual command, or schedule. IP cameras often provide two streams: a low-resolution live stream ideal for motion detection and live viewing, and a high-resolution main stream suitable for raw recording. For optimal performance, configure your IP camera sources (under General - Source Type) in Agent DVR with these two streams. Agent DVR utilizes the high-resolution stream for direct recording, bypassing the need for CPU-intensive decoding and encoding.
To record based on Group Detection and Group Alert, specify the group in the Alerts tab.
If only one stream is available, Agent DVR can record it raw as well, reducing CPU usage by avoiding encoding. Ensure the Encoder is set to Auto for this. If playback issues arise, switch the Encoder to GPU or CPU and remove the main record URL from the Source Type configuration.
In raw recording mode, overlays (such as masks, overlay images, timestamps, etc.) will not be visible on recordings, as Agent DVR saves the raw video from the camera directly. To include these elements, encode using GPU or CPU and remove the main stream setting from the Source Type.
- Mode: Options include Alert, Detect, Group Alert, Group Detect, Manual, Constant or Disabled. Alert records during Alert events (see Alerts). Detect records when movement is detected. Group Alert and Group Detect record when any devices in the camera's group alert or detect. Manual records on command or via schedule, and can record continuously. Disabled prevents all recordings. Manual recording is available in all modes except Disabled. Constant Record will always record (you won't be able to stop recording via the live UI).
- Encoder:
Important: We don't encode the raw recording stream because to encode we first need to decode the stream. If we are decoding the raw record stream then it's more efficient to just use it as the live stream.
Choose a recording method:
- Raw Live Stream: Saves the raw data from the camera's live stream. Minimal CPU usage. Doesn't include overlays or masks. Only works with FFmpeg sources (like IP Camera or Onvif). Other sources will use Encode.
- Raw Record Stream: Saves the raw data from the camera's record stream. Minimal CPU usage. Doesn't include overlays or masks. Only works with FFmpeg sources (like IP Camera or Onvif). Other sources will use Encode.
- Encode: Encodes the Live stream to a video file. Includes overlays and masks. If you want high resolution recordings then set the Live stream to a high resolution endpoint on your camera.
- Motion Adaptive Encode: This will encode at a low framerate unless motion is detected.
See Advanced Settings for encoding options. Note that Raw recording supports instant playback (watch whilst you record). Encoded files need to finish saving before they are playable.
- Max Record Time: Maximum recording duration before starting a new file.
- Min Record Time: Minimum recording duration.
- Inactivity Timeout: Duration to continue recording after motion or alert triggers cease.
- Buffer: Pre-record buffer time in seconds, dumped to disk when recording starts.
- Max Framerate: Maximum framerate for encoding, affecting CPU/disk usage and quality.
Advanced Settings
- Use System Clock: Use system clock for frame timestamps to address out-of-sequence timestamps from some cameras, which might cause packet loss. This may result in choppy playback.
- Use GPU: Enable GPU usage for file encoding (requires Encoder to be set to Encode).
- Codec: See Encoding.
- GPU Encoder: Select the hardware GPU encoder to use. Default uses the general setting.
- Encode GPU: Specify the GPU index for video stream encoding if multiple GPUs are available.
- Adaptive Framerate: Motion Adaptive Encode records at a low framerate without audio when there's no motion and at a higher rate with audio when movement is detected, conserving disk space while maintaining a continuous record.
- Apply Transforms: Apply flip and rotate transformations to raw recordings. This can increase CPU usage, especially for high-resolution cameras.
- Filename: Enter a template filename, excluding the file type extension. Agent DVR adds the extension based on the encoder used. The default is {id}_{0:yyyy-MM-dd_HH-mm-ss_fff}. See merge tags.
- Save Thumbnails: By default Agent DVR saves a small and a large thumnail for each recording (taken at the point of maximum movement if you have a motion detector running). This is used to display images for recordings in the UI.
- Trigger Timeout: Duration to keep recording from a "Trigger Recording" action. This resets with every action call. (v4.3.7.0+)
- Reduce: Reduce the size of the encoded video file (v5.3.1.0+)
- Quality: Recording quality setting, applicable only to encoded video.
Encoding
By default Agent DVR will save the raw stream from your camera when possible - this minimizes the CPU usage of the application but has some drawbacks (no overlays or masks are written to the file). To encode instead set the Encoder in recording settings to Encode and then expand the Advanced section at the bottom to configure the encoder.
Agent DVR supports encoding to H264, H265 (see terms, section 26), VP8 and VP9. H264 is the default but you may get less disk space usage with other codecs potentially at the cost of higher CPU usage. If you have GPU enabled and hardware available Agent DVR will attempt to use it for generating files. Check the logs at /logs.html to check if Agent DVR has managed to use the hardware device and make sure via task manager that it's not using too much CPU. If it is you might need to adjust the encoder or resolution of the source video.
RTMP
Configure the specific RTMP server you wish to use for streaming this device.
- RTMP Server: Choose an RTMP server from your server settings for live streaming this device to external platforms. 'Default' will select the first available server.
Schedule
Manage your camera's recording times with scheduled entries that can enable or disable the camera, start or stop recording, and modify various settings on a weekly calendar or specific dates (version 4.4.4.0+).
Tip: By enabling "Apply Schedule at Start" in - Settings - General, Agent DVR will automatically configure your devices according to the set schedule upon startup. Without this setting enabled, Agent DVR will start with the devices in their last known state.
To add a new schedule entry, edit your camera, navigate to the 'Schedule' tab, click 'Configure', then 'Add':
- Enabled: Activate this schedule entry by checking this option. Active entries are indicated with a green tick in the Schedule summary, while inactive ones have an X.
- Type: Choose between a specific time, sunrise, or sunset. For sunrise or sunset options, assign a location with GPS coordinates on the General tab for accurate time calculations.
- Offset: When using sunrise or sunset, set an offset time in minutes from the calculated time (available from v4.0.0.1+).
- Time: Specify a local time for the schedule entry (not applicable if sunrise or sunset is selected).
- Command: Select a command to execute. Options include Alert Action Run, which schedules alert actions at specific times (see Actions). From version 4.0.9.0+, there's also an option to adjust the sensitivity of the motion or sound detector on a schedule under Detector: Set Sensitivity.
- Date: Set a specific date for the action or choose which days of the week the schedule should run. Switch between modes by clearing any set date.
- Days: Choose which days of the week the schedule should be active. Selected days will be highlighted.
Storage
See Storage Settings
Talk
Agent DVR includes support for talk functions on various devices. To enable talk capabilities through the user interface, select the appropriate talk model. Access to the talk function is available in the Live View section.
To select the microphone to use in the UI click on the Account menu - UI Settings (v5.8.1.0+)
To select where talk is played back when using local playback (playback from the computer running Agent DVR) click on the - Settings - General and set the Talk Device option.
Timelapse
Agent DVR offers the capability to create timelapse recordings from your cameras or a sequence of images. These timelapse recordings are identifiable on the timeline as half-height bars and can be viewed in the recordings section, marked with a "TL" overlay. The generation of timelapses can be managed using the scheduler feature.
To solely save photos, set a Photo Frame interval. For generating timelapse videos, configure a Video Frame interval. For instance, setting a frame rate of 5 and a video frame interval of 60 seconds will produce a video playing at 5 frames per second, with each frame representing 1 minute of real time.
- Enabled: Enable or disable timelapse generation.
- Frame Rate: Set the frame rate for the generated video file, in frames per second (fps).
- Video Frame Interval: Specify the frequency for adding a frame to the video file (set to 0 to disable).
- Photo Frame Interval: Determine how often to capture a photo and save it to the grabs directory (set to 0 to disable).
- Save Every: Configure the interval, in minutes, to complete and start a new timelapse video file.
Timestamp
The timestamp options in Agent DVR allow you to overlay a timestamp (and optionally additional data) onto your live video streams. It's important to note that these timestamps will only be visible in your recordings if you are encoding them (using CPU or GPU, not raw recording from the device). For more information on encoding, refer to the Recording section.
- Formatter: Customize the content of your timestamp. From version 3.4.2.0, this supports multiline formatting and updates via the API. Available tags include:
- {FPS} - Displays frames per second.
- {0:G} - Shows date and time.
- {0:T} - Shows time only.
- {NAME} - Displays the camera name.
- {LEVEL} - Displays the motion detector level.
- {REC} - Indicates "REC" if the camera is recording.
- {RES} - Video resolution
- {SPACE}, {MEMORY}, {CPU} - Current system stats.
- {0:ddMMMyy} - Displays a custom date format.
- Text Color: Set the color of the timestamp text.
- Font Size: Adjust the font size of the timestamp (may require tuning for high resolution cameras).
- Outline Color: Choose the color for the outline of the timestamp text.
- Outline Size: Specify the size of the text outline.
- Back Color: Select the background color for the timestamp.
- Show Background: Toggle the background color of the timestamp on or off.
- Font Family: Select from available fonts on your system (version 3.4.2.0+, Windows only).
- Align: Choose the alignment of the text within its bounding rectangle.
- Bold: Option to make the timestamp text bold.
- GMT Offset: Apply an offset in hours to the date displayed in the timestamp.
- Location: Decide where in the frame to place the timestamp.
AI LPR
See LPR