AI: Configuration
AI Alert Filtering
To set up Alert filtering in Agent DVR, ensure you have an AI server configured and then follow these steps:
- Configure and enable a Motion Detector. For minimal CPU usage, use the Simple detector. Ensure at least one zone is defined to cover the area you want to monitor.
- On the Alerts tab, set the Mode to Actions Only and enable Alerts.
- On the recording tab, set the Mode to Alerts (if you want recordings)
- Enable Object Recognition on the Object Recognition tab. Set the mode to Motion Detected, select a model, and click Find to choose objects for detection, like Person, Dog, Car, etc.
- Go to Actions in the tab menu and add an Action for the event AI: Object Found.
Select zones to specify where to detect objects, like different zones for your driveway and the road. For instance, selecting the driveway zone will only trigger an alert if a car is detected there.
Under Tasks, click Add to create an Alert task. Click OK twice to confirm.
Agent DVR will process AI object recognition upon motion detection. If it detects a specified object in a chosen zone, it will trigger an action to raise an alert. Absence of zone selection will trigger alerts for any zone.
Set up alert filters similarly for LPR Recognition, Face Recognition, or Audio Recognition.
For constant AI object recognition without a motion detection trigger, set the Mode on Object Recognition to Interval. Monitor the impact on your hardware resources and adjust as needed.
You can configure multiple actions for different objects in various zones. Use the {AI} tag in actions to reference the detected object.
AI Filter Troubleshooting
If AI isn't effectively filtering your recordings, consider the following:
- Ensure the Find setting matches one of the Available options.
- Verify that the master alert switch at the top left of Agent DVR shows a closed padlock, indicating active alerts.
- Confirm that the recording mode is set to Alert and not Detect.
- Ensure the alert mode is set to Actions Only.
- Try lowering the Confidence level under Object Recognition.
- Check /logs.html for error messages, possibly indicating server issues or network blocks.
- Monitor AI server performance and ensure it's not causing system overload or timeouts.
- If AI detects all object classes, it may indicate GPU issues. Check GPU drivers or switch to a CPU-based AI module.
AI Object Recognition
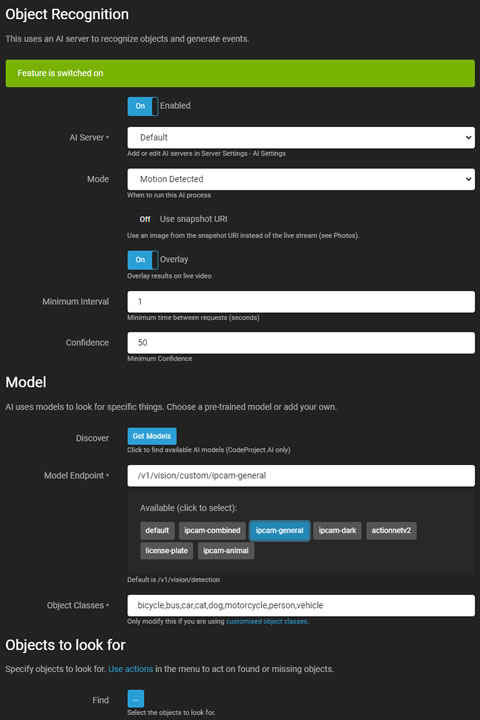
Object Recognition in Agent DVR uses an AI server (CodeProject.AI recommended) to recognize specific objects in video feeds and can generate events, raise alerts, or act as a filter on motion alerts.
- Enabled: Toggle to enable or disable the AI process.
- AI Server: Select from your configured servers, or use the default option.
- Mode: Choose the trigger for the AI process. Trigger via API only by setting this to None and calling triggerObject.
- Motion Pass-through: If the AI server is down and filtering alerts, this allows alerts to pass through without filtering.
- Use Snapshot URI: Use a high-resolution frame from your camera instead of the current live stream frame.
- Resize Mode: Resize images before sending them to the AI server to reduce load and improve response times.
- Overlay: Display AI results on the live video stream.
- Color: Color of the overlay. This setting controls the color of the overlay on all AI features.
- Minimum Interval: Set the minimum time between server requests.
- Confidence: Set the minimum confidence level to recognize an object.
- Check Corners: Refer to Checking Corners for more details.
Models
- Discover: Retrieve installed models from your server (specific to CodeProject.AI).
- Model Endpoint: Choose from available models or use the default endpoint.
- Object Classes: Automatically populated with relevant classes or manually entered.
- Find: Specify objects for the AI to detect.
- Ignore Static Objects: Ignore objects repeatedly found in the same location.
Custom Models
To add custom models to CodeProject.AI, copy the model file to the specified directory. Access it via the Discover button, but manually add the object list to Object Classes.
Change the directory for model storage by editing the Object Recognition module settings.
Actions
Object Recognition generates AI: Object Found and AI: Object Not Found events for use in Actions.
Photos
For information on photos, see photos.
AI Scene Recognition
Scene Recognition in Agent DVR uses an AI server (CodeProject.AI recommended) to recognize the general scene your camera is viewing and can generate events, raise alerts, or act as a filter on motion alerts.
- Enabled: Toggle to enable or disable the AI process.
- AI Server: Select from your configured servers, or use the default option.
- Mode: Choose the trigger for the AI process. Trigger via API only by setting this to None and calling triggerScene.
- Motion Pass-through: If the AI server is down and filtering alerts, this allows alerts to pass through without filtering.
- Use Snapshot URI: Use a high-resolution frame from your camera instead of the current live stream frame.
- Resize Mode: Resize images before sending them to the AI server to reduce load and improve response times.
- Overlay: Display AI results on the live video stream.
- Minimum Interval: Set the minimum time between server requests.
- Confidence: Set the minimum confidence level to recognize an object.
- Model Endpoint: You can override the default endpoint (/v1/vision/scene)
- Scene Classes: Leave this blank to use the default or override with your own if you are using a custom model.
Scenes to look for
Click the button to choose from 365 available scenes to look for. You can select multiple scenes to trigger alerts for.
Actions
Scene Recognition generates AI: Scene Recognised events for use in Actions.
Photos
For information on photos, see photos.
Ask AI
Agent DVR uses AI servers (OpenAI/ Claude/ Gemini/ Local LLMs like Ollama, LM Studio, vLLM etc) to answer human readable questions about the images from your cameras. This can then generate events, raise alerts, or act as a filter on motion alerts. You will need to complete the settings in Server Settings - AI Servers - Ask AI.
You can check the Logs at /logs.html on the local server to see when requests are sent. Set the Server Settings - Logging - Log Level to Info.
- Enabled: Toggle to enable or disable the AI process.
- Provider: Choose which AI provider you want to use to process images. The provider will need to be configured in server settings - AI servers. If you select Default then the first configured provider will be used.
- Mode: Choose the trigger for the AI process. Trigger via API only by setting this to None and calling triggerAskAI
- Motion Pass-through: If the AI server is down and filtering alerts, this allows alerts to pass through without filtering.
- Use Snapshot URI: Use a high-resolution frame from your camera instead of the current live stream frame.
- Resize Mode: Resize images before sending them to the AI server to reduce load and improve response times.
- Overlay: Display AI results on the live video stream.
- Minimum Interval: Set the minimum time between server requests.
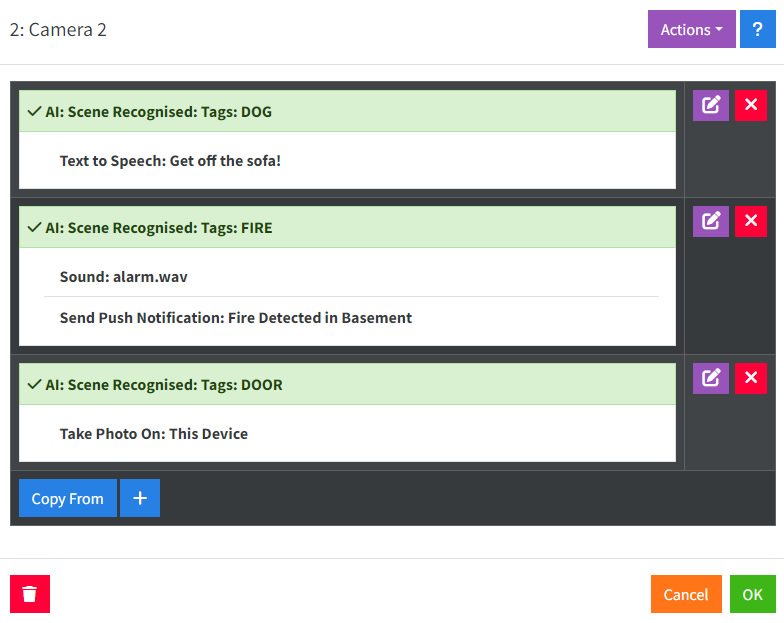
AI Messaging
- Message: Enter your question for AI here. Some examples:
- If you see fire in this image respond with FIRE. If you see a dog sitting on a sofa, respond with DOG. If the door is open respond with DOOR. If multiple conditions are met separate them with a ,
- If the light on the machine on the bench is red respond with ALERT
- If a police car is parked in the driveway respond with POLICE
- If there is any mail or packages on the floor respond with MAIL
- If it looks like someone has broken into my house respond with BREAKIN
- Find: Enter the tags that you have instructed AI to respond with. For example FIRE, DOG, DOOR
- No Repeats: Ignore tags that were returned in the last call to AI
As noted above you can ask for multiple conditions to be met in the message and setup actions to handle each result.
Actions
Scene Recognition generates Ask AI: Positive Result events for use in Actions.
Photos
For information on photos, see photos. Note that AI doesn't yet return any spatial data about where things are in the image so crop and static detection are currently not working.
AI Photos
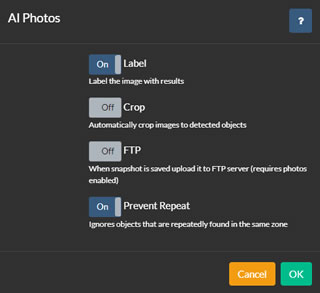
AI processes can capture photos when objects are recognized, offering options for saving, cropping, FTP uploading, and more.
To configure this, go to the Photos option at the bottom of each AI configuration tab when editing a camera. Enable Photos and click to configure.
- Label:Agent DVR overlays boxes on the image and labels the detected objects.
- Crop:Agent DVR crops the image to each detected area and saves multiple images, one for each region.
- FTP: Uploads the saved images to the camera's configured FTP server.
- Prevent Repeat:Agent DVR avoids saving multiple copies of the same object until it leaves the motion zone.
Ask AI: Describe
From v5.8.2.0+ you can use AI to describe the images Agent DVR captures from your cameras in Alert events. This description is then stored with the alert in the UI. To set this up configure Ask AI for your camera and see the option at the bottom under Describe.
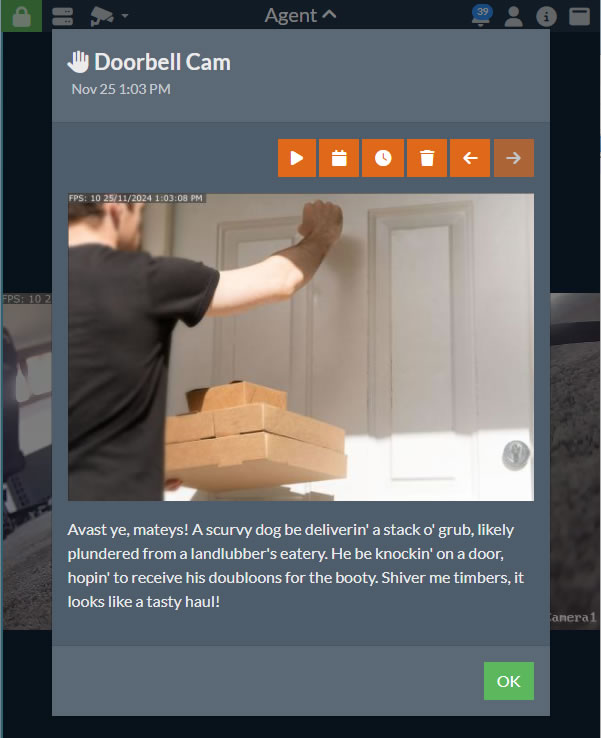
- Prompt: Enter the prompt to be sent to the AI server with your images. The default is "Describe in a short sentence what is happening in this image". You can have some fun with this though for example "Describe what is happening in pirate speak" As we used in the image above.
- Next go to the Alerts tab and check the option Describe.
Note that you will need Ask AI enabled. Set the Mode to None if you only want it to describe alert images
Once you've got it annotating your images you can integrate it with the Actions system for AI: Describe Response Received. You can use {MSG} and {AIJSON} in tasks from this action for other integrations.
LPR or ALPR
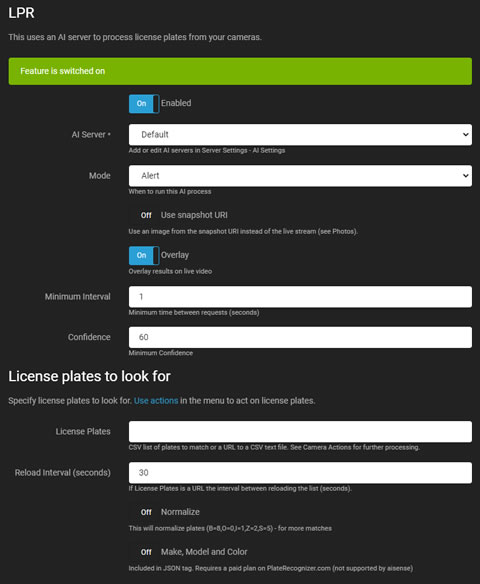
LPR (License Plate Recognition, also known as ALPR/ ANPR) utilizes an AI server to recognize and read license plates from cars in your video feeds. It generates events, raises alerts, or acts as a filter on motion alerts.
- Enabled: Toggle to enable or disable the AI process.
- AI Server: Choose from your configured servers or use the default option. Agent DVR supports LPR via CodeProject.AI, PlateRecognizer.com, Gemini or any OpenAI compatible vision LLM (like vLLM, Ollama and LM Studio).
- Mode: Choose the trigger for the AI process. Trigger via API only by setting this to None and calling triggerLPR.
- Use Snapshot URI: Opt for a high-resolution frame from your camera instead of the current live stream frame.
- Overlay: Overlay AI results onto the live video stream.
- Minimum Interval: Set the minimum time between server requests to reduce load.
- Confidence: Define the minimum confidence level to recognize a license plate.
- Check Corners: Refer to Checking Corners for more details.
- License Plates: Enter a comma-separated list of plates or a URL to a CSV file containing plates. Agent DVR will generate License Plate Recognized and License Plate Not Recognized events for these plates, which can trigger actions.
- Reload Interval: Set the frequency for reloading the plate list from the URL.
- Normalise: Adjust commonly misidentified plates to improve matching.
- Make, Model, and Color: Enable this only if using a paid plan on PlateRecognizer.com that supports these features. It's not included in the free plan. Details will be included in {AIJSON} in Agent DVR Actions.
Actions
LPR generates AI: License Plate Recognised and AI: License Plate Not Recognised events for use in Actions.
Photos
For information on photos, see photos.
AI Face Recognition
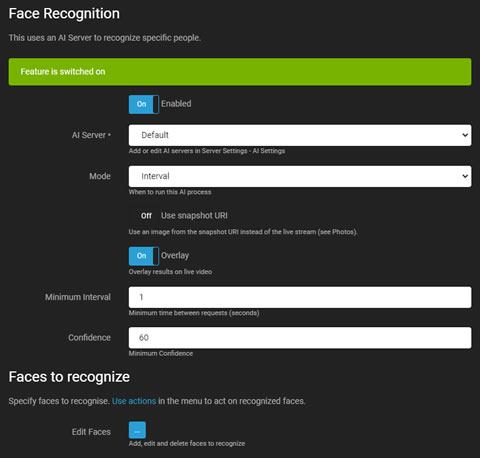
Face Recognition utilizes an AI server (recommended: CodeProject.AI) to recognize specific faces in video feeds. It can generate events, raise alerts, or act as a filter on motion alerts. Faces can be added, edited, or deleted using your camera or by uploading images. See Edit Faces in this tab for more.
- Enabled: Toggle to enable or disable the AI process.
- AI Server: Select from your configured servers, or use the default option.
- Mode: Choose the trigger for the AI process. Trigger via API only by setting this to None and calling triggerFace
- Use Snapshot URI: Opt for a high-resolution frame from your camera instead of the current live stream frame.
- Overlay: Overlay AI results onto the live video stream.
- Minimum Interval: Set the minimum time between server requests to reduce load.
- Confidence: Define the minimum confidence level to recognize a face.
- Check Corners: Refer to Checking Corners for more details.
- Edit Faces: Upload images to the server database for recognition. Ensure that only one face is visible and clearly defined in each image.
Actions
Face Recognition generates AI: Face Recognised and AI: Face Not Recognised events for use in Actions.
Photos
For information on photos, see photos.
AI Audio Recognition
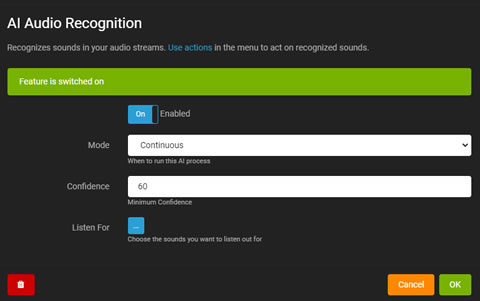
AI-based audio recognition in Agent DVR responds to recognized sounds from microphones or audio streams.
You will need to edit the Microphone settings to setup audio recognition. If you have a camera with an audio stream you can access the audio settings by editing the camera and selecting the Audio tab and click "Configure".
- Enabled: Toggle to enable or disable the AI process.
- Mode: Choose the trigger for the AI process.
- Confidence: Set the minimum confidence level for sound recognition.
- Overlay: Displays AI results on the live audio visualization.
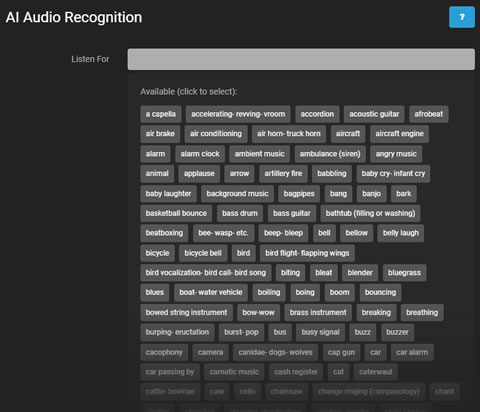
- Listen For: Select specific sounds for the AI to detect.
Clicking Listen For shows available sounds for detection. Select sounds as needed.
Use the Action AI: Sound Recognized to perform tasks when a sound is identified.
Audio recognition can also be used to filter alerts, similar to cameras.
AI Language
To change the display language for labels and tagging in Agent DVR, go to Server Menu - Settings - Playback - Default Language.
Adding Actions to AI Events
Agent DVR generates events through AI processes, which can trigger Actions. For instance, Object Recognition generates "Object Found" and "Object Not Found" events. Each AI system in Agent DVR produces unique events.
These events can trigger various actions, such as raising alerts, calling URLs with object labels, executing programs, or publishing messages to MQTT servers. Use tags {AI} for labels or {AIJSON} for the full JSON response from CodeProject.AI in actions.