Configuration: Actions
About
Actions in Agent DVR are responses to specific events, like camera/AI alerts or device disconnections. To access and configure Actions, edit a device and navigate to the Actions section in the menu.
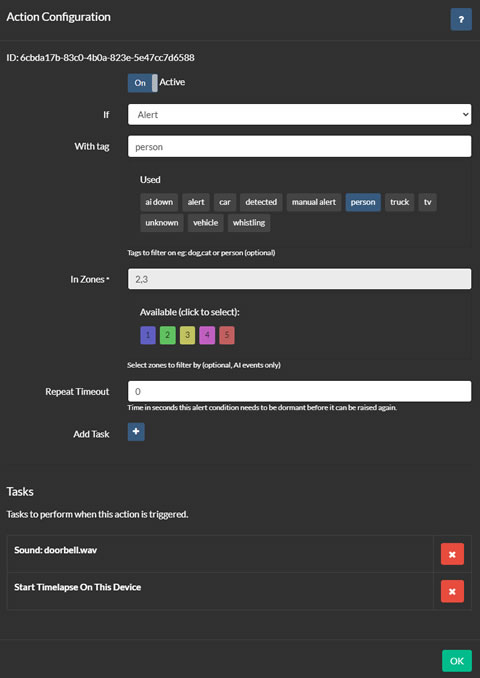
Click 'Add' to create a new action. You will be presented with a configuration screen similar to the images below:
There is a wide range of events that can trigger actions. Multiple actions can be associated with each event, and you can incorporate various tags within these actions to create dynamic responses.
Configuring an Action
- Active: Toggle this to activate or deactivate the action. Alternatively, you can use the Schedule and the API with commands like actionOn, actionOff, and actionRun, using the ID shown above.
- If: Select an available action (see below).
- With tag: (AI Events). This is mainly used with AI actions. For instance, if you select AI: Object Found and enter cat here, the action will trigger only when a cat is detected. Note that the tag matches based on the language selected in Server Settings - General.
- In Zones: (AI Events). Specify motion zones (from the motion detection tab) to filter the detected objects. For example, selecting zone 1 and cat as the tag, the action will only trigger when a cat is detected in zone 1. Leave blank to include all zones.
- Repeat Timeout: This suppresses the event if it has been raised within this interval and also resets the timer. For example, with 'Vehicle detected' as the trigger and a 30-second timeout, an alert will be sent once, with subsequent alerts paused until there’s a 30-second gap in the detected traffic.
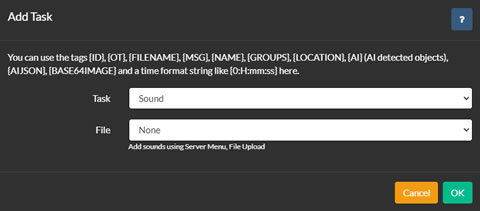
- Add Task: Click to add a task. You can assign multiple tasks to an action (v4.5.5.0+).
Available Actions
The events you can set up actions for are:
- AI: Server Down (AI Server has returned an error - event will fire after requests have failed 3 times and not recur until the server is back online)
- AI: Server Up (AI Server has exited the error state)
- AI: Face Recognized
- AI: Face Not Recognized
- AI: License Plate Recognized
- AI: License Plate Not Recognized
- AI: Object Found
- AI: Object Not Found
- AI: Scene Recognized
- AI: Sound Recognized (mics only)
- AI: Ask AI Positive Result (It found an object you were looking for)
- AI: Ask AI Describe Response Received (An image was described by AI - the description is in {MSG} and {AIJSON} tags)
- AI: Loiter
- Alert
- Alert Finished
- Call URL Response Received - This is triggered by the response you get when a "Call URL" task runs, letting you respond to it with other tasks.
- Manual Alert
- Motion Detected
- Motion Finished
- None - use this if you want to trigger actions with "Alert Action Run" command on the schedule
- ONVIF Logical State ON - use this to for example start and stop recording based on ONVIF logical state updates (requires the motion detector type to be set to ONVIF)
- ONVIF Logical State OFF
- Photo Taken
- PTZ Preset Applied
- Reconnect Failed
- Recording Finished
- Recording Started
- Source Disconnected
- Source Reconnected
- Source Covered/ Tampered
- Switch Device Off
- Switch Device On
- System: UI Connected - when someone opens a browser to view your system)
- System: UI Disconnected - when the session is closed (happens roughly a minute after the browser disconnects)
Detecting Loitering
To detect loitering (people or objects staying in one place for a certain time period) you'll need to configure the following:
- Setup an AI server in server settings
- Add an Action for AI: Loitering Detected
- Set the tag you are looking for - this would usually be person but you could use car to detect cars parked in an area for too long or suitcase for left luggage or a cat sitting on your sofa. You can use multiple tags here for example car,bus,truck. For a list of available objects to find see the classes list in object recognition when you edit the camera.
- Specify the zones you want to look for the object in. Use the detector tab to draw out motion zones.
- Specify the number of seconds you will tolerate the detected object being in the zone for.
- Add Tasks to perform when the conditions are met.
Note: The loiter detector uses the settings from the object recognition settings like check corners and overlay
Adding Custom Events
Beyond the pre-set events, you can create custom events by adding Tasks. Once a task is created, it will appear in the Events list. You can then set up an Action to respond to this task. Tasks can be triggered from the Live page in the UI (by selecting a camera and then clicking the task icon at the bottom left) or through the Action: Run command found in the Schedule.
Custom Tasks
Tasks are commands you can attach to devices to manually trigger Actions. Actions can call third party APIs to perform tasks like open doors, turn lights on, play sounds etc. To add, delete and execute tasks select a device on the Live page and click on the task icon .
Setting up a task:
- Enter some text to describe the task, for example "Turn Lights On" and click the + button. Click OK
- Click to edit the device using the edit icon . Select the Actions panel in the editor using the menu at top right.
- Add an action. Select the "If" condition to be the task you just created (tasks are shown at the bottom of the list of available actions) and then configure what you want the task to do.
- Click OK
- You can now manually trigger this action from the live view by clicking on the tasks button and clicking the Go arrow button next to the task.
You can also trigger tasks via the Agent DVR API.
Available Tasks
The list of available actions you can perform (under Then) is:
- Alert - triggers an alert on the device
- Beep - plays beep through local PC speaker
- Go to Preset (PTZ Preset)
- Call URL - call any URL with an optional Auth token. You can call the Agent DVR API here. If you have Protect API checked in server settings you will need to provide an authorization header. To do this you will need to add a User Account via Server Settings and enter a Basic Auth Header value:
- Execute Command
To add your own commands/ scripts you can add .bat or .sh files into the Commands directory. You can then pass parameters into the batch file. For example, to copy all photos to the root of the D drive:
Create a plain text file containing:copy %1 D:\
Save it as copyPhoto.bat (on linux use .sh - you will need to make this file executable using chmod +x) to Agent/Commands
Then add an action:
if: "Photo Taken"
then: "Execute Command"
File: copyPhoto
Parameters: "{FILENAME}"
- MQTT - send an MQTT message
- MQTT Image - send a raw live image in jpeg bytes to a topic
- Network Message
- RTMP Start - start RTMP streaming for this device
- RTMP Stop - stop RTMP streaming for this device
- Send Email (with optional image attachements)
- Send Email with video (specify duration - this includes a buffer of the event). v4.9.8.0+
- Send Push Notification
- Send SMS
- Set Motion Detector Area (select the Area you defined on the Detector)
- Show Message - displays message on viewing web browsers
- Sound (on Agent DVR computer)
- Sound (through Camera)
- Sound (through web browser)
- Start Recording On (some device) - will record until stopped.
- Start RTMP Streaming.
- Start Timelapse On (some device)
- Stop Recording On (some device)
- Stop RTMP Streaming
- Stop Timelapse On (some device)
- Switch Object On
- Switch Object Off
- Switch Profile
- Text to Speech (on Agent DVR computer - requires an iSpyConnect.com account as text is rendered via webservice calls)
- Text to Speech (through web browser)
- Text to Speech (through camera)
- Trigger Alert On (another device)
- Trigger Detect On (another device)
- Trigger Face Recognition On (another device)
- Trigger LPR Recognition On (another device)
- Trigger Object Recognition On (another device)
- Trigger Recording On (another device). This will record up to the trigger recording timeout setting on the Recording tab. This timeout resets with every trigger recording action call.
Using Tags
Tags in the Then fields of Agent DVR actions allow you to create dynamic responses. It's important to note that some tags are context-specific. For instance, {FILENAME} isn't available for Alert Events, and {AI} isn't available if the event wasn't generated by an AI server.
- {ID}: The object ID, visible at the top left of the editor when editing a camera or microphone in Agent.
- {OT}: The object type ID. 1 for Microphone, 2 for Camera.
- {FILENAME}: The filename. Applicable to events like Recording Started, Recording Finished, and Snapshot Taken. It's the full local path to the file.
- {CURRENT_RECORDING}: The filename of the current recording. Full local path to the file. (v5.0.6.0+)
- {MSG}: The name of the event that triggered the action, e.g., "Manual Alert".
- {NAME}: The name of the device (found on the General tab).
- {GROUPS}: The groups to which the device belongs (found on the General tab).
- {LOCATION}: The location of the camera (found on the General tab).
- {LEVEL} and {DB}: The motion or audio level. {DB} is the decibel level for audio devices. Measured when the action runs. (v4.3.7.0+)
- {AI}: A comma-separated list of detected objects from AI, plates from LPR, or detected faces from Facial Recognition.
- {AIJSON}: JSON data returned from AI or LPR.
- {ZONE}: The zone that triggered the action (empty if not using AI or a CSV list for multiple zones like 1,2,3).
- {BASE64IMAGE}: Live image data URL. It's the raw base64 encoded bytes, so format as needed (e.g.,
p=data:image/jpeg;base64,{BASE64IMAGE}). (Available v4.5.9.0+). Live image resized to 640px width. - {BASE64IMAGE-LG}: Live image data URL. It's the raw base64 encoded bytes, so format as needed (e.g.,
p=data:image/jpeg;base64,{BASE64IMAGE-LG}). (Available v6.0.8.0+). Live image resized to 1280px width. - {BASE64IMAGE-NATIVE}: Live image data URL. It's the raw base64 encoded bytes, so format as needed (e.g.,
p=data:image/jpeg;base64,{BASE64IMAGE-NATIVE}). (Available v6.0.8.0+). Native live image.
For example, with an event AI: Face Recognized, a Then task Text to Speech with the text
Hello {AI} will greet each recognized person by name.
Note: If you use {BASE64IMAGE} tags with a file related event like "Photo Taken" it will use the full size image from the file Otherwise it will resize the current live view image.
Once an action is added, the table control displays a summary of your actions. A green tick indicates an active action.

You can use the scheduler to enable/disable actions or trigger an action. For example, you might schedule an action to send an email with two images at a specific time.
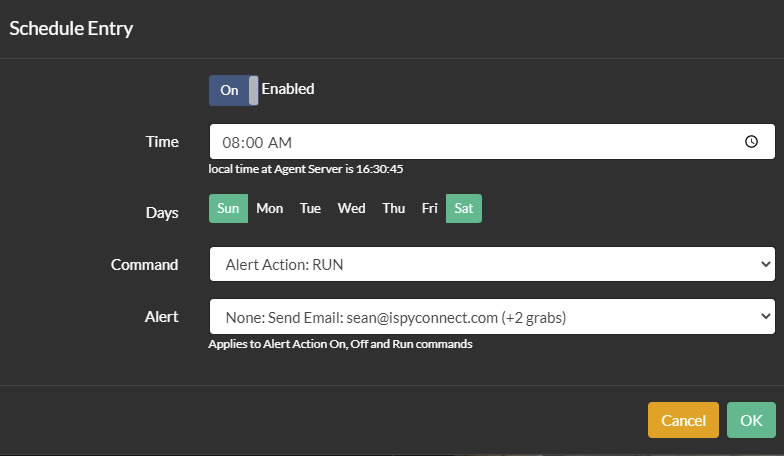
In this example, an action was added to send an email with 2 images, set to None event. Then a schedule entry was created to execute that action at 8AM on Sunday and Saturday.