Configuration: Motion Detection
About
Motion detection in Agent DVR plays a crucial role in initiating Alerts and facilitating AI processing. You can configure Agent DVR to record upon motion detection or when an alert is triggered. For setting up these options, navigate to the Recording menu and refer to the Mode setting. Additionally, motion detection can be used to activate various Actions.
It's important to note that motion detection can sometimes lead to false alerts due to its inability to distinguish between actual object movement and environmental factors like wind, rain, or changes in brightness. To reduce such false alerts, you can enhance motion detection's accuracy by integrating Agent DVR with CodeProject.AI for more sophisticated alert filtering.
Setting up Motion Detection
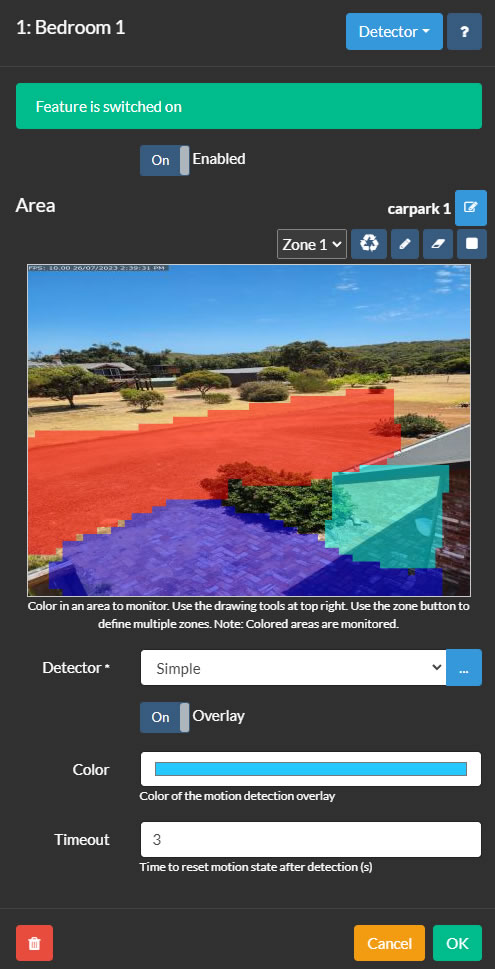
The motion detector area control in Agent DVR is accessible by editing a camera and selecting Detector from the top-right menu. To set up a detector, you start by defining zones to monitor. Agent DVR supports up to 9 zones, each represented by a different color, selectable via the Zone dropdown. To create a zone, click on the pen tool and draw over the video preview. Use the left mouse button or touch for drawing, and on desktop, the right mouse button to erase. The nib tool adjusts the size of the drawing nib, while the eraser tool removes drawn areas. The reset tool can be used to fill the entire area with the selected zone. Agent DVR then monitors these colored areas for motion.
- Enabled: Toggle the use of the detector.
- Detector: Choose a motion detector type and configure it using the button. The various motion detectors are explained in their respective sections.
- Color: Adjust the color of the motion detection overlay (not applicable for all detectors).
- Timeout: Set the duration (in seconds, between 1 and 60, default is 3) for which the camera remains in a motion state after detecting motion stops. This helps reduce fast repeating events.
Using Zones
Zones are crucial for AI detectors (Face/ LPR/ Object Recognition) and object tracking detectors (like trip wire, speed, object tracking). You can select which zones will trigger an alert in the detector configuration, or specify Actions for alerts in specific zones.
The simple detector activates an alert if sufficient motion is detected across all zones.
Some detector types do not utilize the zone settings, such as MQTT, ONVIF, or motion triggered via API calls.
Using Motion Areas
Motion areas are configurable groups of zones that you can name and save for future use. To save your current motion zone configuration as a new area, click on the edit icon next to Area. These tools allow you to add, edit, and delete areas.
To apply a motion area when moving your PTZ camera to a PTZ Preset position (using the Agent DVR UI):
- Create and save a new motion zone configuration with a specific name, like "carpark".
- Add a new Action:
If: "PTZ Preset Applied"
Select the PTZ Preset Command (e.g., "Go Preset 1"). Note: Your camera must support PTZ presets for this to work.
Click to Add a Task:
Task: "Set Motion Detection Area"
Select your new area ("carpark").
Click OK twice. Now, whenever you select the preset, or if Agent DVR sets the preset through scheduling or another event, this motion area will be applied automatically.
You can also modify the motion detector area using the Scheduler. This feature allows for different motion zone configurations depending on the time of day, week, or specific dates.
Simple Detector
Simple
The simple detector focuses on identifying any kind of movement within the camera's field of view. It is the most CPU-efficient option among the detectors, second only to the ONVIF detector. Movements detected are highlighted in red, allowing you to easily discern the source of movement in the scene.
- Advanced: For additional settings and options, refer to the advanced section below.
- Sensitivity: Adjust the level of motion required to trigger the detection. Setting both minimum and maximum values can refine the detection — for example, a maximum value of 80 could help ignore large-scale brightness changes. The numbers under the slider represent the percentage of pixels changed.
- Gain: Apply a multiplier to the changed pixels to increase or decrease the sensitivity of the motion detection.
HAAR Object Detector
This method employs files known as HAAR cascades to recognize objects in the video feed. However, you might achieve better results using the simple object detector in conjunction with setting up an AI Server.

- Frame Size: Select the size of the frame for processing. Smaller frames reduce CPU usage but may be less accurate.
- Detect Interval: Set the frequency of frame processing, in milliseconds. For example, 200 equals 5 times per second, and 1000 equals once per second.
- Width Limits and Height Limits: Define the size range of objects for Agent DVR to detect, expressed as a percentage of the frame's width or height. Adjusting these sliders will display an overlay on the video, indicating the size range of objects being targeted.
- Use GPU: Option to use GPU for processing, available only if your GPU supports Cuda and the necessary drivers are installed.
- File: Choose the HAAR Cascade file to configure the object detector. Default files are provided for detecting faces and cat faces.
- Alert Condition and Alert Number: Configure Agent DVR to generate alerts based on object detection depending on the number of objects detected. For instance, to trigger an alert upon recognizing a face, set the condition to "More Than" and the Alert Number to 0.
- Alert Zones (v4.4.8.0+): Specify the motion zones to be included in the monitoring area.
- Check Corners: For further details, see Checking Corners.
Corner Checking
Agent DVR uses a sophisticated method to determine if detected objects should trigger alerts or actions based on your zone configuration. It does this by checking the center point of the detected object and, optionally, a grid expanding out to the corners of the object's bounding box. You can adjust this feature by setting a percentage that represents the distance from the center point to the corner of the bounding box for zone checks. Essentially, a setting of 0 means only the center point is checked, 100 checks out to all corners, and 50 checks to the midpoints between the center and each corner of the bounding rectangle. If you are receiving numerous event notifications where the object doesn't appear to be within the designated zone, then setting Check Corners to 0 could be beneficial.
MQTT
You have the ability to initiate motion detection from your MQTT server. First, ensure that you have set up MQTT appropriately. Then, to trigger object detection, simply pass the command indicated in the detector configuration screen to the SERVER/commands channel where SERVER is your server name (displayed in the server menu which you can edit in Settings). This integration allows for a more versatile and responsive motion detection system, leveraging the capabilities of your MQTT server.
ONVIF
Many ONVIF-compatible devices come equipped with their own motion detection capabilities. When you select this mode and pair it with an ONVIF-capable camera (using the ONVIF connection type in Agent), Agent DVR will rely on the device itself to provide motion detection events and trigger actions based on those. If you encounter any issues with this functionality, it's advisable to check the logs (accessible at /logs.html on the local server) as it's possible that your camera may not support ONVIF detection. For more information on configuring these settings, please refer to Server ONVIF settings.
Person Detector
This method employs a specialized algorithm specifically designed to detect pedestrians. However, you might find that using the simple object detector and integrating AI for alert filtering provides better results.
- Use GPU: Decide whether to use GPU for processing, available only if your GPU supports Cuda and the necessary drivers are installed.
- Frame Size: Select the frame size for processing. Note that smaller frames are less CPU-intensive but may yield less accurate results.
- Detect Interval: Set the frequency for frame processing, in milliseconds. For instance, 200 equals 5 times per second, while 1000 equals once per second.
- Alert Condition and Alert Number: Configure the criteria for generating alerts based on the number of detected objects. For example, to trigger an alert upon recognizing a face, set the condition to "More Than" and enter 0 in the Alert Number field.
- Alert Zones (v4.4.8.0+): Choose the specific motion zones that should be monitored within the detection area.
- Check Corners: For more detailed settings, refer to Checking Corners.
Reolink
Some Reolink cameras offer an API endpoint that Agent DVR can poll to receive motion or AI alert states. If your camera supports this feature, you can utilize this detector. To check if your camera has this capability, try accessing the URL: `http://[IP ADDRESS]/api.cgi?cmd=GetMdState&channel=0&rs=Get&user=[USERNAME]&password=[PASSWORD]` (replace `[IP ADDRESS]`, `[USERNAME]`, and `[PASSWORD]` with your camera's IP address and login credentials, respectively). A successful connection will return JSON-formatted text rather than an error page.
- Interval: Determine the frequency at which Agent DVR polls your camera for alerts or motion data.
- Mode: Select between 'Motion' and 'AI'. Both modes trigger motion detector events in Agent DVR, which can be used for recording (set the record mode to Detect). The 'AI' option triggers motion detection if the camera identifies specific object classes (such as dog_cat, face, people, vehicle).
You can configure actions to perform tasks when objects tagged as dog_cat, face, people, or vehicle are detected, starting from version 4.6.6.0.
Note: To enable the AI feature, you might need to activate tracking in the camera's web UI and set the minimum and maximum object size parameters. Agent DVR will then tag your recordings with the objects identified by Reolink.
Hikvision
Hikvision cameras offer an ISAPI endpoint that Agent DVR can monitor to receive motion or AI alert states. If your camera supports this feature, you can utilize this detector. Check the docs for your camera to see if this is supported.
- Use SSL: Whether or not to use SSL for the connection.
- Port: Agent will use port 80 or 443 depending on Use SSL but you can override that here.
- Channel: The channel your camera is using - for cameras this would be 1 but if you have a Hikvision NVR it might be different
- Sensitivity: Value between 0 (least sensitive) to 100 (most sensitive) for the motion detector.
These cameras can also detect other events (like fire, violence, loitering, region exit etc) - you can add an action to respond to these under "AI Object Found" using the tags provided below to filter the actions. Set server settings - logging to debug and access the logs in the server menu to see which events your camera is generating.
linedetection, fielddetection, regionEntrance, regionExiting, parking, loitering, group, rapidMove, unattendedBaggage, attendedBaggage
Speed Detection
This method employs scene information provided by you to track moving objects, estimate their speed, and generate alerts if the objects are moving too fast or too slowly.
- Advanced: For more detailed settings, refer to the advanced section below.
- Width Limits and Height Limits: Define the size range for object detection in the scene, with values expressed as a percentage of the scene's width or height. Adjusting these sliders will display an overlay on the video, indicating the target size range of objects.
- Minimum Travel: Set the minimum distance an object must move to be considered in motion, based on a percentage of the scene's width.
- Minimum Time: Specify the time duration an object must be in motion to be tracked, in tenths of a second (e.g., 1 = 0.1 seconds, 10 = 1 second).
- Speed Measurement: Select the preferred unit of speed measurement for the overlay.
- Speed Limits: Determine the lower and upper limits of speed detection. Movements outside this range will trigger motion detection events.
- Horizontal and Vertical Distance: Enter the total distance across the scene in meters. Agent DVR uses this measurement to calculate the speed of moving objects.
- Alert Zones (v4.4.8.0+): Choose which motion zones are included in the monitoring area.
- Check Corners: For additional settings, see Checking Corners.
Object Tracking
This detector identifies and tracks moving objects, triggering motion detection events based on the duration of their presence in the scene and the distance they travel.
- Advanced: For more detailed settings and options, refer to the advanced section below.
- Width Limits and Height Limits: Specify the size range for object detection, with values given as a percentage of the scene's width or height. Adjusting these sliders will overlay a visual representation of the targeted object size range on the video.
- Minimum Travel: Define the minimum distance an object must move to be recognized as a moving object, relative to the width of the scene.
- Minimum Time: Set the minimum time duration an object must be in motion to be considered for tracking, in tenths of a second (e.g., 1 = 0.1 seconds, 10 = 1 second).
- Display Total: Add a counter to the live video feed to keep track of moving objects.
- Heat Map: Visualize movement patterns over time by adding lines to tracked objects.
- Alert Zones (v4.4.8.0+): Choose which motion zones should be included in the monitoring area.
- Check Corners: For additional information, see Checking Corners.
As Agent DVR monitors and tracks movement in the scene, it displays colored rectangles around detected objects. The colors have the following meanings:
- White: Object just detected and is under consideration.
- Yellow: Object detected for multiple frames.
- Orange: Object has moved for at least the minimum time specified in the tracking settings.
- Red: Object has met all tracking requirements to trigger a motion detection event.
Trip Wires
This detector recognizes and tracks moving objects, triggering motion detection events when they cross predefined trip wires in the scene. To add trip wires, simply click and drag on the live video. You can create multiple trip wires as needed. To remove a trip wire, click and drag one of its points out of the scene.
- Advanced: For more detailed settings and options, refer to the advanced section below.
- Width Limits and Height Limits: Set the size range of objects to be detected, with values expressed as a percentage of the scene's width or height. Adjusting these sliders will overlay a visual representation of the target size range on the video.
- Minimum Travel: Specify the minimum distance an object must move to be recognized as a moving object, relative to the width of the scene.
- Minimum Time: Define the minimum time duration an object must be in motion to be tracked, in tenths of a second (e.g., 1 = 0.1 seconds, 10 = 1 second).
- Repeat Trigger: Enable this to allow an object to trigger the same trip wire multiple times. By default, an object can only trigger a trip wire once.
- Count: Show a count of the number of times objects have crossed the trip wire, along with the direction of crossing. Options include counting left, right, both, or total crossings.
- Alert: Configure the system to generate an alert if the trip wire is crossed in a specified direction or any direction.
- Alert Zones (v4.4.8.0+): Choose which motion zones are included in the monitoring area.
- Check Corners: For additional information, see Checking Corners.
Via API
To start motion detection for a camera using an API call, you must define the object type (ot) and object ID (oid). For example, for a camera (ot=2) with an ID of 1 (oid=1 — this ID is displayed at the top of the edit control when editing a device), the API call should be structured as follows:
http://localhost:8090/command/detect?ot=2&oid=1Advanced Settings
The default settings for detectors are generally suitable for most scenes, but you can fine-tune them for enhanced performance if necessary.
- Analyzer: The current available analyzer is the CNT background subtractor, known for its high accuracy and low CPU usage.
- Frame Size: Select the frame size for processing. Smaller frames reduce CPU usage and may actually improve tracking due to noise reduction.
- Tracker: Choose the OpenCV tracker for object tracking. Options include:
- Mosse: This tracker offers the lowest CPU usage but is the least accurate (default).
- KCF: More accurate than Mosse, but slightly more CPU-intensive.
- CSRT: The most accurate option, but it also uses the most CPU. Ideal for challenging tracking situations.
- Max Objects: Set a limit on the number of objects to track simultaneously. More objects mean higher CPU usage.
- Detect Interval: Define the frequency of frame processing for motion detection, in milliseconds (e.g., 200 for 5 times per second, 1000 for once per second).
- Track Interval: Set the tracker processing frequency. A higher interval may lose fast-moving objects (e.g., 200 for 5 times per second, 1000 for once per second).
- Pixel Stability: Determine the number of samples for a pixel to be considered stable and the maximum 'credit' a pixel can earn for remaining the same color. These settings are crucial for effective background subtraction and movement detection. More info
- Use History: Enable this to learn about consistently moving objects in the scene. It's generally recommended to keep this disabled unless necessary.
- Parallel Process: Activate parallel processing in the motion detection algorithm. It's advisable to keep this enabled.
- Tracking Timeout: Specify the time to wait (in seconds) for an object to reappear before ceasing to track it.
- Movement Timeout: Set the duration (in seconds) to wait for a stationary object to move again before stopping its tracking.