User Interface: Live Viewing Devices
Using the Live View
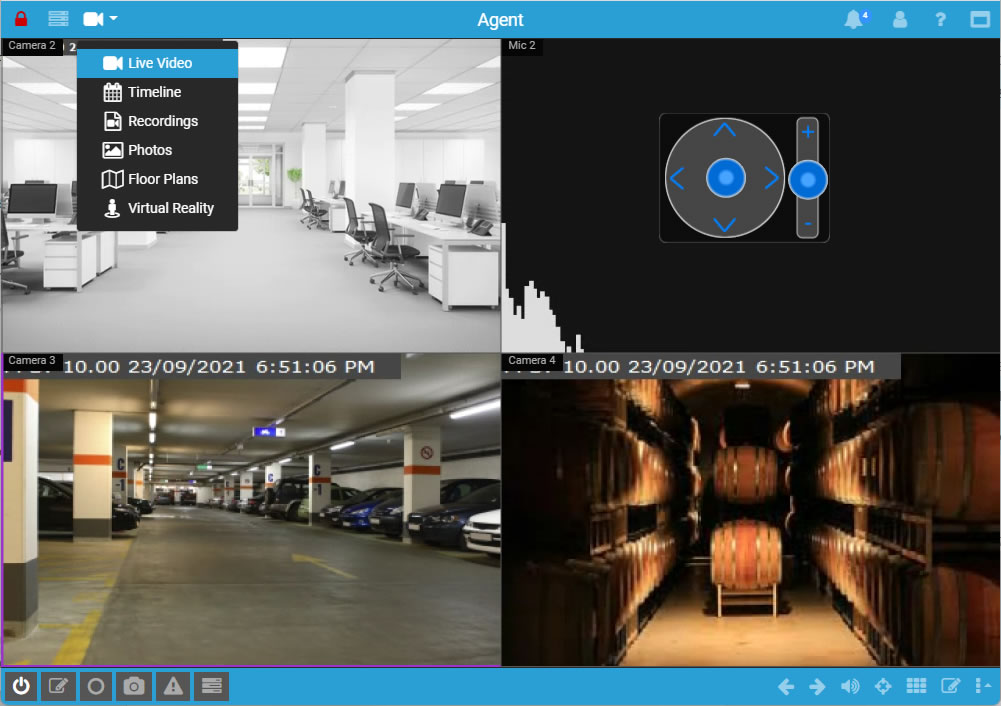
To access Live View, click on the view menu in the top bar and select the Live View icon.
The live view is your window to real-time streams from your devices. Set up multiple live views in Agent DVR and add any devices you like. Agent DVR intelligently arranges your devices for optimal viewing on any screen.
Panel Markers
The live view has markers to show device state and recording status:
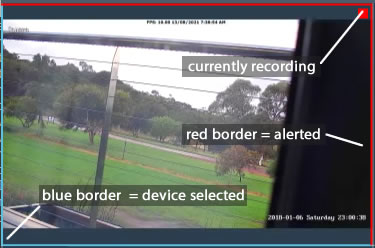
- Blue border on left and bottom - Indicates the selected device. Controls on the bottom left apply to this device.
- Red "REC" symbol at top right - The device is recording.
- Red flashing border at top and right - The device is in an alert state.
- Orange flashing border at top and right - Motion has been detected by the device.
You can turn Icons on in the Account Menu - UI Settings. Icons will then be displayed at the bottom left of each device showing their state (recording, alerts enabled, motion detection enabled, schedule enabled)
Buttons/ Icons
The live view includes icons at the bottom for controlling the selected device and the view. Left buttons control the active device, right buttons control the view. Tool-tips explain each button's function and shortcuts.
Device control buttons include:
- Power on/off the device.
- Edit the device.
- Start/Stop manual recording.
- Take a photo.
- Trigger a manual alert.
- Open tasks for the device.
- Go to device recordings.
- Go to device photos.
- Playback last 20 seconds from recording.
View control buttons include:
- Toggle the motion highlighter. The motion highlighter feature changes the video to black and white, helping detected motion stand out clearly. When this feature is enabled, everything in the video appears in shades of gray, while any detected movement is highlighted in red. This makes it easier to spot movement, as it contrasts sharply with the grayscale background.
- Open volume control.
- Edit the view.
- Start/Stop playback of live view.
- Open views menu.
- Start/Stop talk.
- Show/Hide PTZ controller.
- Show PTZ presets.
- Previous view.
- Next view.
Using Views
Click the views icon at the bottom right to open the views menu. Each view shows a preview of the associated layout. To switch to a specific view, simply click on its button. Setting Cycle to a number like 3 lets Agent DVR automatically rotate through views with devices every 3 seconds. Default View determines the first view shown when you open the browser.

To edit a view (add devices, rename, change layout, etc.), click the edit icon at the bottom right.
Manually cycle through your views in the live screen using the left and right arrows. Note: these controls only show views with added devices.
For detailed information on using and customizing layouts, check out our layouts guide.
Using the PTZ Controller
Click on the icon to show/hide the PTZ (Pan-Tilt-Zoom) controller. Select a device in the live view, and then use the PTZ controller to operate it. Ensure PTZ is configured on your device – edit the device and see PTZ for setup instructions.
Agent DVR offers 2 different PTZ (Pan-Tilt-Zoom) controller options. To choose your preferred style, head over to the Account Menu and select UI Settings.
- Click and drag on the control's background to move it around the live viewer.
- Use the round joystick controls by clicking and dragging with the mouse or using touch gestures to control your camera’s PTZ.
- With the PTZ controller displayed, use numpad arrow keys and numpad +/- for zoom adjustments.
- Click or tap the blue arrows or + / - on the zoom control for incremental movements.
- Middle-click to show/hide the PTZ control.
- For digital PTZ, use the mouse wheel or pinch and swipe gestures on touch devices to zoom. When zoomed in, click and drag to navigate the zoomed area.
Gamepad and Joystick Support
Starting from version 3.9.7.0, Agent DVR supports PTZ control via gamepad. Note that for local usage using a GamePad you may need to setup SSL:

Tips:
- To maximize a device, click on it to select it and then click again. If your camera has high and low-res stream URLs, you can set Agent DVR to use the high-res stream when maximized. Edit the device, adjust video source settings, and check "Use record stream when maximised" under the Advanced tab.
- Click on a device to select it. Use the bottom left device controls to switch it on/off, start/stop recording, take photos, trigger manual alerts, or edit and run custom tasks.
- Add microphones as well as cameras to the live view. Configure the microphone's display style in the General tab when editing the Microphone settings.
- Use the menu at the bottom right for more features like RTMP broadcast, starting talk, pausing live video, and locking/unlocking layout positions.
- Agent DVR shows which device is selected with a highlight around the left and bottom. Alerting devices will have red flashing lines around the top and right.
- Assign a location to your camera to display it next to the camera name, and set the background and border color to match the location color.