Mobile Applications
Our mobile apps let you connect over your LAN or via our remote services. They're available for both Android and iOS devices.
Download the Agent DVR Remote Android App .
Download the Agent DVR Remote IOS App .
Python Wrapper
There's a python wrapper for basic UI functionality here: agent-py .
URL Parameters
You can open Agent DVR to a specific view by calling the Agent DVR url with (case sensitive):
- ?start=Live&viewIndex=3 (live view on view 3)
- ?start=Live&viewIndex=3&ot=2&oid=2&max=true (live view on view 3, cam id 2 maximised). "oid" is the object id of the device (visible at the top of the dialog when you edit the camera), "ot" is the object type - 1 = microphone, 2 = camera.
- ?start=TimeMachine (timemachine view)
- ?start=Timeline (timeline view)
- ?start=Photos (photos view)
- ?start=Recordings (recordings view)
- ?start=Floorplans&planIndex=2 (floorplans view on plan 2)
- ?start=VR (virtual reality)
You can open Agent DVR with a specific language (bypassing the language selection). Just pass in the 2 letter language code: ?lang=fr
You can pass in the name of a saved filter to apply using a filter parameter - eg: ?start=Recordings&filter=intruder. You can also pass in a from and to time for the filter using javascript ticks. eg ?start=timeline&from=1657841514949&to=1657852514949.
Set default theme options (theme options are available in the account menu - theme settings):
- ?theme=darkly&variant=dark&large=false
- ?theme=sketchy&variant=primary&large=true
Auto play audio on load (may also require changing browser settings):
- ?playaudio=true
Start in minimised mode (top and bottom UI bars hidden):
- ?mini=true
Pass in local username and password for auto login (caution - this will expose your credentials to the network):
- ?un=username&pwd=password
Open a specific alert by alert id (in the alert json):
- ?alertid=xxx
Commands
To access Commands in Agent DVR, click on the Server icon at the top right of the Agent DVR UI, and select "Commands" under System. A quick shortcut is to press "Alt-C".
Agent DVR includes several pre-built commands that can control multiple devices simultaneously. These commands utilize the API to perform various tasks. You have the flexibility to add your own custom commands for calling the API or running software on your computer.
Calling a Script File
To execute a generic script file, simply add a .bat file (or .sh file on Linux/macOS) to the commands directory. The script's filename (without the extension) will appear in the Commands list and can be clicked to run. Note: You might need to reload the UI for it to appear.
Calling the API
Create a new .bat file in the Commands folder where Agent DVR is installed. The first line should be:
REM ispy-internalThis line indicates that the file should be processed internally by Agent DVR, not executed as a standalone application.
The subsequent lines are interpreted as commands for the Agent DVR's API. For instance:
 REM ispy-internal

 switchon&group=external

 switchoff&group=internal

 record&group=external

 broadcast 'external cameras are on and recording'
These commands are appended to API calls in the format /command.cgi?cmd=.... Thus, you can use any command available in the API.
The example commands above will activate all devices labeled as "external", deactivate all "internal" devices, start recording on "external" devices, and send a broadcast message to all connected clients.
Refer to the readme command button for examples and the API documentation for a list of available commands.
After reloading the UI and pressing "Shift-Alt-C", your new command should be visible in the list. Click on it to execute.
From version 3.8.1.0+, you can use location names in commands (e.g., switchon&location=home). Just assign a location to your devices first!
Amazon Alexa
From version 2.9.5.0, Agent DVR offers Amazon Alexa integration. This feature allows you to control Agent DVR using voice commands through Alexa-enabled devices. You can arm or disarm the system or display live video feeds on Alexa Show devices.
To set it up, select 'Alexa' under Integrations in the Server menu of Agent DVR. This redirects you to Amazon for linking your accounts.
Once linked, run Alexa's discovery process. It should find two devices: the security panel and the camera control.
Now you can use voice commands like:
- "Alexa, arm Agent in home mode"
- "Alexa, show Agent camera"
Set your security code in Agent DVR Settings for operations requiring authentication. The default code is 1234.
The Alexa profiles (Home / Away / Night) match those in Agent DVR. Configure them in Server - Profiles.
For multiple servers, set a server name in settings and use it in voice commands.
Home Assistant
Agent DVR fully integrates with Home Assistant, allowing you to add Agent DVR into your Home Assistant setup. Embed the Agent DVR panel in the lovelace UI or select individual cameras. It also includes a control for the main security panel. For more information, see the Home Assistant link under Server - Integrations.
Agent DVR can also publish its devices to Home Assistant as sensors and switches via MQTT: see Home Assistant MQTT discovery.
Prefer to ask in plain language? Agent DVR also works with AI assistants such as Claude, ChatGPT and Gemini CLI; see Connect an AI Assistant.
ioBroker
ioBroker users can connect Agent DVR with the community-maintained ioBroker.agent-dvr adapter (also on npm). It talks to Agent DVR over the local HTTP API, so it works with the free version on your own network.
What you get
- Data points: every camera is discovered automatically and its properties (online, recording, detected, alerting, resolution and more) are mirrored as ioBroker states for use in scripts and visualisations.
- Controls: record, snapshot, arm and disarm, switch on and off, detector and schedule toggles, sensitivity, PTZ with presets, and system-wide arm, disarm, profile selection and restart.
- Live dashboard and recordings: a built-in dashboard served by ioBroker with per-camera MJPEG, FLV or go2rtc streams, plus a recordings browser with playback and delete.
- Real-time updates: add the adapter's webhook URL as a Call URL action in Agent DVR so ioBroker refreshes immediately on alerts and new recordings instead of waiting for the next poll.
Setup
- Install the adapter from the ioBroker admin (it requires the iobroker.web adapter).
- Enter the Agent DVR IP address and port (default 8090) on the adapter's Connection tab. If Agent DVR has a login configured, enter the same username and password.
- Use Agent DVR v7.8.0.0 or newer for recording playback in the adapter's dashboard.
IFTTT (If This Then That)
IFTTT lets you set up actions and triggers with IoT devices. Start by linking your IFTTT account with iSpyConnect.com, accessible under Server - Integrations.
Push Alerts
Setting up mobile push alerts is detailed at Setting up Push Alerts.
Telegram
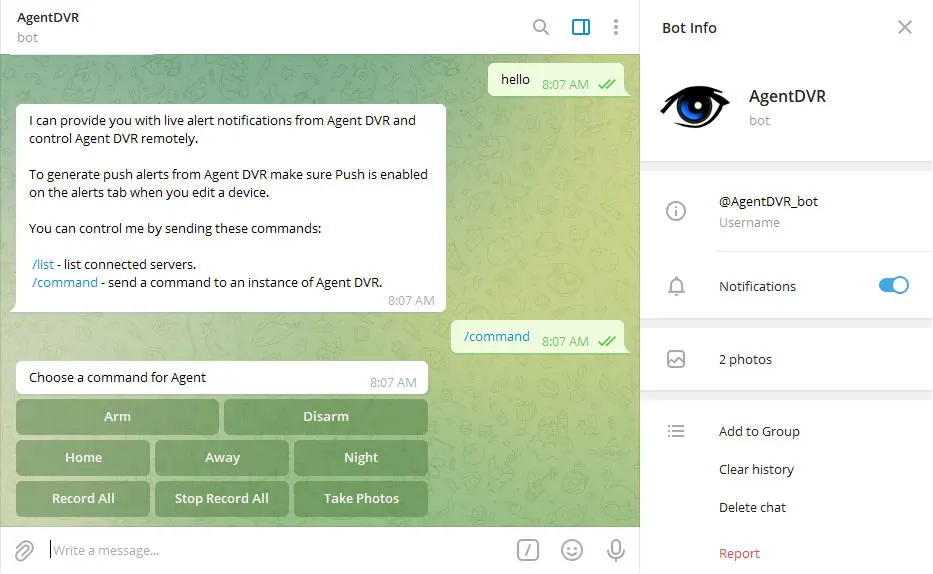
Connect Agent DVR with the Telegram chatbot for control and live alert notifications. Enable Push notifications in device settings for live alerts. Begin by selecting the Telegram button under the Server icon in the remote web interface.
Bot Commands
- /list - List connected servers
- /command - Send a command to an Agent DVR Server
- /groupalerts - (in a group) Send alerts to this group
- /privatealerts - (in private chat) Send alerts back to this private chat
Webhooks (Discord, Slack and more)
Agent DVR can send alerts to any service that accepts incoming webhooks, including Discord, Slack, Mattermost, Google Chat, Microsoft Teams and ntfy. No account linking is needed: you create a webhook URL in the target service and Agent DVR posts alerts to it directly, so this also works on servers with no internet-facing remote access.
The general setup is the same for every service. Edit your camera or microphone, open the Actions tab and add an action:
- If: Alert (or any other event)
- Then: Call URL
- URL: the webhook URL from the service
- Method: POST
- Body: the message, formatted as shown for each service below
You can use tags like {NAME}, {MESSAGE}, {AI} and {ZONE} in the Body field to build the message dynamically.
Content-Type: application/json
Discord
In Discord, open your channel's settings (gear icon) and choose Integrations - Webhooks - New Webhook, then Copy Webhook URL. In the Agent DVR action use:
- URL: the copied webhook URL
- Body:
{"content":"{MESSAGE}: {NAME} on {SERVER} {AI}"}
To attach snapshots to the Discord message, set the Upload Image slider to 1 or more (v7.8.7.0+). Each image beyond the first is captured half a second apart.
Slack
Create a Slack app at api.slack.com/apps, enable Incoming Webhooks, click Add New Webhook to Workspace, pick a channel and copy the URL (it starts with hooks.slack.com). In the Agent DVR action use:
- URL: the copied webhook URL
- Body:
{"text":"{MESSAGE}: {NAME} on {SERVER} {AI}"}
Slack incoming webhooks are text only, so leave Upload Image at 0.
Mattermost
In Mattermost, go to Main Menu - Integrations - Incoming Webhooks - Add Incoming Webhook, pick a channel and copy the URL. Use the same Body format as Slack:
{"text":"{MESSAGE}: {NAME} on {SERVER}"}
Google Chat
In a Google Chat space (Workspace accounts), click the space name and choose Apps & integrations - Webhooks - Add webhook, then copy the URL. Use the same Body format as Slack:
{"text":"{MESSAGE}: {NAME} on {SERVER}"}
Microsoft Teams
In Teams, click the three dots next to a channel, choose Workflows and add the template Post to a channel when a webhook request is received, then copy the URL it gives you. Teams requires the message as an Adaptive Card:
{"type":"message","attachments":[{"contentType":"application/vnd.microsoft.card.adaptive","content":{"type":"AdaptiveCard","version":"1.4","body":[{"type":"TextBlock","text":"{MESSAGE}: {NAME} on {SERVER}","wrap":true}]}}]}
ntfy
ntfy sends push notifications to your phone with no account required, and can also be self hosted. Pick a topic name that is hard to guess (anyone who knows it can subscribe), then:
- URL: https://ntfy.sh/your-topic-name
- Body: plain text (no JSON), e.g.
{MESSAGE}: {NAME} on {SERVER} - Headers (optional, one per line):
Title: Agent DVR
Tags: rotating_light
Priority: high
Install the ntfy app on your phone and subscribe to your topic to receive the alerts.
Other services
Anything that accepts an HTTP POST works the same way, for example Home Assistant webhook triggers (http://homeassistant.local:8123/api/webhook/your-id - though the MQTT integration is richer). Agent DVR sends JSON bodies as application/json and anything else as form encoded. You can add extra headers (for example API keys) in the Headers field, one per line as Name: Value.